Integrations
Event
Adobe provides analytics and optimizations for mobile and web apps and brings together all marketing capabilities across Adobe Experience Cloud.
Differences from mParticle
Adobe Analytics tracks Metrics, which count actions in your app and are similar to events in mParticle, and Dimensions, a broad category that covers data that in mParticle would be considered “device information”, “application information”, “event attributes”, and “user attributes”.
When setting up this integration, it’s important to understand that mParticle and Adobe take different approaches to accepting data. mParticle allows you freedom to capture custom attributes for your users and events. New event and attribute names can be added to your implementation at any time. All you have to do is send in new data.
Adobe, on the other hand, explicitly demands and enforces a data plan. Apart from a set of standard metrics and dimensions (covered below), every data point you want to track must be created in the Adobe Analytics dashboard. In particular there are four types of data points that you may need to create in Adobe:
- Custom Success Events
- Conversion Variables (or eVars)
- Traffic Properties (or props)
- Hierarchy Variables ( or hiers )
Also unlike mParticle, where an event or attribute name can be almost any string, Adobe gives you a specific allotment of each data type with predefined keys. For example, eVars are keyed eVar1, eVar2, etc.
Before you start trying to set up an mParticle -> Adobe connection, you need to consider how you want to organize your data in Adobe and create the appropriate data points. A few useful Adobe resources include:
- General docs on metrics, including Page Views and Custom Success Events
- General docs on Variables in Adobe reporting
- Tech specs for eVars, props, and hiers
- General docs on Props
- General docs on eVars
Enable the Adobe Marketing Cloud Integration
Connect the Integration
Connect your iOS, Android, or Web workspaces to Adobe Marketing Cloud. You will need to provide:
-
Your Tracking Server - this can be created one of two ways:
- Reporting Suite IDs
- Your Marketing Cloud Organization ID
- Make sure the Timestamps Enabled option in the Configuration Settings matches the Timestamp Configuration of your Reporting Suites.
iOS and Android Setup
On iOS and Android, mParticle supports Adobe Analytics through a combination of an “embedded kit”, and server-side forwarding to the Data Insertion API.
Reference the Apple SDK and Android SDK guides to read more about kits.
The embedded kit supports tvOS and Fire TV apps as well as iOS and Android phones.
mParticle publishes the Adobe Marketing Cloud Kit as separate iOS and Android libraries which have a transitive dependency on the mParticle core libraries. You can add them to your app via Carthage, Cocoapods, or Gradle:
# Sample Podfile

source 'https://github.com/CocoaPods/Specs.git'

target '<Your Target>' do
    # To send media data to Adobe, you must use CocoaPods since their SDKs do not support Carthage
    pod 'mParticle-Adobe/AdobeMedia'

    # Otherwise uncomment below for the previous non-media Adobe integration, you can integrate via Carthage or CocoaPods
    # pod 'mParticle-Adobe/Adobe'
end
// Sample build.gradle
dependencies {
// To send media data to Adobe, you must use the adobemedia-kit, which also contains all functionality of the adobe-kit
compile 'com.mparticle:android-adobemedia-kit:5.31.0'
// Otherwise uncomment below for the non-media Adobe integration
// compile 'com.mparticle:android-adobe-kit:5.31.0'
}The source code for each kit is available on Github:
Web Setup
mParticle’s Adobe Analytics integration supports Adobe’s Marketing Cloud ID Service. As long as you have the mParticle web SDK enabled on your website, you do not need to add any additional code to your site. The mParticle web Adobe integration will load the required Adobe javascript files — visitorAPI.js and appmeasurement.js — when you have set up the integration in the Dashboard.
Identity Mapping
This integration requires that data be attached to a Marketing Cloud ID (MID), which is used to send data server-side via Adobe’s Data Insertion API.
For web and native integrations, mParticle will store the MID for each device in the user’s profile. This allows for us to enrich future data with the MID, should it be omitted.
Retrieve MID for the current user
Depending on the OS, the MID is retrieved in different ways.
For iOS and Android, the embedded Adobe Marketing Cloud Kit is able to both retrieve the user’s MID, as well as keep Adobe’s record up-to-date with all available identifiers.
MPIAdobeApi *adobe = [[MParticle sharedInstance] kitInstance:MPKitInstanceAdobe];
if (adobe) {
    //access the MID
    NSString *mid = adobe.marketingCloudID;
}
final AdobeApi adobe = (AdobeApi) MParticle.getInstance().getKitInstance(MParticle.ServiceProviders.ADOBE);
if (adobe != null) {
//access the MID
String mid = adobe.getMarketingCloudID();
}On Web, you can retrieve the MID by accessing Adobe’s visitorAPI.js directly. Since multiple instances can be active on a page at once, you will need to get an instance using the appropriate Marketing Cloud Organization ID and use the getMarketingCloudVisitorID() method.
For other OSs — such as Roku — the MID will either need to:
- already be resident within the given user’s profile, such that enrichment can occur in the backend.
- be manually populated via the
integration_attributesfield. For S2S requests, the JSON Reference Docs will have more information.
Data Mapping
For the native integrations, the embedded kit retrieves the Adobe Marketing Cloud ID (MID) for the user, but sends no data directly to Adobe. All data forwarding is done server-to-server via GET requests to Adobe’s Data Insertion API.
On web, the Marketing Cloud ID is always retrieved using client-side code, but you can choose to send data to Adobe either client-side or the server-side, via the Forward Web Requests Server Side Connection Setting. If you are using a snippet to load the mParticle web SDK, simply clicking this setting is enough to send data server side. If you are self-hosting, there is an additional step. We offer 2 different npm modules, one to send data to Adobe client-side, and another to send it server-side. To send data server side in a self-hosting environment, you must both check the setting and use the server-side kit. Checking the setting and using the client side kit may result in duplicate data, with the client sending the data, and then our servers also sending the data.
Once you have created your data plan in Adobe, you need to map mParticle event and attribute names to their counterparts in Adobe. Mapping for a limited set of standard events and attributes are handled automatically. We’ll cover these later. Your custom events and attributes need to be mapped manually.
There are two basic approaches you can take:
- You can map event names and attributes to events, eVars, props and hiers in the Connection Settings. This approach is required for Web integrations, unless Forward Web Requests Server Side is enabled.
- For iOS, Android, and Web requests where Forward Web Requests Server Side is enabled, regardless of whether you provide mappings in your connection settings, mParticle will also forward event names and attributes to Adobe as Context Variables. Context variables are similar to mParticle’s Custom Attributes, since their name can be any string. However, Context Variables cannot be tracked in Adobe until you create a Processing Rule, which copies the value of the context variable to one of your eVars, Props, etc.
Mapping in Adobe
Our recommended approach for new implementations is to send as much data as possible using Context Variables and rely on Processing Rules in Adobe to map mParticle data to Adobe. We recommend this approach for three reasons:
- This style of implementation comes closest to how you would use Adobe’s native SDKs, which, in their latest versions, do not directly capture eVars, props or hiers and require the use of Context Variables and Processing Rules.
- mParticle is only able to map to events, eVars, props and hier variables, but Adobe does support other data types. Utilizing processing rules gives you access to all data types.
- mParticle can map to Adobe’s variable keys (like
eVar1,eVar2, etc) but to know whateVar1is, you need to go to the Adobe dashboard. Your mapping will be easier to set up and maintain if you do it with Processing Rules, where all the information you need is available.
To use this approach, just don’t create any event or variable mappings in the Connection Settings dialog. Once data starts flowing into Adobe, you can use Context Variables to map mParticle data to your Adobe Metrics and Dimensions. See below for the variable names mParticle uses to forward data to Adobe.
Mapping in mParticle
It is also possible to directly map mParticle event and attribute names to Adobe events, eVars, props and hiers. You can create these mappings in the Connection Settings.

Adobe Lifecycle Metrics and Dimensions
‘Metrics’ in Adobe are similar to events in mParticle. They count the number of times something happens in your app. mParticle uses data collected by our Application State Transition and Crash Report events to forward a complete set of standard mobile metrics to Adobe.
Note that some of these metrics will automatically be available in your reporting suite, others will require a Processing Rule.
Standard Metrics
| Adobe Metric | Adobe Context Variable | Processing Rule Required | mParticle mapping |
|---|---|---|---|
| First Launches | a.InstallEvent |
No | Forwarded when mParticle detects an install or reinstall |
| Upgrades | a.UpgradeEvent |
Forwarded when mParticle detects a version number change | |
| Daily Engaged Users | a.DailyEngUserEvent |
Yes | Forwarded the first time the application is used on a given device on a given calendar day |
| Monthly Engaged Users | a.MonthlyEngUserEvent |
Yes | Forwarded the first time the application is used on a given device in a given calendar month |
| Launches | a.LaunchEvent |
No | Forwarded on every App Init or Foreground that is not an install or upgrade. |
| Crashes | a.CrashEvent |
No | Forwarded every time mParticle receives a Crash Report event. |
| Previous Session Length | a.PrevSessionLength |
No | Whenever an Application Init or Foreground starts a new session, mParticle forwards the total foreground length of the previous session in seconds. |
Standard Dimensions
Referrer
For Android and FireTV installs, mParticle forwards UTM Referrer information to Adobe:
| Adobe Dimension | Adobe Context Variable | mParticle mapping |
|---|---|---|
| Campaign | a.referrer.campaign.name |
application_info.install_referrer |
| Campaign Content | a.referrer.campaign.content |
application_info.install_referrer |
| Campaign Medium | a.referrer.campaign.medium |
application_info.install_referrer |
| Campaign Source | a.referrer.campaign.source |
application_info.install_referrer |
| Campaign Term | a.referrer.campaign.term |
application_info.install_referrer |
For Web page view events, mParticle forwards UTM Referrer information to Adobe. The data should be sent in a custom flag with the following format: utm_campaign=my_campaign&utm_source=google&utm_medium=cpc&utm_term=my_keyword&utm_content=ad_variation1.
| Adobe Dimension | Adobe Context Variable | Custom Flag |
|---|---|---|
| Campaign | a.referrer.campaign.name |
Adobe.UTM |
| Campaign Content | a.referrer.campaign.content |
Adobe.UTM |
| Campaign Medium | a.referrer.campaign.medium |
Adobe.UTM |
| Campaign Source | a.referrer.campaign.source |
Adobe.UTM |
| Campaign Term | a.referrer.campaign.term |
Adobe.UTM |
For Web page view events, mParticle forwards Referrer URL information to Adobe:
| Adobe Dimension | Adobe Variable | Custom Flag |
|---|---|---|
| Referrer | r |
Adobe.Referrer |
Context Variables
mp Variables
mParticle forwards a common set of context variables with every native event. These context variables are prefixed with mp. To display any of these variables in your reporting suite, you will need to create a Processing Rule.
Device Identities
| Adobe Context Variable Name | mParticle mapping |
|---|---|
| iOS & tvOS | |
| mp.AdvertisingIdentifier | device_info.ios_advertising_id |
| mp.VendorIdentifier | device_info.idfv |
| Android & Fire TV | |
| mp.GoogleAdvertisingIdentifier | device_info.android_advertising_id |
Device and Application Information
| Adobe Context Variable Name | mParticle mapping |
|---|---|
| mp.LocaleCountry | device_info.locale_country |
| mp.LocaleLanguage | device_info.locale_language |
| mp.DeviceManufacturer | device_info.device_manufacturer |
| mp.DeviceName | device_info.device |
| mp.AppName | application_info.application_name |
| mp.PackageName | application_info.package |
| mp.AppVersion | application_info.application_version |
User Information
mParticle always forwards the following user context variables if available:
FirstNameLastNameGenderAgeCountryZipCityStateAddressMobile
User Agent
mParticle will always forward the HTTP user agent included in your Events API data. Adobe will surface user agent in reports and you can use Adobe’s IAB and custom bot filtering to filter your data based on this string.
- When using the mParticle client SDKs, the user agent string is collected automatically.
- When sending data to mParticle server-side via the Events API, you must populate this field manually after having collected it from your users. Sending a user agent string that’s not reflective of the original user client device may trigger Adobe’s bot filtering or otherwise corrupt your Adobe data. If you are unable to populate the user agent string, you should explicitly set it to empty in both the header of your Events API request and the device information object of the batch.
Please see the Events API documentation for how to properly populate the user agent field in Event API uploads.
Timestamps
mParticle will forward timestamps to Adobe if you have configured Timestamps Allowed or Timestamps Optional in your Configuration Settings
| Adobe Context Variable Name | mParticle mapping |
|---|---|
ts |
The unix event timestamp in seconds |
t |
A string giving local time. See the Data Insertion API docs for format details. |
Web Variables
Note that since the client-side Web Integration actually sends data directly via Adobe’s javascript, mParticle does not pass a long list of automatically collected device information in the same way as the native integration. Instead, Adobe automatically collects the information it needs from the browser client. See Adobe’s Page Variables docs for more information
Custom Events
Once your Adobe integration is set up, logging an event in mParticle is roughly equivalent to a trackAction call using the Adobe SDK. See Adobe’s track action docs for iOS and Android.
// Logging this event in mParticle...
MPEvent *event = [[MPEvent alloc] initWithName:@"Viewed Video"
                                          type:MPEventTypeTransaction];
event.info = @{@"category":@"Destination Intro",
               @"destination":@"Paris"};
[[MParticle sharedInstance] logEvent:event];

// ...is roughly equivalent to this trackAction call to the Adobe SDK
NSMutableDictionary *contextData = [NSMutableDictionary dictionary];
[contextData setObject:@"Destination Intro" forKey:@"category"];
[contextData setObject:@"Paris" forKey:@"destination"];
[ADBMobile trackAction:@"Viewed Video" data:contextData];
// Logging this event in mParticle...
Map<String, String> eventInfo = new HashMap<String, String>(2);
eventInfo.put("category", "Destination Intro");
eventInfo.put("destination", "Paris");
MPEvent event = new MPEvent.Builder("Video Watched", EventType.Other)
.info(eventInfo)
.build();
MParticle.getInstance().logEvent(event);
// ...is equivalent to this trackAction() call to the Adobe SDK
HashMap<String, Object> contextData = new HashMap<String, Object>();
contextData.put("category", "Destination Intro");
contextData.put("destination", "Paris");
Analytics.trackAction("Viewed Video", contextData);/*
Assuming the following connection settings
"Viewed Video" -> "event1"
"category" -> "prop2"
"destination" -> "eVar2"
Forward Events Server Side = false
*/
// Logging this event in mParticle...
mParticle.logEvent('Viewed Video', mParticle.EventType.Other, {category: 'Destination Intro', destination: 'Paris'});
// ...is equivalent to this Adobe code
window.s.events = 'event1'
window.s.prop2 = 'Destination Intro'
window.s.eVar2 = 'Paris'
window.s.linkTrackVars = 'eVar2, prop1, events, pageName'
window.s.t();
window.s.clearVars();
/*
Assuming the following connection settings:
No Mappings
Forward Events Server Side = true
Data will be forwarded server side via the Insertion API with the following context variables:
"action" : "Viewed Video",
"category": "Destination Intro",
"destination": "Paris"
*/Custom events are forwarded to Adobe as follows:
- If you have mapped the event name to a custom success event in the Connection Settings, mParticle will forward it as the mapped event number. If you have not mapped the event, mParticle will send the event name as a a context variable:
a.action = <event name>. - If you have mapped any eVars, props or hiers in the Connection Settings, these will be mapped directly.
- All other custom attributes are forwarded as Context Variables with their original attribute name as the key.
- Standard Context Variables will be added as listed above.
Screen Views
Once your Adobe integration is set up, logging a screen view in mParticle is roughly equivalent to a trackState call using the Adobe SDK. See Adobe’s track state docs for iOS and Android.
// Logging this screen view in mParticle...
NSDictionary *screenInfo = @{@"rating":@"5",
                             @"property_type":@"hotel"};

[[MParticle sharedInstance] logScreen:@"Destination Details"
                            eventInfo:screenInfo];

// ...is equivalent to this trackState call to the Adobe SDK
NSMutableDictionary *contextData = [NSMutableDictionary dictionary];
[contextData setObject:@"logged in" forKey:@"myapp.login.LoginStatus"];
[contextData setObject:@"logged in" forKey:@"myapp.login.LoginStatus"];
[ADBMobile trackState:@"Destination Details" data:contextData];
// Logging this screen view in mParticle...
Map<String, String> screenInfo = new HashMap<String, String>();
screenInfo.put("rating", "5");
screenInfo.put("property_type", "hotel");
MParticle.getInstance().logScreen("Destination Details", screenInfo);
// ...is equivalent to this trackState() call to the Adobe SDK
HashMap<String, Object> contextData = new HashMap<String, Object>();
contextData.put("rating", "5");
contextData.put("property_type", "hotel");
Analytics.trackState("Destination Details", contextData);/*
Assuming the following connection settings
"rating" -> "prop1"
"property_type" -> "eVar1"
Forward Events Server Side = false
*/
// Logging this page view in mParticle...
mParticle.logPageView('Destination Details', {rating: 'five', property_type: 'hotel'});
// ...is equivalent to this Adobe code
window.s.prop1 = 'five';
window.s.eVar1 = 'hotel';
window.s.pageName = 'Destination Details'; // if no pageName is provided, "PageView" will be sent to Adobe
window.s.t(); // logs the current window object with Adobe
window.s.clearVars(); //clears the current window object so the next event can be logged
/*
Assuming the following connection settings:
No Mappings
Forward Events Server Side = true
Data will be forwarded server side via the Insertion API with the following context variables:
"pageName" : "Destination Details",
"rating": "5",
"property_type": "hotel"
*/Screen Views are forwarded to Adobe as follows:
- If you have mapped the event name to a custom success event in the Connection Settings, mParticle will forward it as the mapped event number, as if it were a custom event. If not, the
pageNamecontext variable will be set to the Screen Name. - If you have mapped any eVars, props or hiers in the Connection Settings, these will be mapped directly.
- All other custom attributes are forwarded as Context Variables with their original attribute name as the key.
- Standard Context Variables will be added as listed above.
Commerce Events
Commerce Event Types
mParticle’s Product Action values map to standard Adobe events and do not require Processing Rules to make them available in your reporting suite.
| Adobe Metric | mParticle Commerce Product Action |
|---|---|
prodView |
View Detail |
scAdd |
Add to Cart |
scRemove |
Remove from Cart |
purchase |
Purchase |
scCheckout |
Checkout |
Products
Products are forwarded to Adobe as a specially formatted string, with the product’s attributes separated by the ; character as follows:
<product.category>;<product.id (or product.name if unavailable)>;<product.quantity>;<product.total_product_amount>;<product incrementors>;<merchandising variables>All fields are optional. We’ll deal with product incrementors and merchandising variables below. For now, an example of a products variable for 2 flights from New York to Ibiza, at $400 each, might look like this:
&&products=flights;JFK-IBZ;2;800| Adobe Context Variable Name | mParticle mapping |
|---|---|
mp.transactionId |
product_action.transaction_id |
mp.couponCode |
product_action.coupon_code |
mp.affiliation |
product_action.affiliation |
mp.shippingAmount |
product_action.shipping_amount |
mp.tax |
product_action.tax_amount |
mp.revenue |
product_action.total_amount |
Product Incrementors
Product attributes can also be mapped to product-specific events. Product-specific events are generally of the ‘incrementor’ or ‘currency’ type. See Adobe’s docs on counter, incrementor and currency events for more info. To set a product specific event you will need to have set up the event number in Adobe beforehand.
Example:
mPtravel lets users earn reward cash when they make purchases. A custom product attribute — reward_cash — is used to track the reward value of each product. These rewards can be tracked in Adobe using a product-specific event. In Mobile App settings, allocate event1 to “Reward Cash”, and set type to “Decimal Number”.
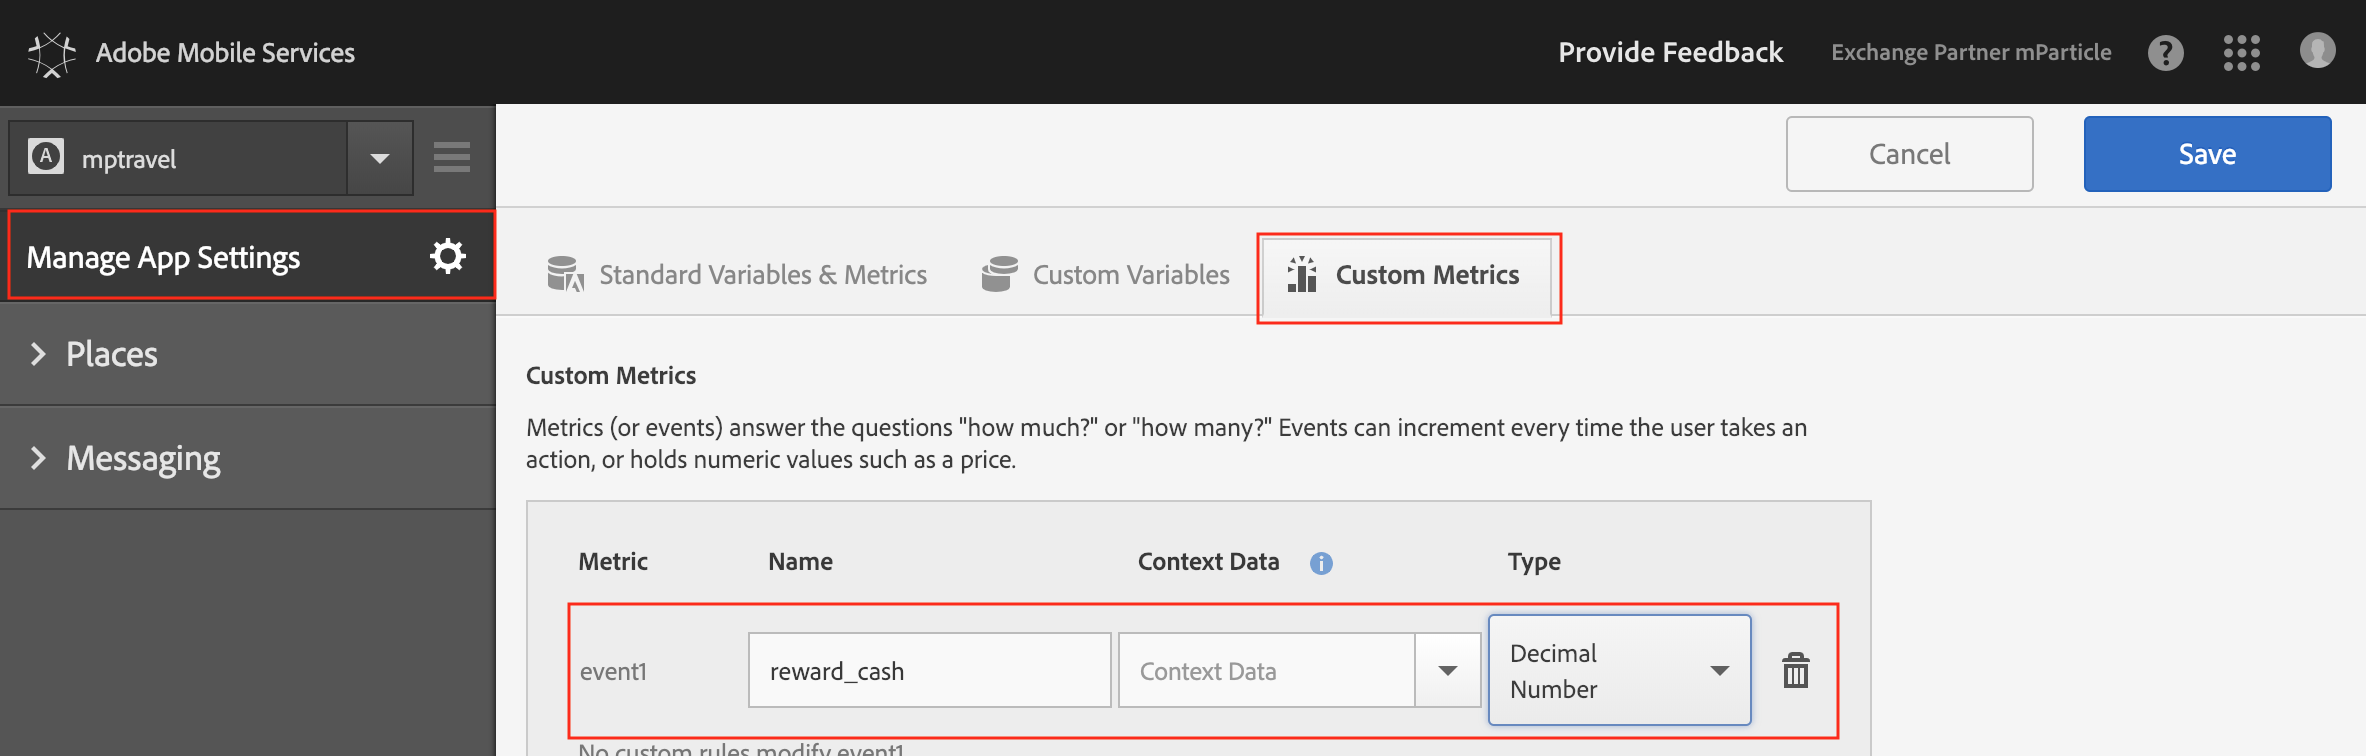
In the Product Incrementors section of the mParticle Connection Settings, map the reward_cash variable to event1. Now, a product variable forwarded to Adobe will look like:

&&products=flights;JFK-IBZ;2;800;event1=9.34Merchandising Variables
Merchandising Variables are eVars tied to products, that help you track revenue for segments or categories of products. You can map any Product Attribute to a Merchandising Variable in the Connection Settings. As with Product Incrementors, you need to have set these up in the Adobe dashboard.
Example:
mPtravel periodically puts flight packages on sale. A custom product attribute sale_name is used to track when a product is part of a sale. By creating sale_name as a Merchandising Variable in Adobe, it is possible to analyse the overall revenue generated by a particular sale.
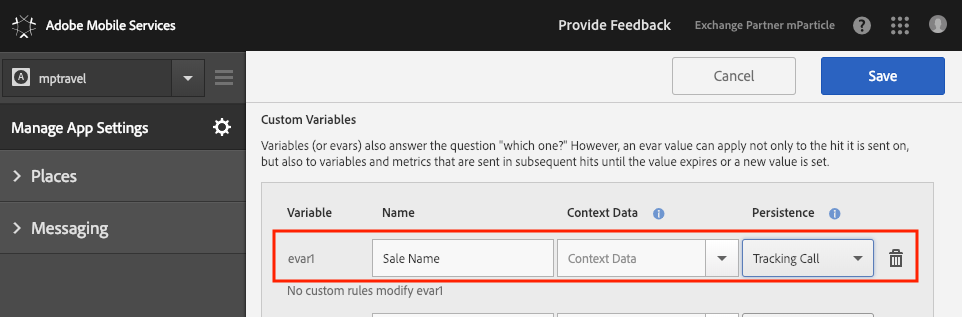
In the Merchandising Variables section of the mParticle Connection Settings, map the sale_name variable to evar1.

Now, a product variable forwarded to Adobe will look like:
&&products=flights;JFK-IBZ;2;800;event1=9.34;evar1=Super Spring SaleCustom Flags on Web
| Custom Flag | Data Type | Description |
|---|---|---|
Adobe.PageName |
string |
The value assigned to pageName in the payload sent to Adobe. If no value is passed for custom and commerce events, then window.document.title will be used. If no value is passed for logPageView calls, the event name passed to logPageView is used, otherwise PageView is sent. |
Adobe.LinkName |
string |
The value assigned to the linkName parameter (pev2). If no value is passed, this will remain empty. |
Calculated Attribute Support
mParticle calculated attributes are supported for events. //If the integration also supports audience, modify to say that CA is supported for audiences and events.
For more information, see Calculated Attributes.
Configuration Settings
| Setting Name | Data Type | Default Value | Description |
|---|---|---|---|
| Report Suite IDs | string |
The report suite ID from Adobe settings page. Multiple IDs can be entered, separated by commas | |
| Tracking Server | string |
The URL of the Adobe tracking server | |
| Experience Cloud Identity Server | string |
Set the domain name used by calls to the Experience Cloud Identity Service. By default this value is “dpm.demdex.net”. Enter the full value (ie. “YourSubdomainName.demdex.net”), and not just the subdomain. | |
| Send Messages Securely | bool |
True | If enabled, mParticle will forward all data to Adobe using SSL |
| Timestamp Enabled | enum |
Timestamps Optional | Matches your Reporting Suite’s timestamp settings. A report suite can have its timestamps configured as one of: not allowed, required, or optional. Timestamps Optional is the default setting for all new report suites. |
Connection Settings
| Setting Name | Data Type | Default Value | Platform | Description |
|---|---|---|---|---|
| User Identification | enum |
Marketing Cloud ID | All | Type of ID to forward to Adobe. Currently, only Marketing Cloud ID is supported. |
| Marketing Cloud Organization ID | string |
All | Your Adobe Marketing Cloud Organization ID, available from your Adobe Marketing Cloud dashboard. | |
| Adobe Launch App ID | string |
iOS, Android | Adobe Launch App ID is used to initialize and configure your Adobe Mobile Core and Media Analytics. You can find it within the Environment Tab of your Mobile property within the Adobe Launch Platform. | |
| Media Tracking Server | string |
Web | Tracking server for media analytics. This is different from your analytics tracking server. When this is filled in, we will load Adobe Heartbeat. If you do not want Adobe Heartbeat functionality, leave this blank. | |
| Context Variables | Custom Field |
All | Mapping of your application’s event attributes to Adobe context variables | |
| Events | Custom Field |
All | Mapping of your application’s custom event names to Adobe event numbers | |
| Props | Custom Field |
All | Mapping of your application’s custom event attributes to Adobe props | |
| eVars | Custom Field |
All | Mapping of your application’s custom event attributes to Adobe eVars | |
| Hier Variables | Custom Field |
All | Mapping of your application’s screen view attributes to Adobe hier variables | |
| Product Incrementors | Custom Field |
All | Mapping of your application’s custom event names to Adobe product incrementor event numbers | |
| Merchandising Variables | Custom Field |
All | Mapping of your application’s event attributes to Adobe product merchandising | |
| Page Specific Product Actions (deprecated) | Custom Field |
iOS, Android, tvOS, FireTV | Allows you to log eCommerce events as trackState (screen view), rather than trackAction. This is mostly useful for Promotion or Impression events. |
|
| Forward as Track State Events | Custom Field |
iOS, Android, tvOS, FireTV | Allows you to log eCommerce events as trackState (screen view), rather than trackAction. This is mostly useful for Promotion or Impression events. |
|
| Extend Commerce Event Attributes | bool |
false |
All | When enabled, mParticle will add additional commerce and product action attributes to customer-mapped commerce events. |
| Attach pageName to non-page view event logging | bool |
false |
Web | Attach pageName to non-page view event logging. |
| Set Global Window Object | bool |
true |
Web | Set the instance of AppMeasurement created by this connection to the global window.s object. |
| Set trackExternalLinks | bool |
false |
Web | Automatically track all exit links. |
| Forward Web Requests Server Side | bool |
false |
Web | If enabled, mParticle will not initialize the full Adobe integration on the web client. Instead, web data will be forwarded to Adobe via server-to-server API. If self-hosting, it is required to use the Adobe server-side kit, along with this setting. See Data Mapping for more details. |
Was this page helpful?