Developers
Kits
In most cases, data collected by the mParticle SDK is sent to mParticle, and then forwarded on to integration partners server-to-server.
However, in cases where a server-to-server integration cannot support all the required functionality of an integration partner, an embedded kit may be used. Embedded kits are extra components added to the mParticle SDK that communicate directly with an integration partner from the app client. Usually the embedded kit includes some or all of the partner’s own client-side SDK.
mParticle supports several kinds of client-side kits:
- mParticle-hosted kits that mParticle has developed and fully supports.
-
Partner-hosted kits that have been tested and are fully supported by mParticle:
- Sideloaded kits, also called custom kits, that have not been tested and are not support by mParticle. You are responsible for any sideloaded kit that you write yourself or include from a third-party source. This responsibility includes the correct handling and protection of user profiles and identities both within your own system as well as any third-party service you may forward that data to. Be especially cautious with sideloaded kits you may find from third-party repositories. They will potentially receive all events that you log via the mParticle SDK, so you are responsible for ensuring that they handle that data correctly and safely.
Just as with other integrations, you are not required to write any client-side code to leverage the kits. As with other integrations, you should enable and configure the mParticle-hosted kits listed below via the mParticle Dashboard.
Refer to the iOS and Android SDK GitHub repositories for configuring these kits with the mParticle SDK into your app.
Adding the Kit dependency
The Core SDK will detect kits at runtime, but you need to add them as dependencies to your build:
dependencies {
    implementation (
        'com.mparticle:android-example-kit:5+',
        'com.mparticle:android-another-kit:5+',
    )
}
Kits are deployed as individual artifacts in Maven Central, and each has a dedicated repository if you’d like to view the source code.
To find the artifact for a kit in Maven Central, go to Maven Central and search for a partner integration including the keyword “mparticle”.
To find a kit’s repository, go to mparticle-integrations and search for a partner integration. Some partners have integrations for multiple platform SDKs, so make sure to select the correct integration for the SDK you are using. Most kit repository names follow the pattern mparticle-PLATFORM-integration-PARTNER.
Making direct calls to Kits
The mParticle SDK only initializes kits that are enabled for your app in the mParticle dashboard. Since services can be enabled or disabled at any time, it is important to confirm that a kit has been initialized in your app before trying to access its APIs. mParticle provides a simple method to ensure that a kit is active. You can then access the kit instance directly and call any APIs you need.
private void refreshFeed {
    if (MParticle.getInstance().isKitActive(ServiceProviders.APPBOY)) {
        //Active kit code
    }
}
fun refreshFeed() {
if (MParticle.getInstance()?.isKitActive(ServiceProviders.APPBOY) ?: false) {
//Active kit code
}
}Kit Availability and Unavailability Notifications
The mParticle SDK also allows you to listen for kit activity notifications asynchronously, avoiding the need to repeatedly check if a kit is active or inactive.
//Use the BROADCAST_ACTIVE and BROADCAST_DISABLED actions, concatenated with the provider ID
IntentFilter filter = new IntentFilter(MParticle.ServiceProviders.BROADCAST_ACTIVE + MParticle.ServiceProviders.APPBOY);
filter.addAction(MParticle.ServiceProviders.BROADCAST_DISABLED + MParticle.ServiceProviders.APPBOY);
this.registerReceiver(new BroadcastReceiver() {
  @Override
  public void onReceive(Context context, Intent intent) {

     if (intent.getAction().startsWith(MParticle.ServiceProviders.BROADCAST_ACTIVE)){
       //make a direct Appboy API call, or set a boolean field that you can check elsewhere
     }else{
       //the provider has been deactivated, avoid future calls to it
     }
  }
}, filter);
//Use the BROADCAST_ACTIVE and BROADCAST_DISABLED actions, concatenated with the provider ID
var filter = IntentFilter(MParticle.ServiceProviders.BROADCAST_ACTIVE + MParticle.ServiceProviders.APPBOY);
filter.addAction(MParticle.ServiceProviders.BROADCAST_DISABLED + MParticle.ServiceProviders.APPBOY);
this.registerReceiver(object : BroadcastReceiver() {
override fun onReceive(context: Context, intent: Intent) {
if (intent.action!!.startsWith(MParticle.ServiceProviders.BROADCAST_ACTIVE)) {
//make a direct Appboy API call, or set a boolean field that you can check elsewhere
} else {
//the provider has been deactivated, avoid future calls to it
}
}
}, filter);Deep Linking
Several integrations support the creation and attribution of deep links to install and open an app. A deep link will typically contain some additional information to be used when the user ultimately opens your application, so that you can properly route the user to the appropriate content, or otherwise customize their experience.
As at version 5, the mParticle SDKs offer an integration-agnostic Attribution Listener API that lets you query your integrations at runtime to determine if the given user arrived by way of a deep link.
The following integrations support deep linking:
public class SampleApplication extends Application implements AttributionListener {

    @Override
    public void onCreate() {
        super.onCreate();
        MParticleOptions options = MParticleOptions.builder(this)
                .credentials("FOO", "BAR")
                .attributionListener(this)
                .logLevel(MParticle.LogLevel.VERBOSE)
                .build();
        MParticle.start(options);
    }

    @Override
    public void onResult(AttributionResult attributionResult) {
        //do something with attributionResult
    }

    @Override
    public void onError(AttributionError attributionError) {
        //do something with attributionError
    }
}
class SampleApplication : Application(), AttributionListener {
override fun onCreate() {
super.onCreate();
MParticleOptions.builder(this).run {
credentials("FOO", "BAR")
attributionListener(this@SampleApplication)
logLevel(MParticle.LogLevel.VERBOSE)
build()
}.also {
MParticle.start(it);
}
}
override fun onResult(attributionResult: AttributionResult) {
//do something with attributionResult
}
override fun onError(attributionError: AttributionError) {
//do something with attributionError
}
}Determining Which Partner SDK Version is Being Used By a Kit
The types of questions most users have about kits are:
- What version of the partner SDK do you “support”?
- Which version of a partner’s SDK does a given app/SDK version “use”?
These are two different questions. mParticle defines “support” as - if you can build an app/site with the mParticle SDK and the app compiles, it’s supported.
Therefore, we do not manually test every single version of every single kit.
We only verify that they compile. If the partner breaks their SDK, or our integration with it, it’s possible that we will not know it.
If a partner breaks their SDK/our integration, it typically means they’ve also broken anyone who is directly integrating.
For the Android SDK, which is different than iOS, we do not push individual tags for each kit repo, ever. Instead, each kit is a Git “submodule” of our core SDK. This means that for every commit, tag, and release of the Android SDK, we lock to a specific commit in the partner’s repository. We still do push a new maven artifact for each kit for each version of the SDK - you just won’t see tags in the kit repos.
Android also differs from iOS in that we never use wildcards for kit SDK dependencies. This is because the notion of a “lockfile” does not exist for Android’s Gradle (actually it does, but is not widely adopted). So, using wildcards can lead to unrepeatable builds for our customers.
Find the Kit Source Code
Given version x.y.z of a kit, to find the partner SDK version supported:
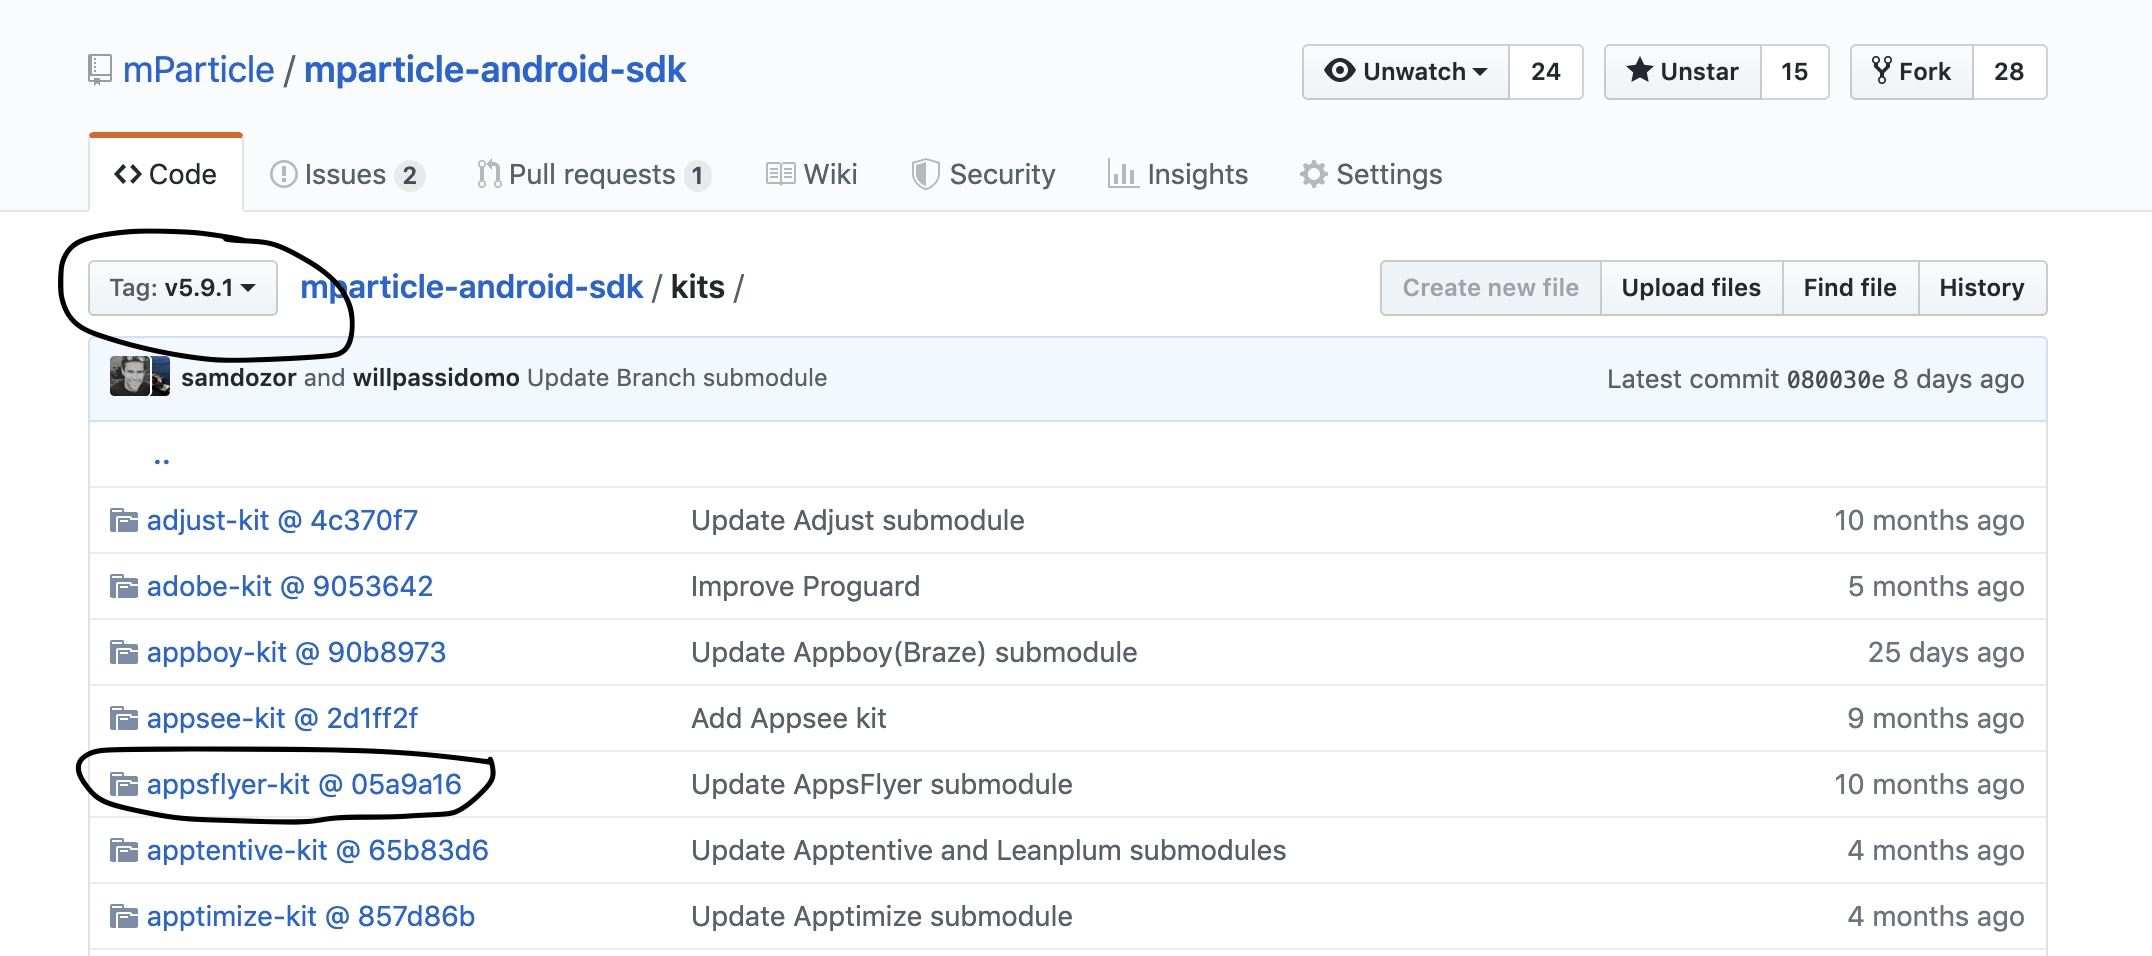
- Navigate to the “kits” directory of our Android SDK Github repo: https://github.com/mParticle/mparticle-android-sdk/tree/master/kits
- Using the dropdown at the top-left of the repository, select the “Tags” tab and then click on the tag version x.y.z that you are checking.
- Click on the kit that you are checking, this will link you out to the mParticle Integrations Github repository for that kit, at the specific commit hash that applies to the tag you chose in step (2).
Determine the Version
- Click to open the build.gradle file, and look for a line that refers to the partner’s SDK (example). In the linked example, the kit is using Airship SDK 9.7.1:
dependencies {
    api 'com.urbanairship.android:urbanairship-core:9.7.1'
    testImplementation 'junit:junit:4.12'
    testImplementation files('libs/java-json.jar')
    testImplementation "org.mockito:mockito-core:1.+"
}
Sideloaded Kits (Custom kits)
Kits are generally added and configured via the mParticle UI settings. When initializing the app, the mParticle SDK receives the configuration settings from our servers and initializes each kit. When you send events to the mParticle Android SDK, they are routed to each kit and mapped to a partner SDK method, ultimately arriving in our partners’ dashboards for your analysis. The kits in our UI are either built by mParticle or by partners. When partners build kits, we require careful coordination and updates to our database in order for their kits to work properly within our ecosystem.
However, there may be cases where you’d like to build a custom kit, whether to debug or to quickly send data to a partner SDK for which we do not have an official kit. We support the ability to build your own kit which can receive events without needing any configuration in our UI or database. We call these sideloaded kits. When sideloaded kits are included in your app, they remove the need for settings from our server because you configure the kit yourself and then include it using a public API we provide.
Important Safety Warning
Remember that while mParticle fully supports all official kits located in the “mparticle-integrations” GitHub organization as well as official kits created by our partners, you are responsible for any sideloaded kit you write yourself or include from a third-party source. This responsibility includes the correct handling and protection of user profiles and identities both within your own system as well as any third-party service you may forward that data to.
Be especially cautious with sideloaded kits you may find from third-party repositories. They will potentially receive all events that you log via the mParticle SDK, so you are responsible for ensuring that they handle that data correctly and safely.
Critical Limitations
Keep in mind that sideloaded kits are completely client-side, so things like data filtering are configured client-side and these options will not be available in the mParticle dashboard. This also means that event forwarding and filtering metrics from sideloaded kits will not be included in the metrics displayed in the mParticle dashboard as they would for official kits.
Our official support channels will be unable to help with issues you may have with your sideloaded kit such as data unavailable downstream, crashes, or unsupported functionality. mParticle support will only be able to help in cases where there is an issue with the mParticle SDK sideloaded kit feature in general.
Developing a Sideloaded Kit
On Android a sideloaded kit is essentially just a class that extends MPSideloadedKit. A simple example written in Kotlin can be found here and the KitIntegration and SideloadedKit definitions, which MPSideloadedKit extends from and implements can be found here and here respectively.
There are a few things to keep in mind when developing your kit:
- The class methods
getName,onKitCreateandsetOptOutcan be implemented but are not mandatory. TheonKitCreatefunction will be called in the kit lifecycle as any other mParticle kit, therefore you can override it with your specific business logic and return an empty list. - Remember that, as with any other kits, the core sdk propagates some messages to the kits based on the listeners implemented by them, so please review if your sideloaded kit implementation is implementing the interfaces required. Each concrete sideloading kit implementation requires to pass a kitId (greater or equal than 1000000) to the superclass
MPSideloadedKitconstructor. If the kitId is lower than the specified value the kit won’t be included. - To add filters to a sideloaded kit an
MPSideloadedFiltersobject must be created using its builder, and added to the kit itself. EachMPSideloadedFiltersobject can have various filtering configurations and be used to setup multiple sideloaded kits.
public class LoggingCustomKit() extends MPSideloadedKit(1000001) { }

MPSideloadedFilters filters = new MPSideloadedFilters.Builder()
        .addScreenNameFilter("screen_name")
        .addCommerceEventAttributeFilter(MPSideloadedFilters.CommerceEventType.PRODUCT_EVENT_TYPE_CHECKOUT, "event_attribute_key")
        .addUserAttributeFilter("user_attribute_key")
        .build();

SideloadedKit kit = new LoggingCustomKit().addFilters(filters);
class LoggingCustomKit() : MPSideloadedKit(1000001) {}
val filters = MPSideloadedFilters.Builder()
.addScreenNameFilter("screen_name")
.addCommerceEventAttributeFilter(MPSideloadedFilters.CommerceEventType.PRODUCT_EVENT_TYPE_CHECKOUT, "event_attribute_key")
.addUserAttributeFilter("user_attribute_key")
.build()
val kit = LoggingCustomKit(1000001).addFilters(filters)Including the Sideloaded Kit
The sideloaded kit must be included directly in your application’s source code, on the initialization process.
To register the sideloaded kit, all that’s needed is to create an instance and pass it to the sideloadedKits property of the MParticleOptions object:
public class LoggingCustomKit() extends MPSideloadedKit(1000001) { }

SideloadedKit kit = new LoggingCustomKit();
List<SideloadedKit> kits = new ArrayList();
kits.add(kit);

MParticleOptions options = MParticleOptions.builder(this)
    .credentials("FOO", "BAR")
    .logLevel(MParticle.LogLevel.VERBOSE)
    .sideloadedKits(kits)
    .build();
MParticle.start(options);
class LoggingCustomKit() : MPSideloadedKit(1000001) {}
val kit : SideloadedKit = LoggingCustomKit()
val options: MParticleOptions = MParticleOptions.builder(this)
.credentials("FOO", "BAR")
.logLevel(MParticle.LogLevel.VERBOSE)
.sideloadedKits(listOf(kit))
.build()
MParticle.start(options)Note that you may use multiple instances of the same sideloaded kit class, but each one must be initialized with a unique kitId. Each sideloaded kit does not need to be a unique class, only a unique instance.
Was this page helpful?