v1 Warehouse Sync API tutorial
Use this tutorial to configure your first Warehouse Sync pipeline with the mParticle Postman collection, and activate the data in a downstream tool. Postman is an easy and friendly environment for developers and non-developers alike to use APIs.
This tutorial is not a complete guide to all of the Warehouse Sync features and APIs. For more reference documentation, see the Warehouse Sync API Reference.
Prerequisites
- Install the latest version of the Postman desktop application. You can download Postman from https://www.postman.com/downloads/.
-
Fork the mParticle Warehouse Sync Postman Collection to your workspace:

A copy of the Warehouse Sync environment is included. You can download it again here.
Step 1. mParticle setup
Create Platform API credentials
You need credentials to use the Platform API to create Warehouse Sync Pipelines.
To create a Platform API credential:
-
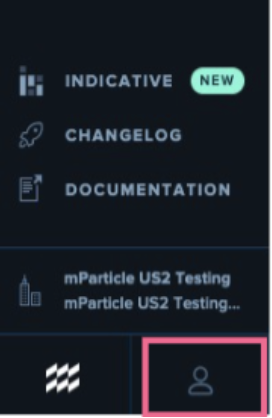
After signing in to the mParticle app as a user with the Admin role, click the user icon in the bottom left corner.
- Click Settings.
- Click the API Credentials tab.
- Click the green Add Credential button at the top right of the screen.
-
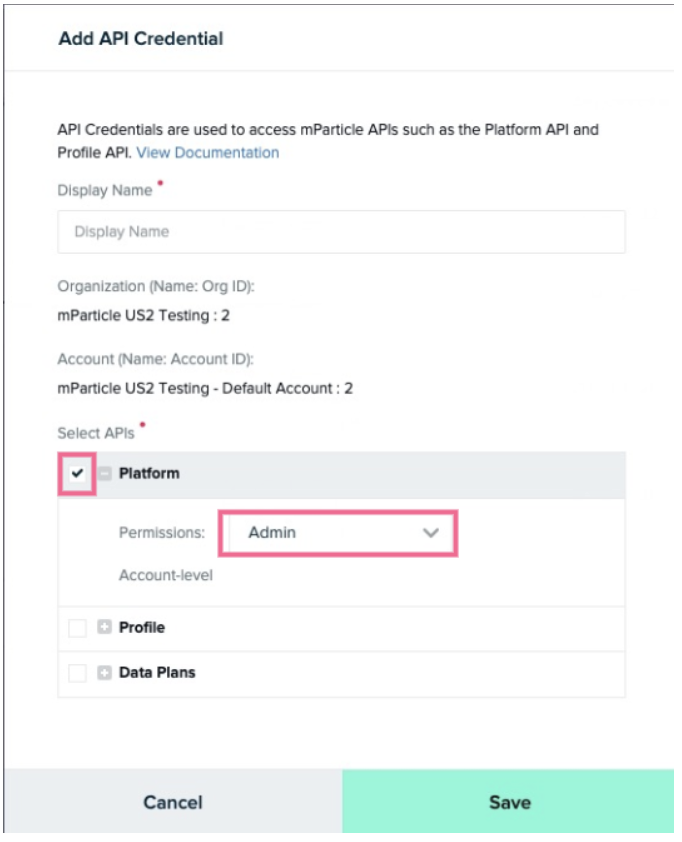
Give the credential a name, and ensure the Platform checkbox is checked and the Admin dropdown is selected. Click the green Save button to save the new credential.
- Copy the Client ID and Client Secret values, as you’ll need these in a later step.
- Click Done.
Step 2. Data warehouse setup
Work with your warehouse administrator or IT team to ensure your warehouse is reachable and accessible by the mParticle app.
- Whitelist the mParticle IP address range so that your warehouse will be able to accept inbound calls from mParticle.
- Ask your database administrator to execute the following steps in your warehouse to create a new Role that the mParticle service will use to connect to and access your database. Make sure to select the correct tab for your warehouse (Snowflake, Google BigQuery, or Amazon Redshift).
Run the following commands from your Snowflake instance:
USE ROLE ACCOUNTADMIN;

// Create a unique role for mParticle
CREATE ROLE IF NOT EXISTS {{role_name}};

GRANT USAGE ON WAREHOUSE {{compute_wh}} TO ROLE {{role_name}};
GRANT USAGE ON DATABASE {{database}} TO ROLE {{role_name}};
GRANT USAGE ON SCHEMA {{database}}.{{schema}} TO ROLE {{role_name}};

// Grant SELECT privilege on any tables/views mP needs to access
GRANT SELECT ON TABLE {{database}}.{{schema}}.{{table}} TO ROLE {{role_name}};

// Recommend creating a unique user for mParticle
CREATE OR REPLACE USER {{user_name}} PASSWORD = "{{unique_secure_password}}";
GRANT ROLE {{role_name}} TO USER {{user_name}};

// Note: Don't change the name of the storage integration: plug in your mP POD, Org ID,
// and Acct ID into the name, and be sure to leave the other characters as they are
// ("mp_", underscores, and "_s3").
//
// Use the value for your mParticle instance for {pod_mp_aws_account_id}:
// US1 = 338661164609
// US2 = 386705975570
// AU1 = 526464060896
// EU1 = 583371261087
CREATE OR REPLACE STORAGE INTEGRATION mp_{{pod}}_{{org_id}}_{{acct_id}}_s3
          WITH TYPE = EXTERNAL_STAGE
          STORAGE_PROVIDER = S3
          ENABLED = TRUE
          STORAGE_AWS_ROLE_ARN = "arn:aws:iam::{{pod_mp_aws_account_id}}:role/ingest-pipeline-data-external-{{org_id}}-{{acct_id}}"
          STORAGE_AWS_OBJECT_ACL = "bucket-owner-full-control"
          STORAGE_ALLOWED_LOCATIONS = ("s3://{{pod}}-ingest-pipeline-data/{{org_id}}/{{acct_id}}");


GRANT USAGE ON INTEGRATION mp_{{pod}}_{{org_id}}_{{acct_id}}_s3 TO ROLE {{role_name}};

DESCRIBE INTEGRATION mp_{{pod}}_{{org_id}}_{{acct_id}}_s3;
The DESCRIBE command returns a number of different values. Copy the values for STORAGE_AWS_IAM_USER_ARN and STORAGE_AWS_EXTERNAL_ID as you will need to enter them in the next section.
Create a new service account for mParticle
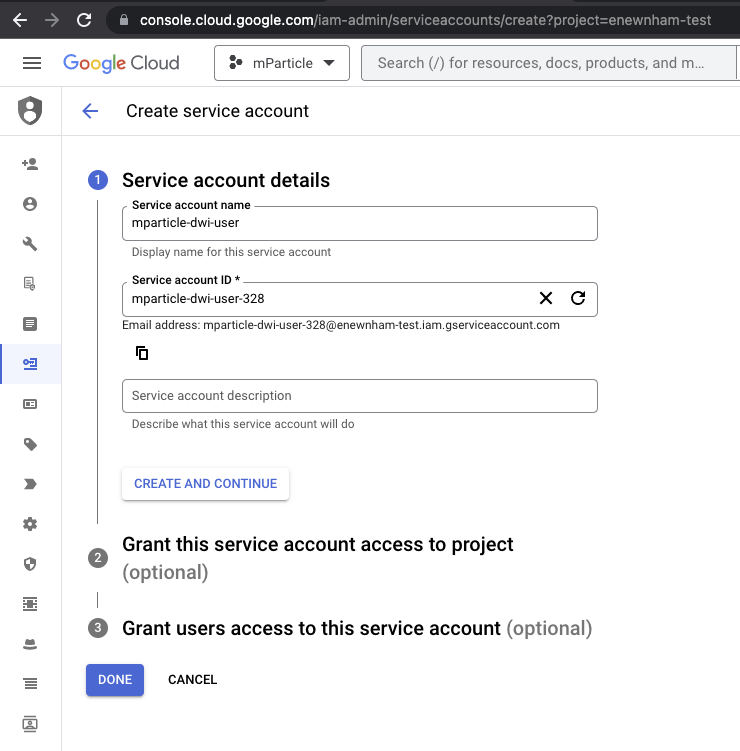
- Go to console.cloud.google.com, log in, and navigate to IAM & Admin > Service Accounts.
- Select Create Service Account.
- Enter a new identifier for mParticle in Service account ID. In the example below, the email address is the service account ID. Save this value for your Postman setup.
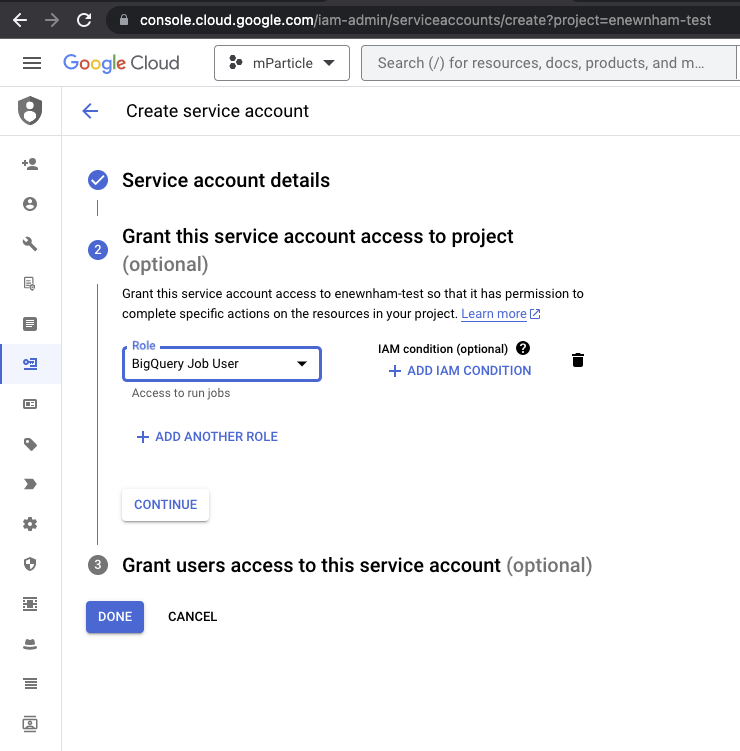
- Under Grant this service account access to project, select BigQuery Job User under the Role dropdown menu, and click DONE.
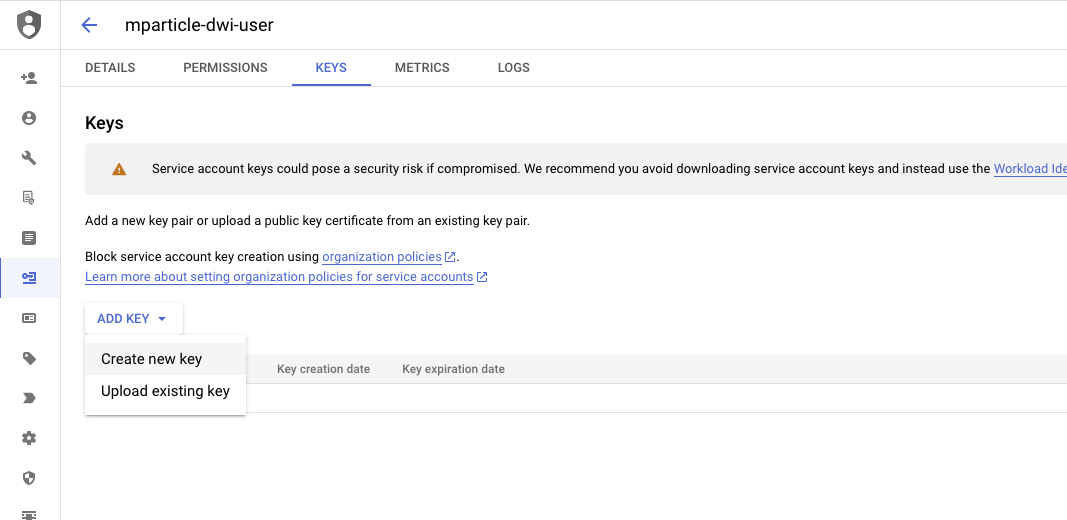
- Select your new service account and navigate to the Keys tab.
- Click ADD KEY and select Create new key. The value for
service_account_keywill be the contents of the generated JSON file. Save this value for your Postman setup.
Identify your BigQuery warehouse details
Navigate to your BigQuery instance from console.cloud.google.com.
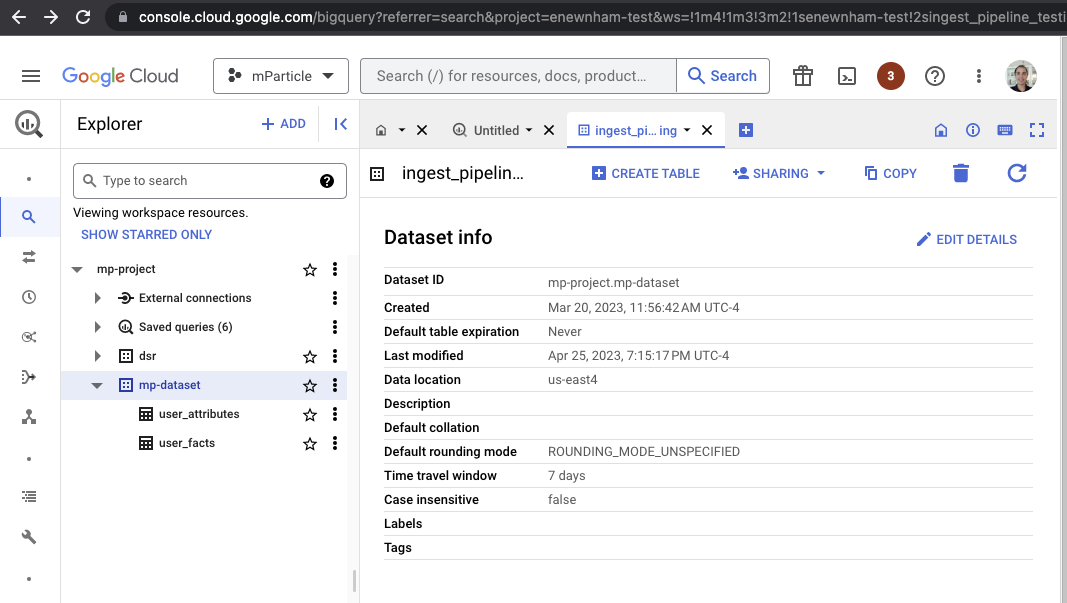
- Your
project_idis the first portion of Dataset ID (the portion before the.). In the example above, it ismp-project. - Your
dataset_idis the second portion of Dataset ID (the portion immediately after the.) In the example above, it ismp-dataset. - Your
regionis the Data location. This isus-east4in the example above.
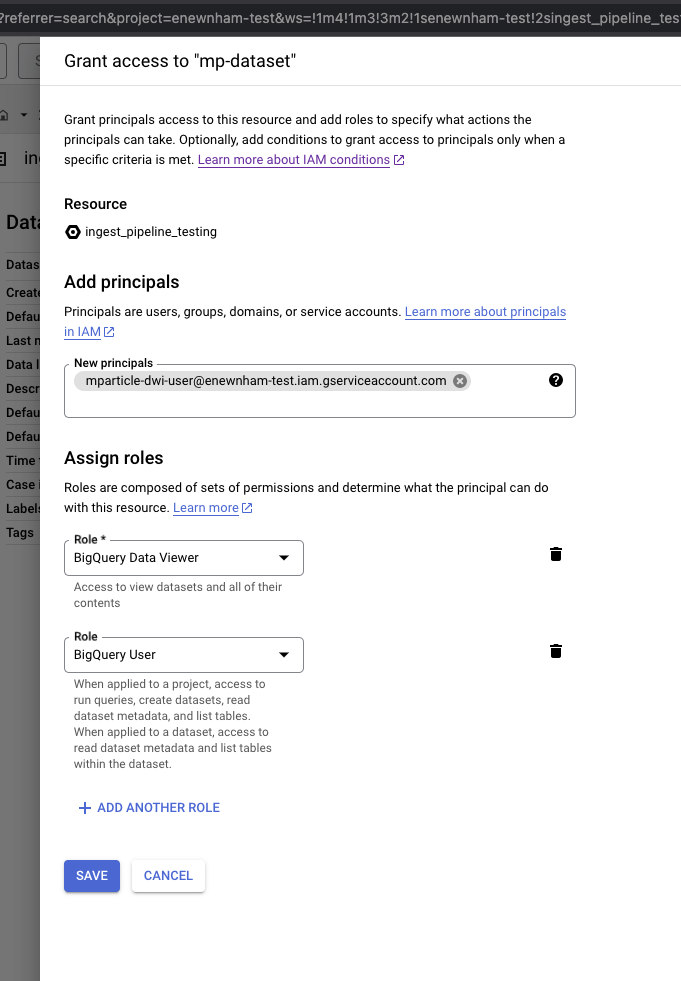
Grant access to the dataset in BigQuery
- From your BigQuery instance in console.cloud.google.com, click Sharing and select Permissions.
- Click Add Principle.
- Assign two Roles, one for BigQuery Data Viewer, and one for BigQuery User.
- Click Save.
- Navigate to your AWS Console, log in with your administrator account, then navigate to your Redshift cluster details.
- Run the following SQL queries to create a new user for mParticle, grant the necessary schema permissions to the new user, and grant the necessary access to your tables/views.
-- Create a unique user for mParticle
CREATE USER {{user_name}} WITH PASSWORD '{{unique_secure_password}}'

-- Grant schema usage permissions to the new user
GRANT USAGE ON SCHEMA {{schema_name}} TO {{user_name}}

-- Grant SELECT privilege on any tables/views mP needs to access to the new user
GRANT SELECT ON TABLE {{schema_name}}.{{table_name}} TO {{user_name}}- Navigate to the Identity And Access Management (IAM) dashboard, select Roles under the left hand nav bar, and click Create role.
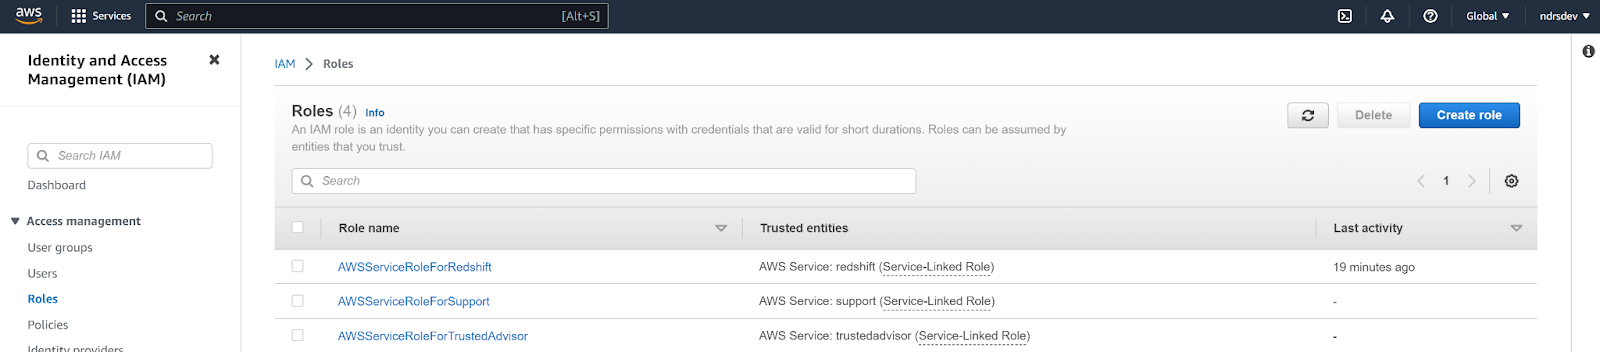
- In Step 1 Select trusted entity, click AWS service under Trusted entity
- Select Redshift from the dropdown menu titled “Use cases for other AWS services”, and select Redshift - Customizable. Click Next.

- In Step 2 Add permissions, click Create Policy.

- Click JSON in the policy editor, and enter the following permissions before clicking Next.
-
Replace
{pod_mp_aws_account_id}with one of the following values according to your mParticle instance’s location:- US1 =
338661164609 - US2 =
386705975570 - AU1 =
526464060896 - EU1 =
583371261087
- US1 =
{
    "Statement": [
        {
            "Action": "sts:AssumeRole",
            "Effect": "Allow",
            "Resource": "arn:aws:iam::{{pod_mp_aws_account_id}}:role/ingest-pipeline-data-external-{{org_id}}-{{acct_id}}",
            "Sid": ""
        }
    ],
    "Version": "2012-10-17"
}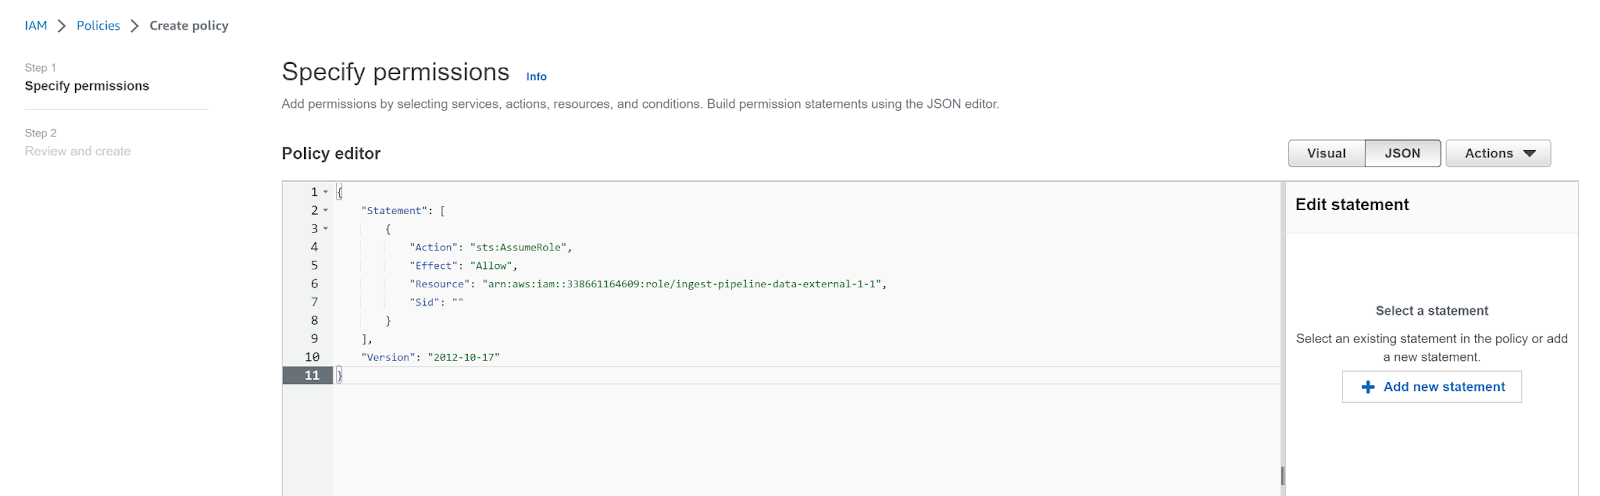
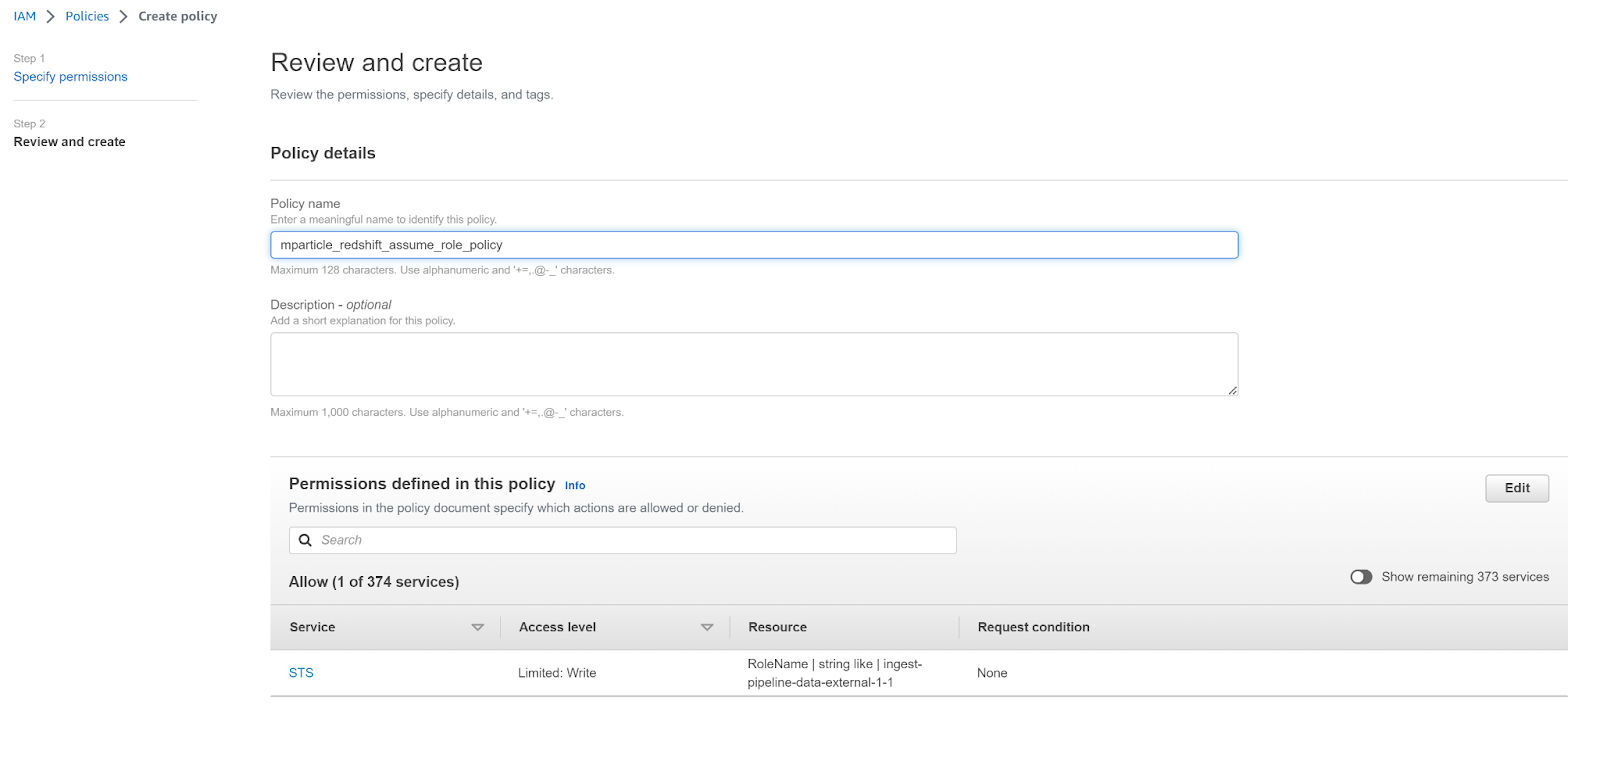
- Enter a meaningful name for your new policy, such as
mparticle_redshift_assume_role_policy, and click Create policy.
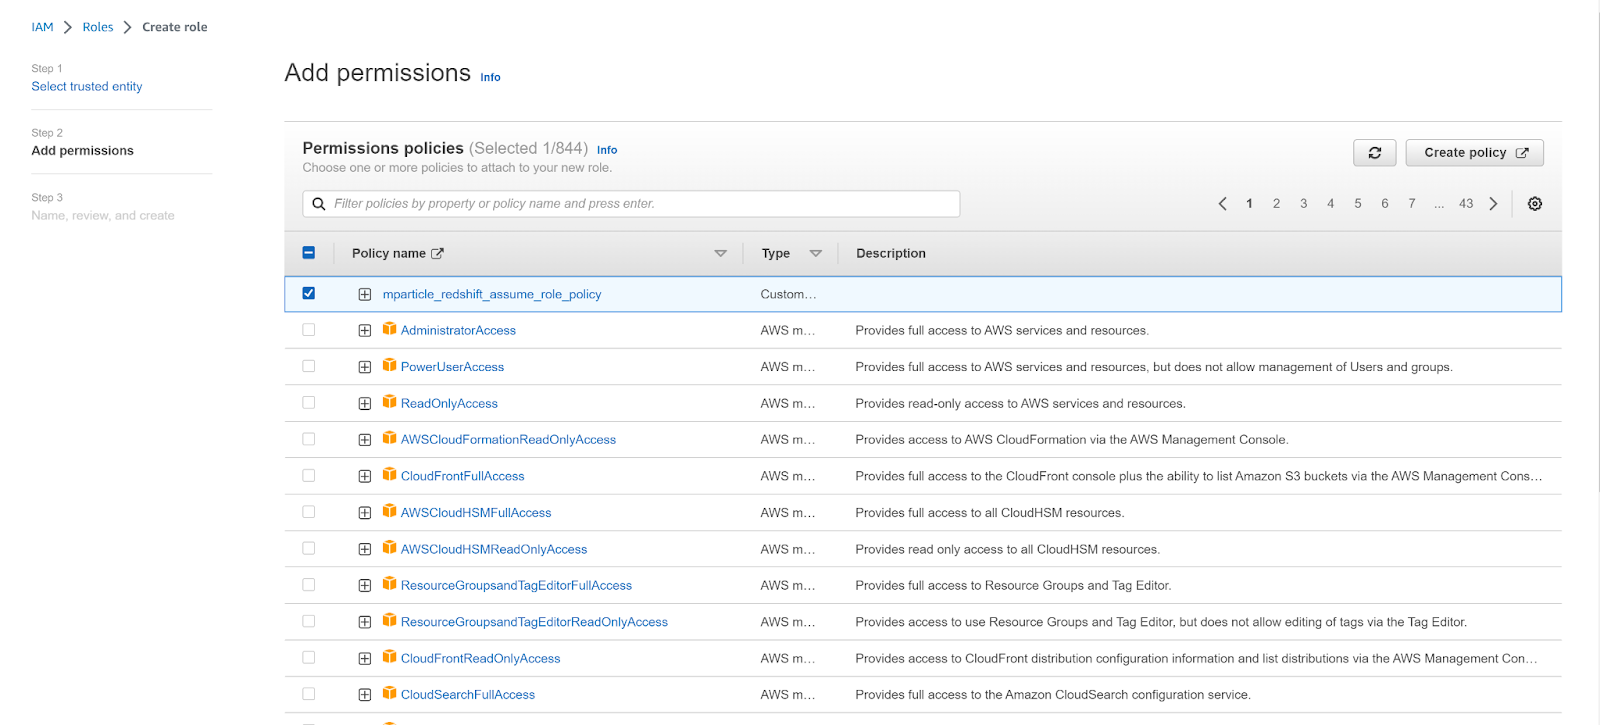
- Return to the Create role tab, click the refresh button, and select your new policy. Click Next.
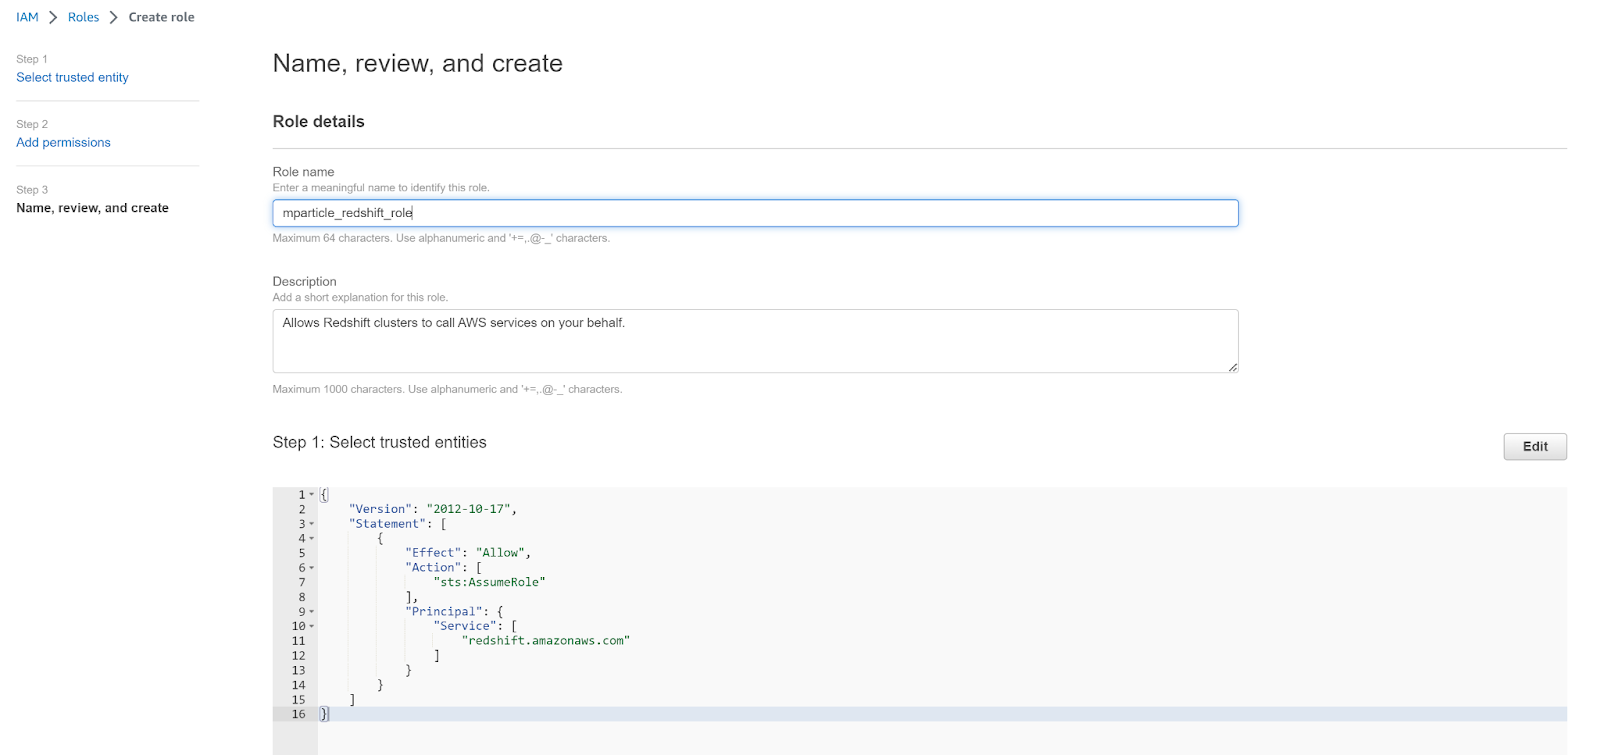
- Enter a meaningful name for your new role, such as
mparticle_redshift_roleand click Create role.
Your configuration will differ depending on whether you are using Amazon Redshift or Amazon Redshift Serverless. To complete your configuration, follow the appropriate steps below:
Make sure to save the value of your new role’s ARN. You will need to use this when setting up Postman in the next section.
Amazon Redshift (not serverless)
- Navigate to your AWS Console, then navigate to Redshift cluster details. Select the Properties tab.
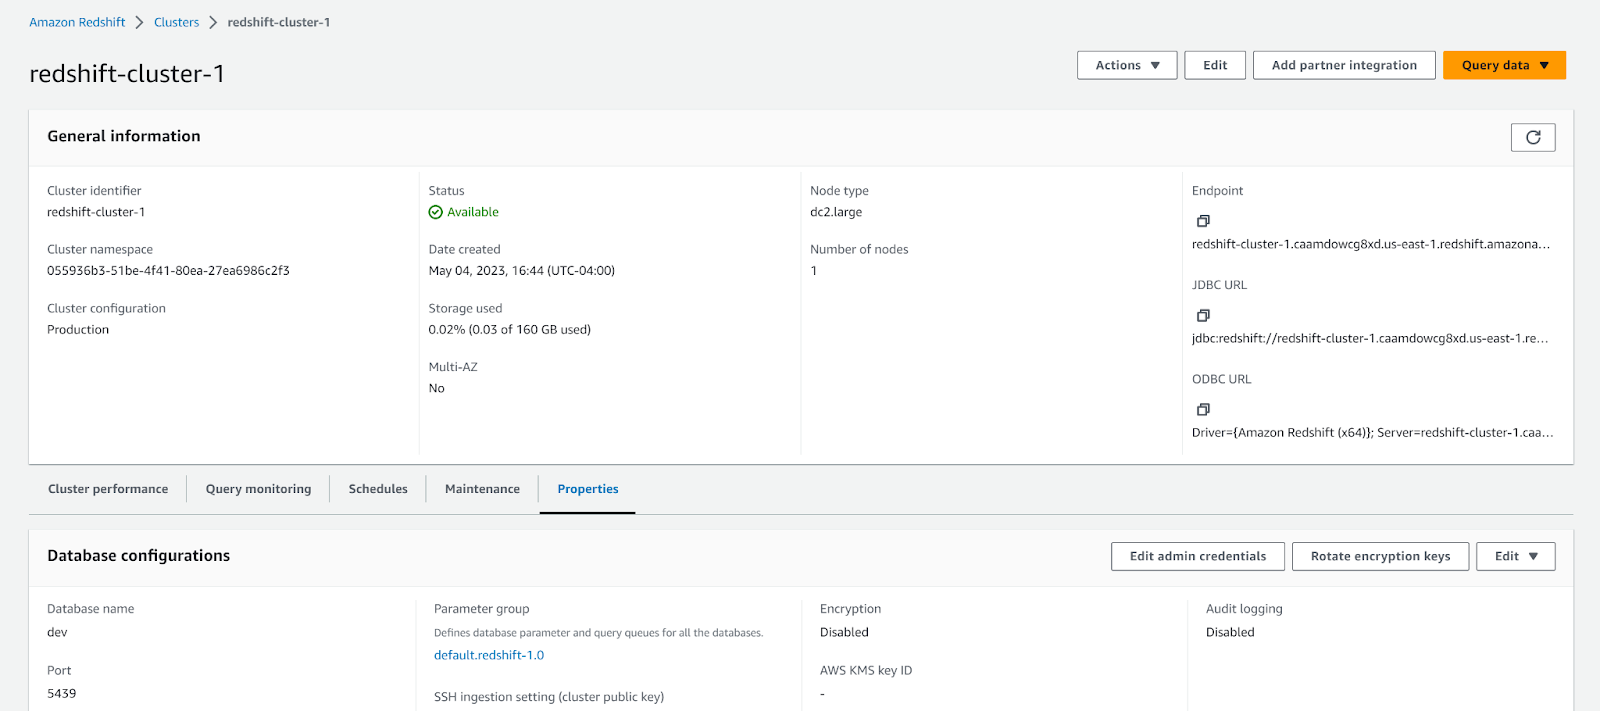
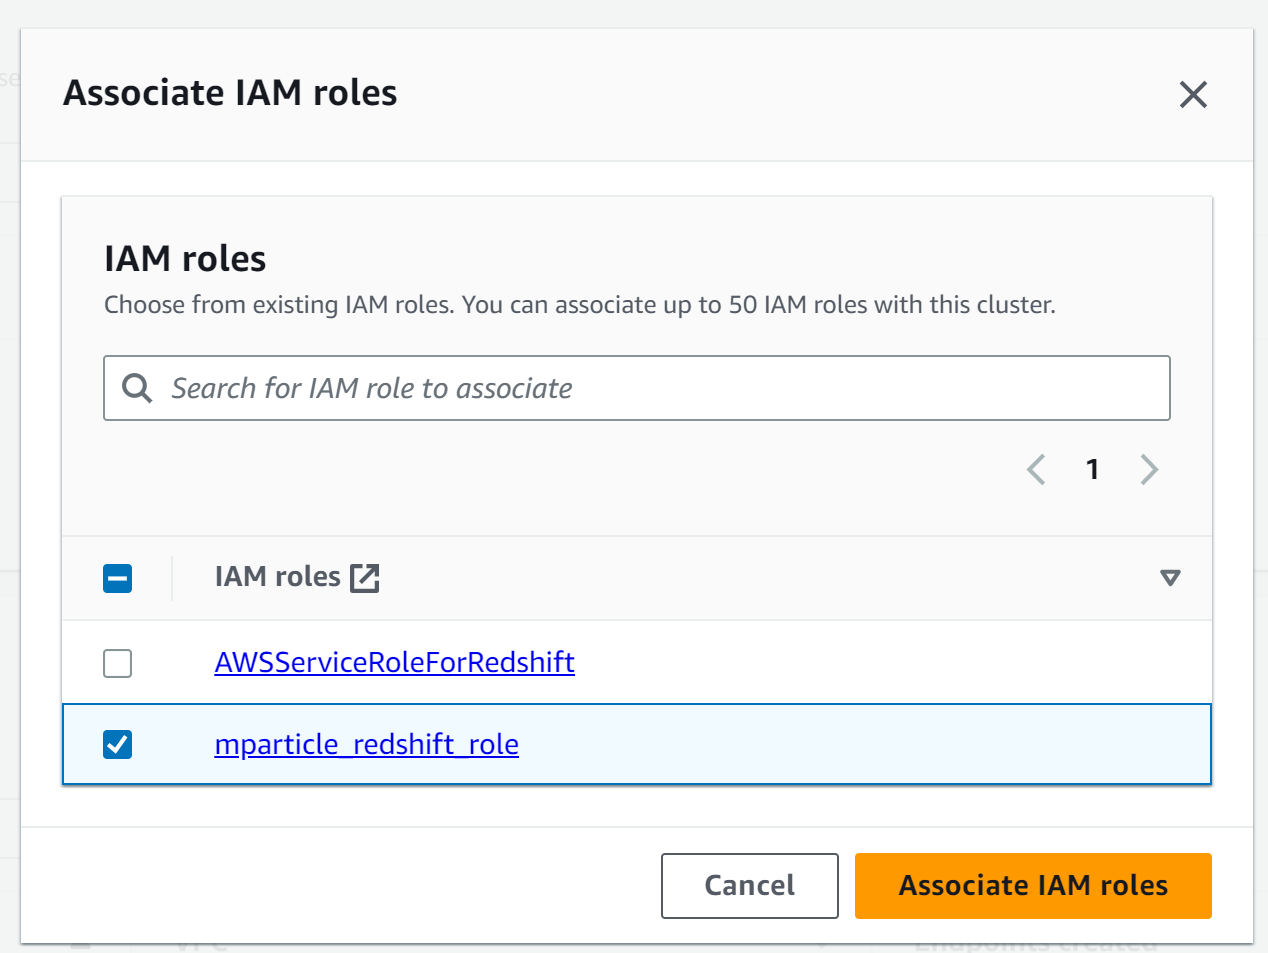
- Scroll to Associated IAM roles, and select Associate IAM Roles from the Manage IAM roles dropdown menu.
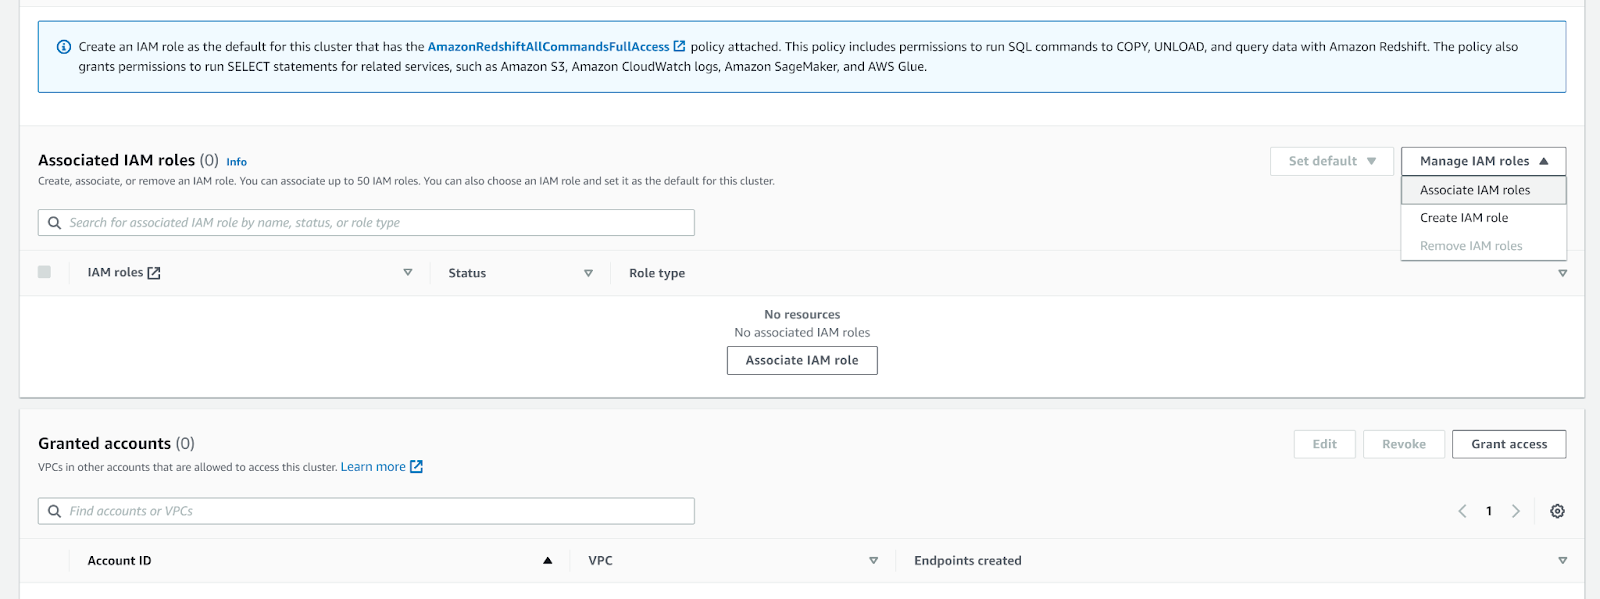
- Select the new role you just created. The name for the role in this example is
mparticle_redshift_role.
Amazon Redshift Serverless
- Navigate to your AWS Console, then navigate to your Redshift namespace configuration. Select the Security & Encryption tab, and click Manage IAM roles.
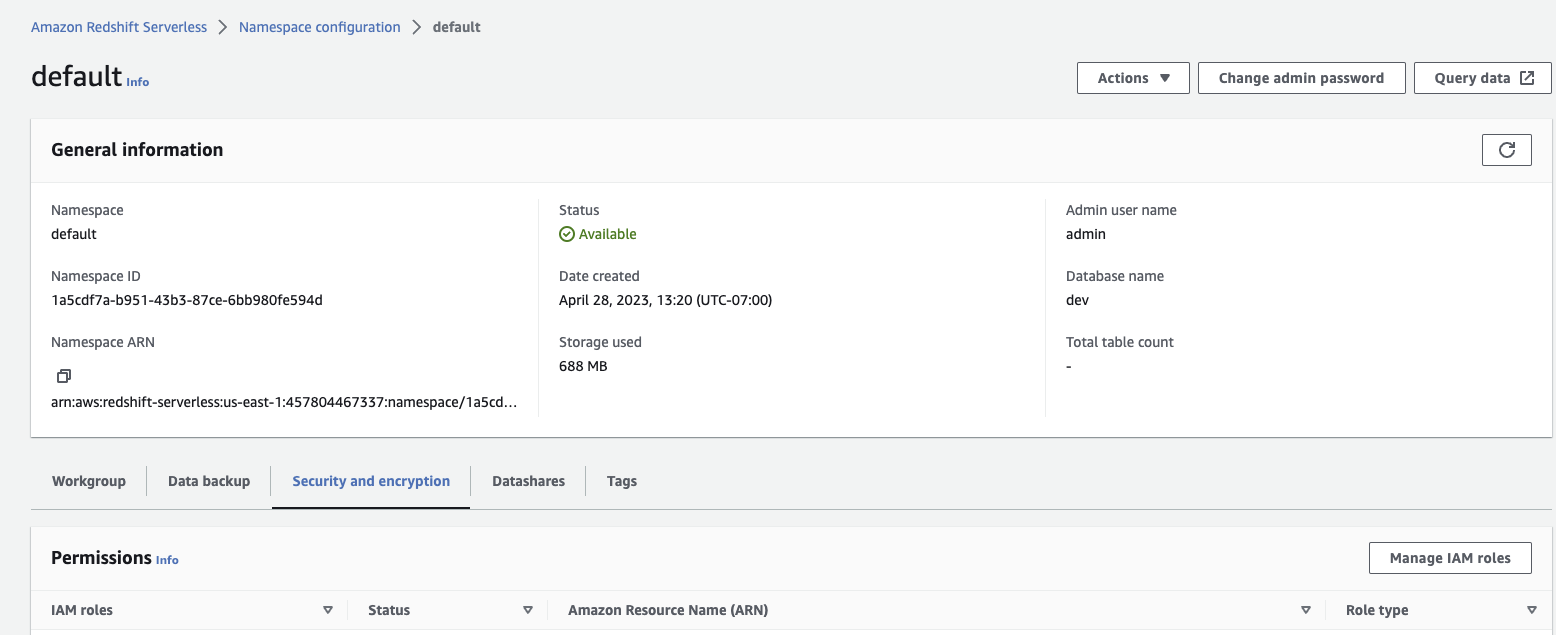
- Select Associate IAM roles from the Manage IAM roles dropdown menu.
- Select the new role you just created. The name for the role in this example is
mparticle_redshift_role.
Step 3. Postman setup
Once you have installed Postman, configure the collection environment.
Update Postman environment settings
- Ensure you have forked mParticle Warehouse Sync Postman Collection in the Prerequisites section. In Postman, click the Environments tab on the left hand navigation.
-
Once successfully forked, you’ll see it in the list of Environment configurations. You can rename it to something more meaningful by right-clicking on the … next to the name and choosing the Rename option.
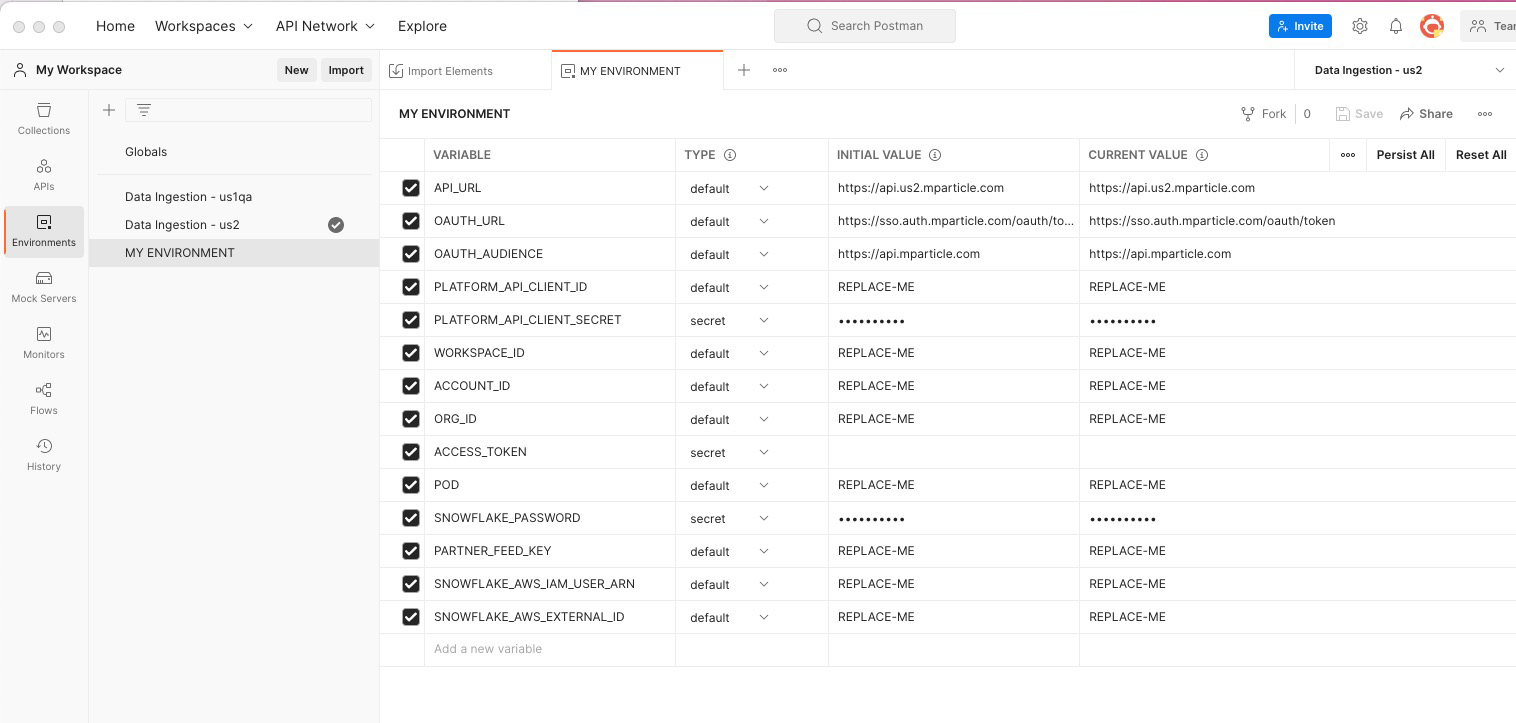
-
Replace the placeholder value “REPLACE_ME” for several environment variables with values corresponding to your environment. Ensure you update the values in the CURRENT VALUE column.
- Replace PLATFORM_API_CLIENT_ID and PLATFORM_API_CLIENT_SECRET with the Platform API credentials from the mParticle Setup Section.
-
Replace WORKSPACE_ID, ACCOUNT_ID, and ORG_ID with the corresponding values.
- To find your Org ID, log into the mParticle app. View the page source. For example, in Google Chrome, go to View > Developer > View Page Source. In the resulting source for the page, look for “orgId”:xxx. This number is your Org ID.
- Follow a similar process to find your Account ID (“accountId”:yyy) and Workspace ID (“workspaceId”:zzz).
- Replace POD with the POD your mParticle account is deployed on. Look at the URL in your browser where you are signed into mParticle. The POD is one of the following values: US1, US2, EU1, AU1.
- Replace PASSWORD with the password of the warehouse user account you defined in the Data Warehouse Setup section.
-
Enter the corresponding data warehouse username and password you copied down in “Step 2. Data Warehouse Setup.” according to the data warehouse you are using.
- For Snowflake, replace SNOWFLAKE_AWS_IAM_USER_ARN and SNOWFLAKE_AWS_EXTERNAL_ID with the values you copied from step 2.
- For BigQuery, replace SERVICE_ACCOUNT_ID with the service account ID you used in BigQuery, and replace SERVICE_ACCOUNT_KEY with the key from the generated JSON file in step 2.
- For Redshift, replace REDSHIFT_AWS_IAM_ROLE_ARN with the ARN of the role created in step 2.
- After updating all the values, click COMMAND-S (or CTRL-S) to save your changes.
Update the Postman collection
- Ensure you have forked the mParticle Warehouse Sync Postman Collection in the Prerequisites section. In Postman, click the Collections tab on the left hand navigation.
- Once successfully forked, you’ll see the collection in the list of available collections.
-
Click the Warehouse Sync collection to expand it. Then click the Variables tab.
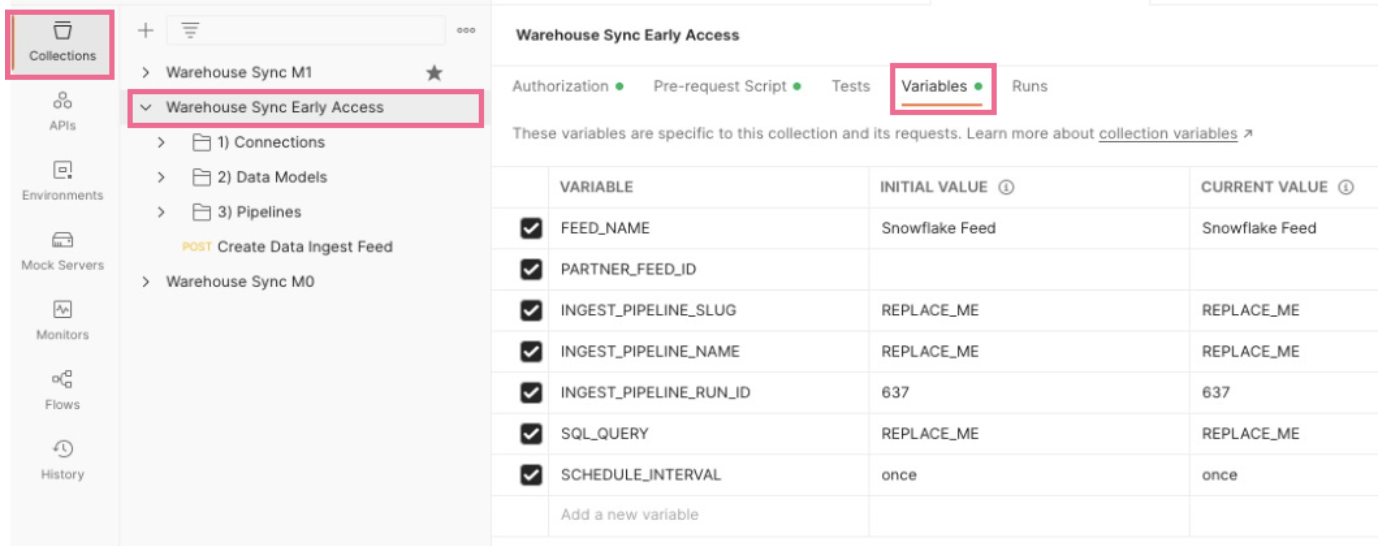
-
Replace placeholder values (the ones indicated with “REPLACE_ME”) for several variables with the values corresponding to your environment. Ensure you update the values in the CURRENT VALUE column.
- Replace INGEST_PIPELINE_SLUG and INGEST_PIPELINE_NAME with values for what you’d like to call the pipeline you’ll be creating.
-
Replace SQL_QUERY with the database query mParticle should use to retrieve the data from your warehouse. SQL is a powerful language and you can use advanced expressions to filter, aggregate, join, etc. your data. Work with your database administrator if you need help crafting the right SQL query:
- Your query can contain a timestamp column that mParticle will use to keep track of which rows need to be loaded.
- Your query should contain one or more user identity columns that mParticle will use to perform identity resolution to ensure that data ends up on the correct user profile.
-
As part of the SQL query, you must specify how columns in the query will map to attributes on a user’s profile. You do this by using column aliasing in SQL. For example, in the following query, the column
cidin Snowflake is being mapped to the mParticle attributecustomer_id.
If you don’t provide an alias, mParticle will use the name of the column in your database. If an attribute of this name does not already exist on the user’s profile, mParticle will create a new attribute with this name.
- Before using the query in mParticle, test the query outside of mParticle to ensure it is returning the data you think it will.
- To learn more checkout the Warehouse Sync SQL reference
- After updating all the values, click COMMAND-S (or CTRL-S) to save your changes.
Step 4: Create your first Warehouse Sync pipeline
Creating a Warehouse Sync pipeline takes four steps:
- Create the partner feed.
- Create the connection.
- Create the data model.
- Create the pipeline.
- Monitor the pipeline.
Create the partner feed
The first step is to create a feed. mParticle uses this information for rules, and connections in your workspace. By submitting a request to the Feeds API. You will need to provide a value for module_name that corresponds with the data warehouse you are configuring with Warehouse Sync. Valid values for module_name are Redshift, BigQuery, or Snowflake. Note that these values are case sensitive. For example, if you use snowflake instead of Snowflake, you will encounter errors later in your configuration.
- In Postman, ensure the environment drop-down is pointed to the Environment configuration you recently imported.
- Expand the Warehouse Sync Collection and open the Feeds folder.
- Click Create Warehouse Sync Feed.
-
Click the Body tab to see the information you will pass to the API in order to create the feed.
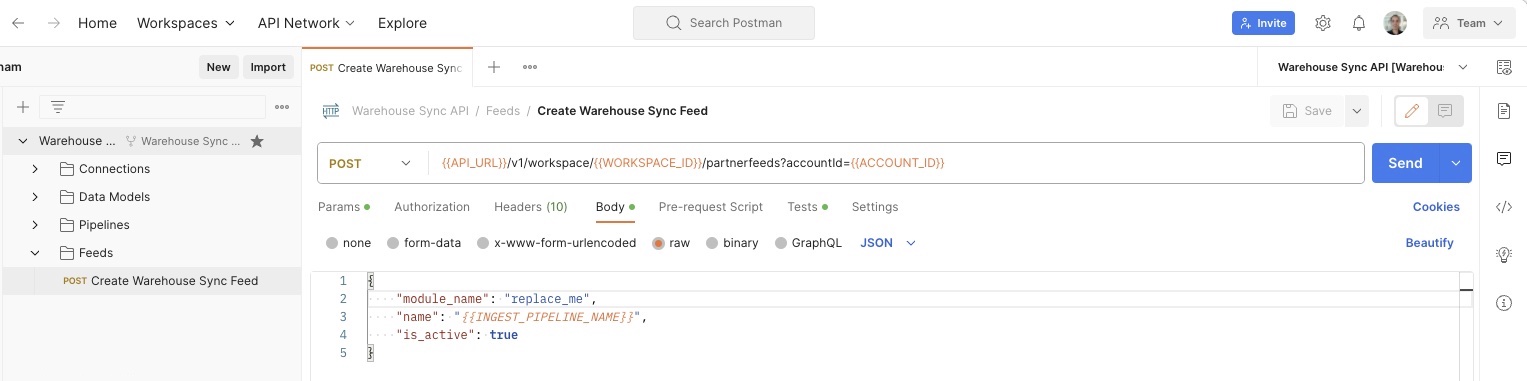
module_namecan be one ofSnowflake,BigQuery, orRedshift
The values in
{{Sample Values}}will be taken from the variables you updated in previous steps. -
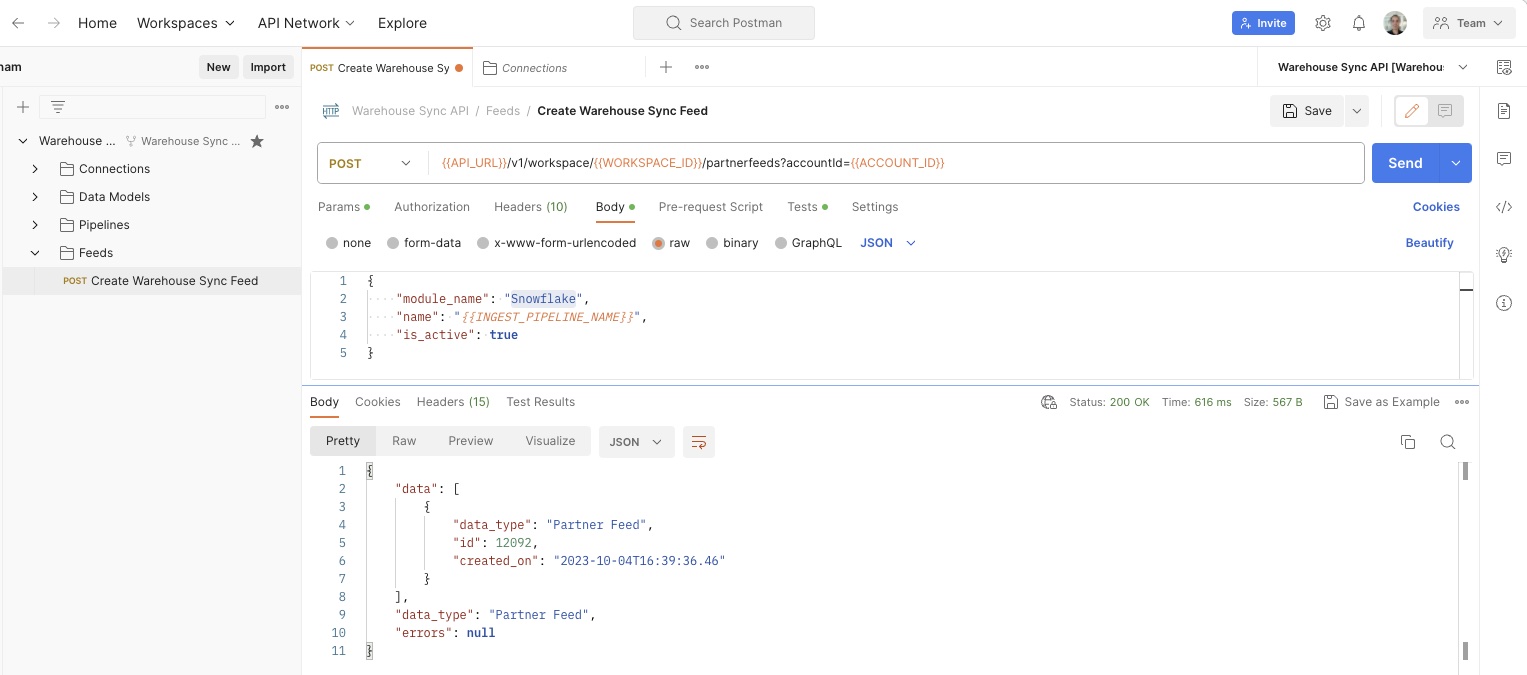
Once you are confident all values are correct, click the blue Send button to issue the API request that creates the feed. If everything is correct, mParticle returns a success message with details about the feed you just created. If the request was not successful, mParticle returns an error message with additional information about what the issue might be.
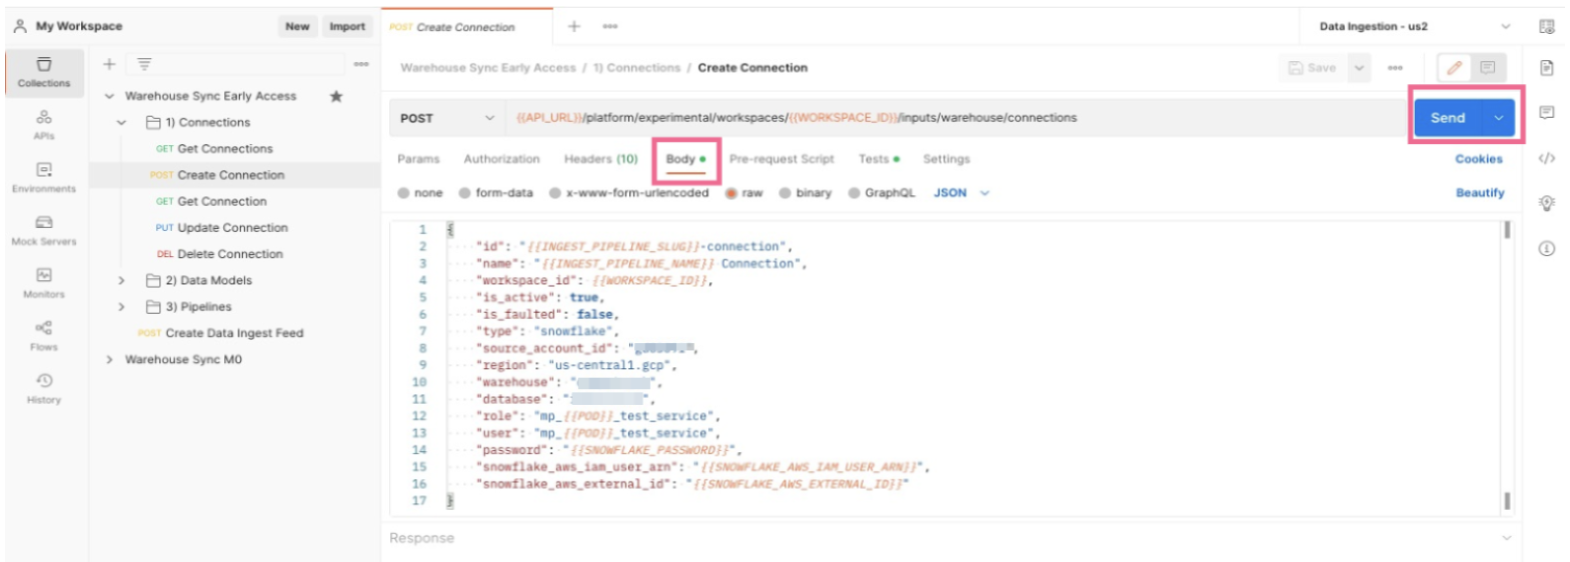
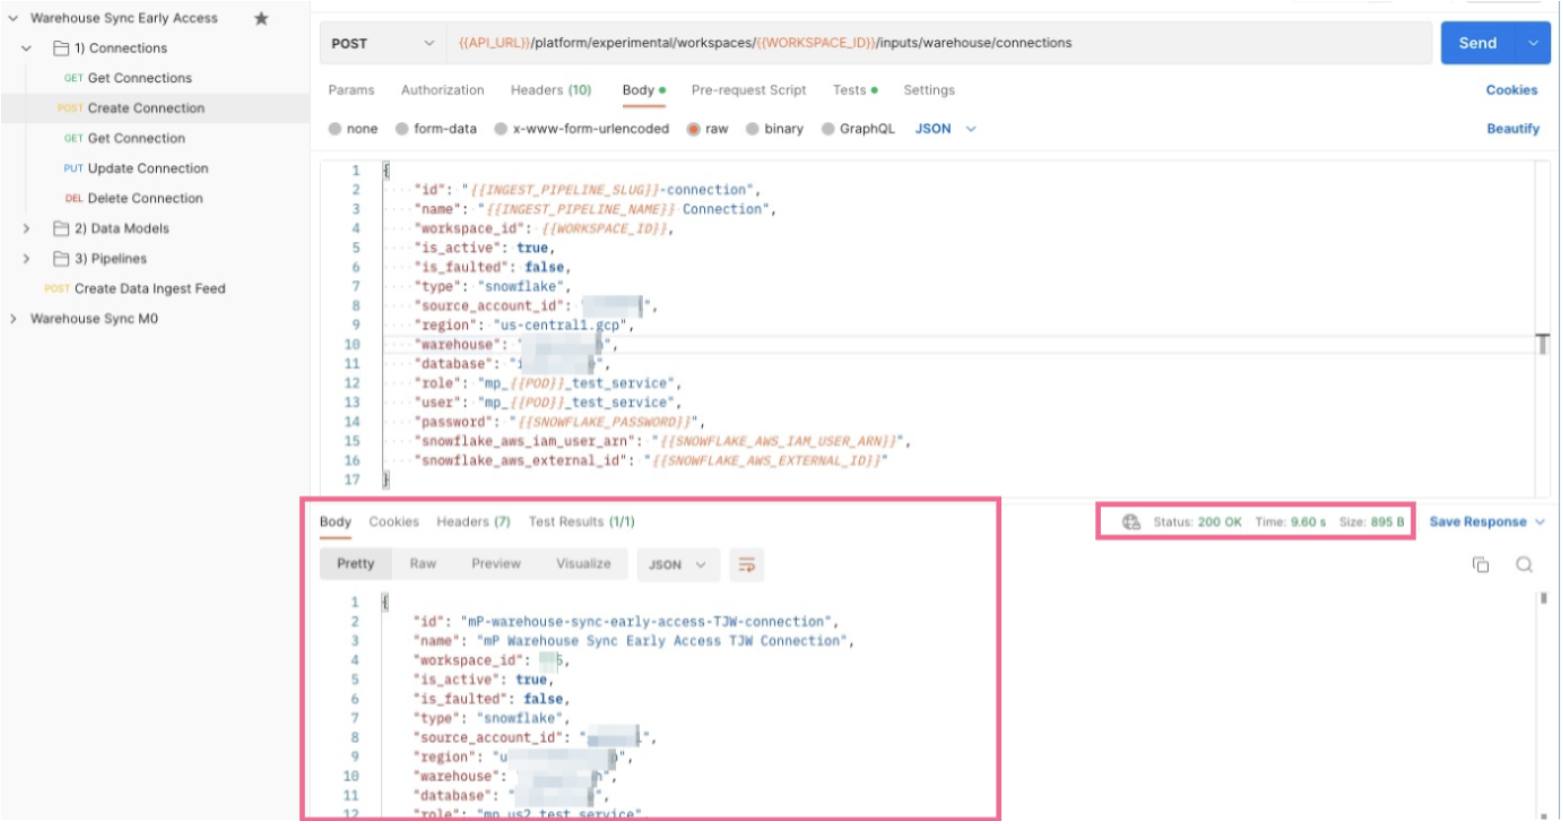
Create the connection
The next step is to create a connection. mParticle uses this information in order to establish a connection with your data warehouse.
-
In Postman, ensure the environment drop-down is pointed to the Environment configuration you recently imported.

- Expand the Warehouse Sync Collection and open the 1) Connections folder.
- Click POST Create Connection.
-
Click the Body tab to see the information you will pass to the API in order to create the connection.
The values in
{{Sample Values}}is taken from the environment variables you updated in earlier steps. Make sure these values match the values for your organization’s data warehouse. You may need to work with your database administrator to ensure you have the correct values. -
Once you are confident all values are correct, click the blue Send button to issue the API call to create the Connection configuration. If everything is correct, mParticle will return a success message with details about the configuration you just created. If it was not successful, you will get an error message with additional information pointing to what the issue might be.
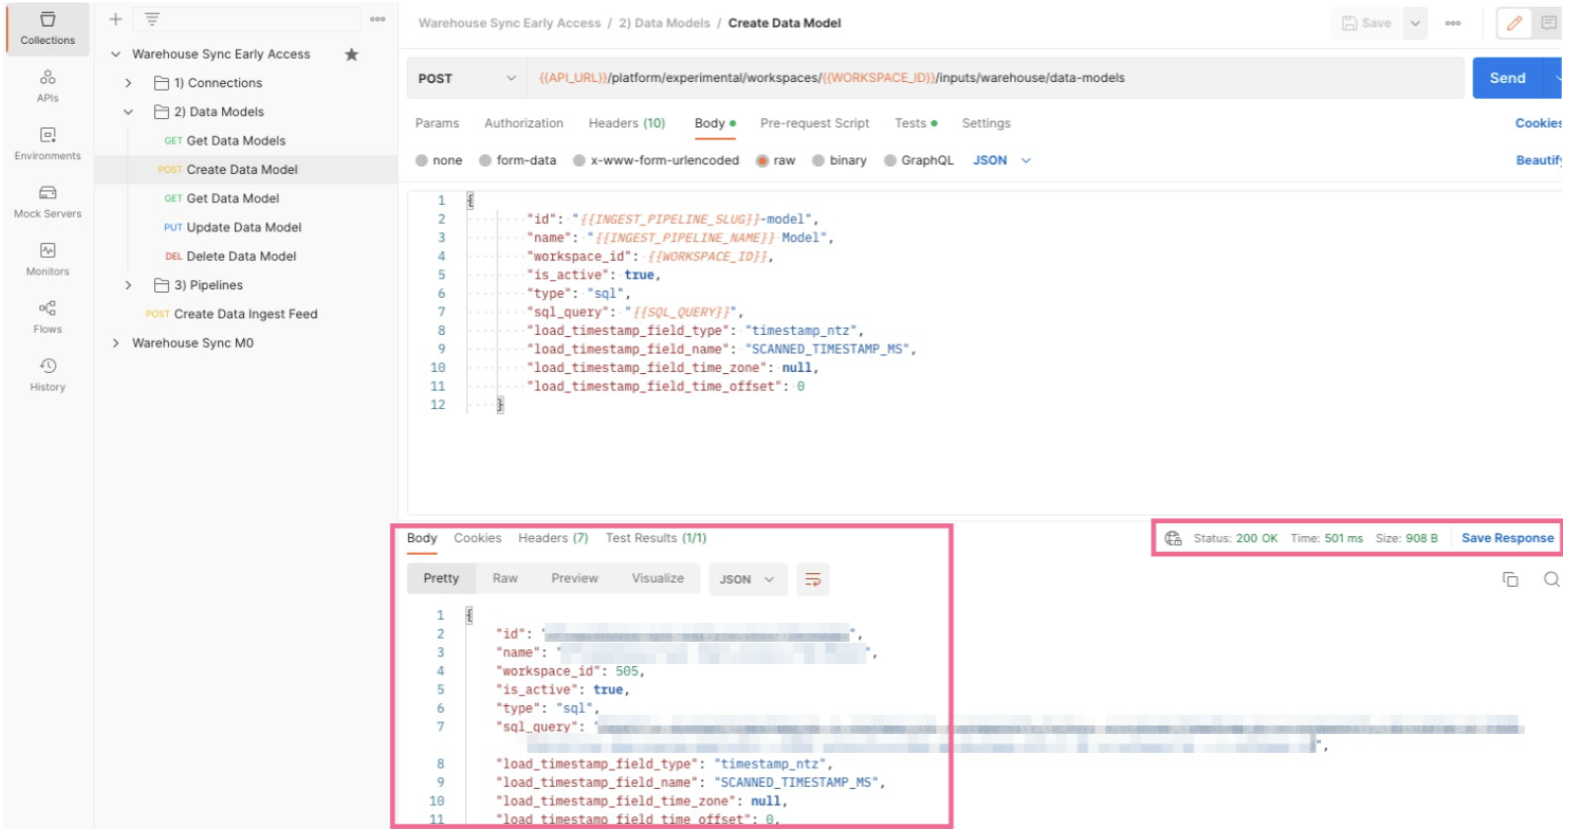
Create the data model
The second step in the pipeline creation process is creating a data model. mParticle uses this information in order to determine what data should be extracted from your database and how it will map to mParticle’s data model.
- In Postman, expand Warehouse Sync Collection and open the 2) Data Models folder.
- Click the Create Data Model request.
-
Click the Body tab to see the information you will pass to mParticle in order to create the data model.

-
The values in
{{Sample Values}}will be taken from the variables you updated in previous steps. If your SQL Query provided in an earlier step includes a timestamp field, update the values forload_timestamp_field_type,load_timestamp_field_name, andload_timestamp_field_time_zoneto match. They should be blank if your SQL Query does not contain a timestamp.-
load_timestamp_field_typeis the warehouse data type of your timestamp column.- The timestamp values for Snowflake are:
timestamp_ltz, timestamp_ntz, timestamp_tz, datetime, date, timestamp_unixtime_ms, timestamp_unixtime_s. - The timestamp values for Google BigQuery are
datetime,date,timestamp,timestamp_unixtime_ms,timestamp_unixtime_s. - The timestamp values for AWS Redshift are
date,timestamp,timestamptz,timestamp_unixtime_ms,timestamp_unixtime_s.
- The timestamp values for Snowflake are:
load_timestamp_field_nameis the timestamp column name in your SQL query.load_timestamp_field_time_zoneindicates whether the field has an associated time zone. Specify a valid IANA timezone value here (ex: America/New_York). — List of IANA values.
-
-
Once you are confident all values are correct, click the blue Send button to issue the API request that creates the data model. If everything is correct, mParticle returns a success message with details about the data model you just created. If the request was not successful, mParticle returns an error message with additional information about what the issue might be.
Create the pipeline
The final step in the process is creating the pipeline itself. You will pass in the Connection and Data Model configurations previously created and provide a few additional details.
- In Postman, expand Warehouse Sync Collection and open the 3) Pipelines folder.
- Click the request called
Create Pipeline. -
Click the Body tab to see the information you will pass to mParticle in order to create the Pipeline configuration.
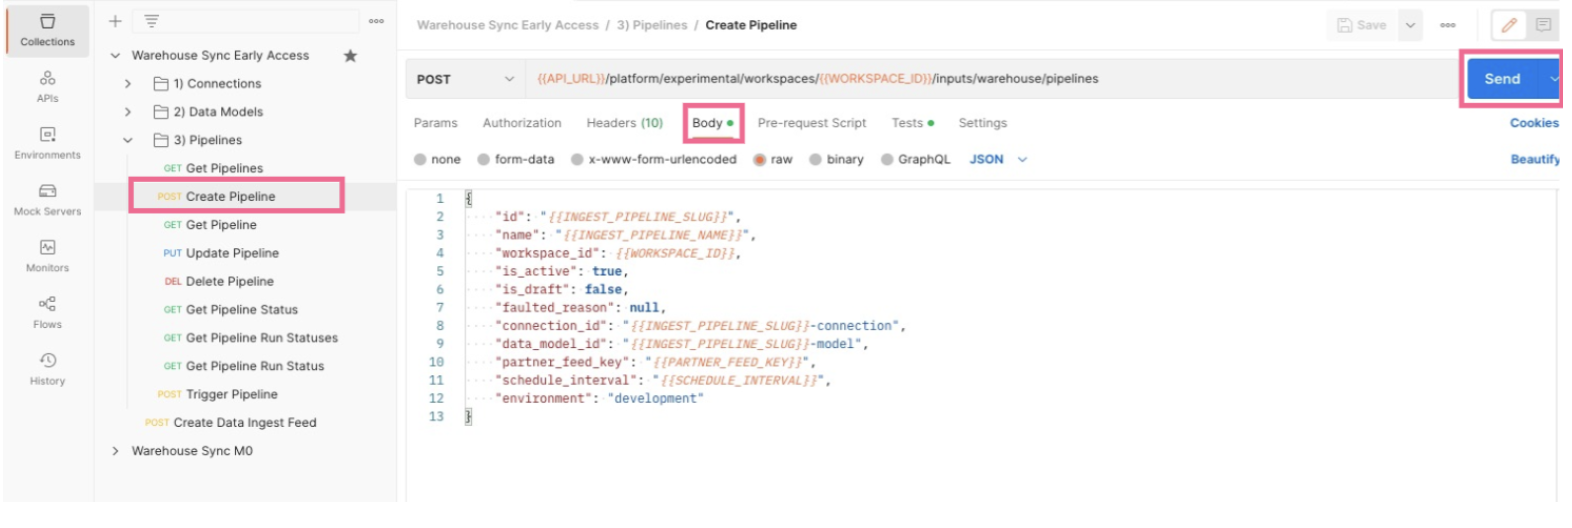
The values in
{{Sample Values}}will be taken from the variables you updated in previous steps. No values are required to be updated in this step. You can optionally update theenvironmentvariable. It is currently set to target your mParticle development environment, but you can change it to target your production environment. - You can associate an optional data plan with your data warehouse pipeline to help improve the quality of, and grant you more control over, the data imported to mParticle from your warehouse. In the request body of your call to the Data Warehouse Sync API, include the body parameters
"plan_id"andplan_versionand set these to the values of the data plan and version you want to use. You must use a data plan version that is active and that exists within the workspace you are creating the pipeline. -
Once you are confident all values are correct, click the blue Send button to issue the API request that creates the Pipeline configuration. If everything is correct, mParticle returns a success message with details about the configuration you just created. If it was not successful, mParticle returns an error message with additional information about what the issue might be. If you kept the default value for the
scheduled_interval(set to “once”), the pipeline kicks off immediately after creation and only runs once. You can set ithourly,daily, orweekly.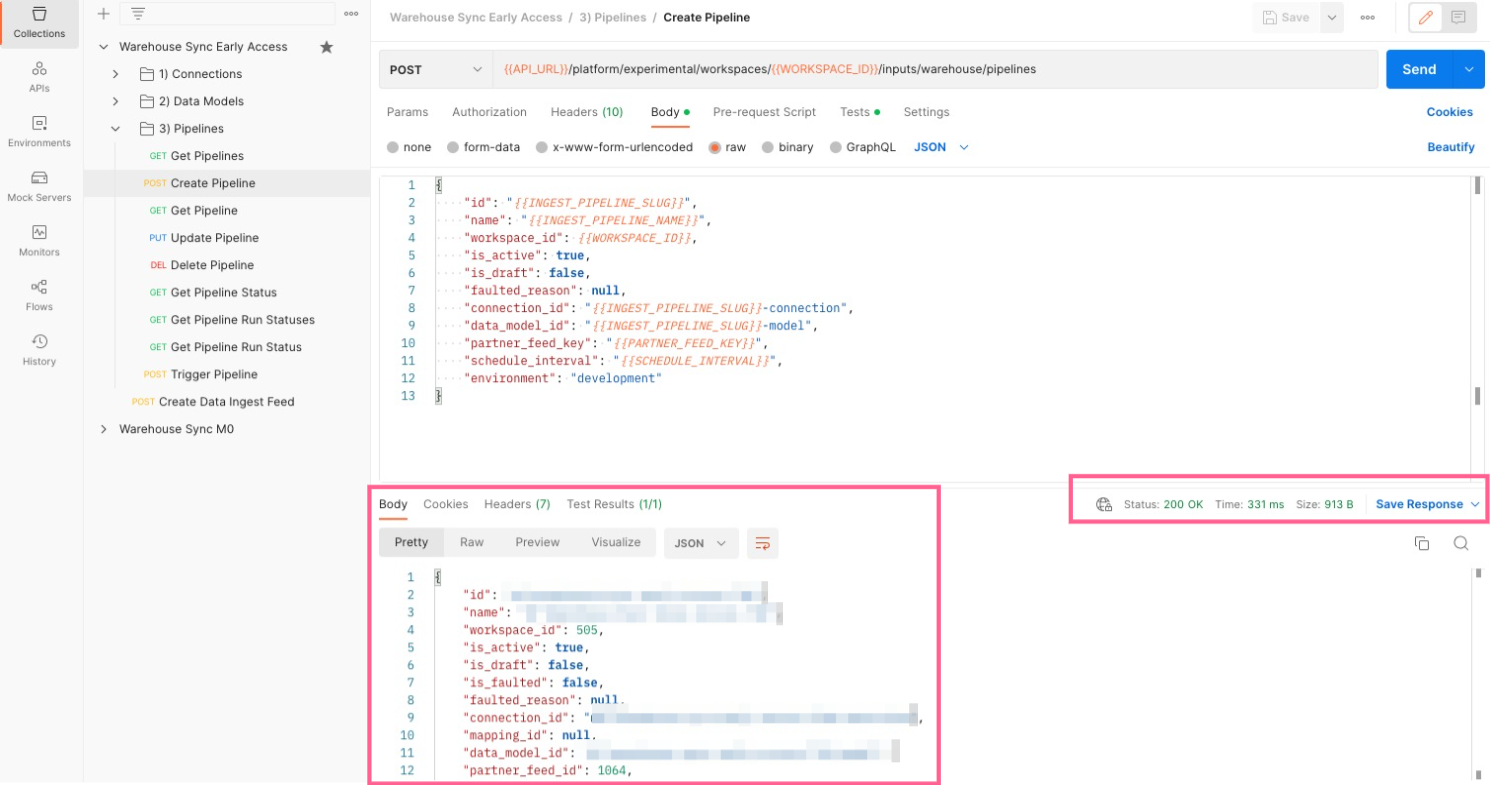
Monitor the pipeline
Once a pipeline has been created, you can monitor its status using the additional requests provided in the Postman collection.
- In Postman, expand the Warehouse Sync Collection and open the 3) Pipelines folder.
- Click the
Get Pipeline Statusrequest. - Click the blue Send button to submit the request.
-
mParticle sends a detailed message with the pipeline’s current status. Note that after creating a pipeline, there is an approximate one-minute delay until the pipeline is created in the mParticle backend, so submitting a
Get Pipeline Statuscall results in aNot Founderror. Try again in a minute if you experience this.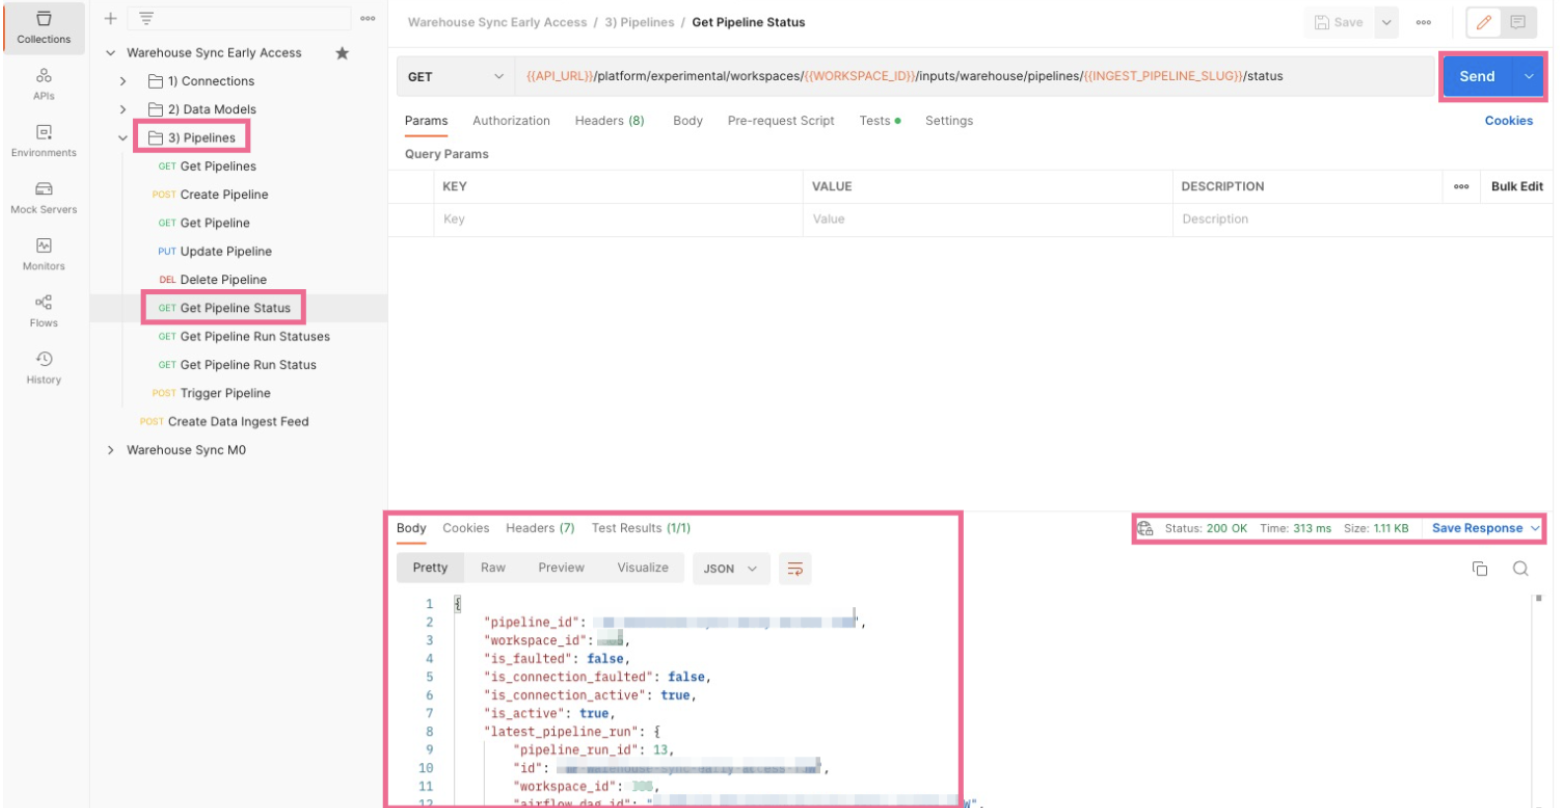
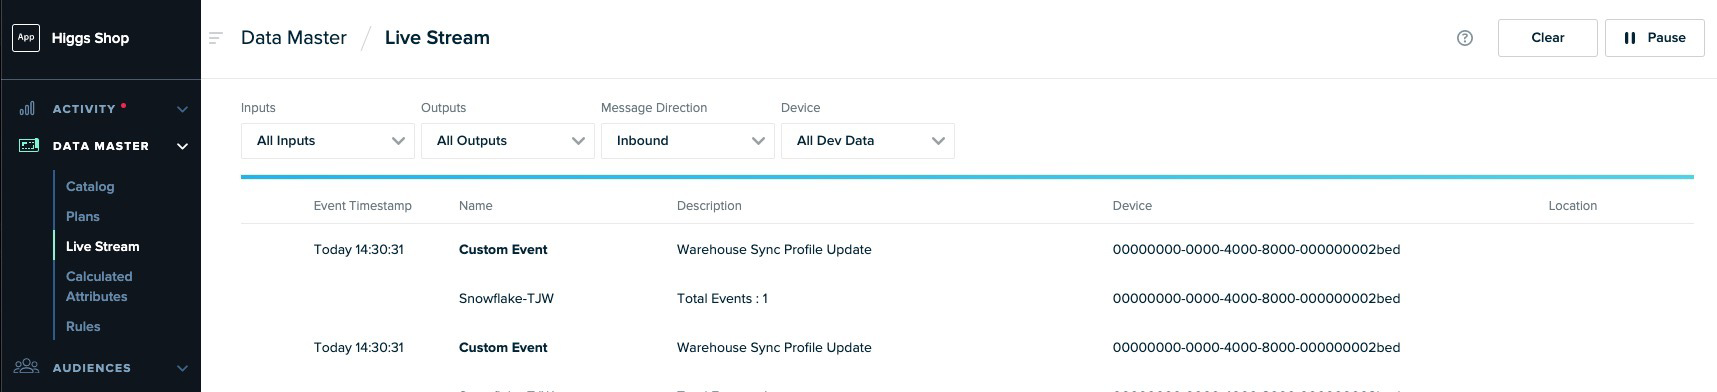
-
While a Pipeline is ingesting data, monitor it in mParticle, just like you do with other inputs. From mParticle, go to Data Master > Live Stream to inspect the incoming data from Snowflake.
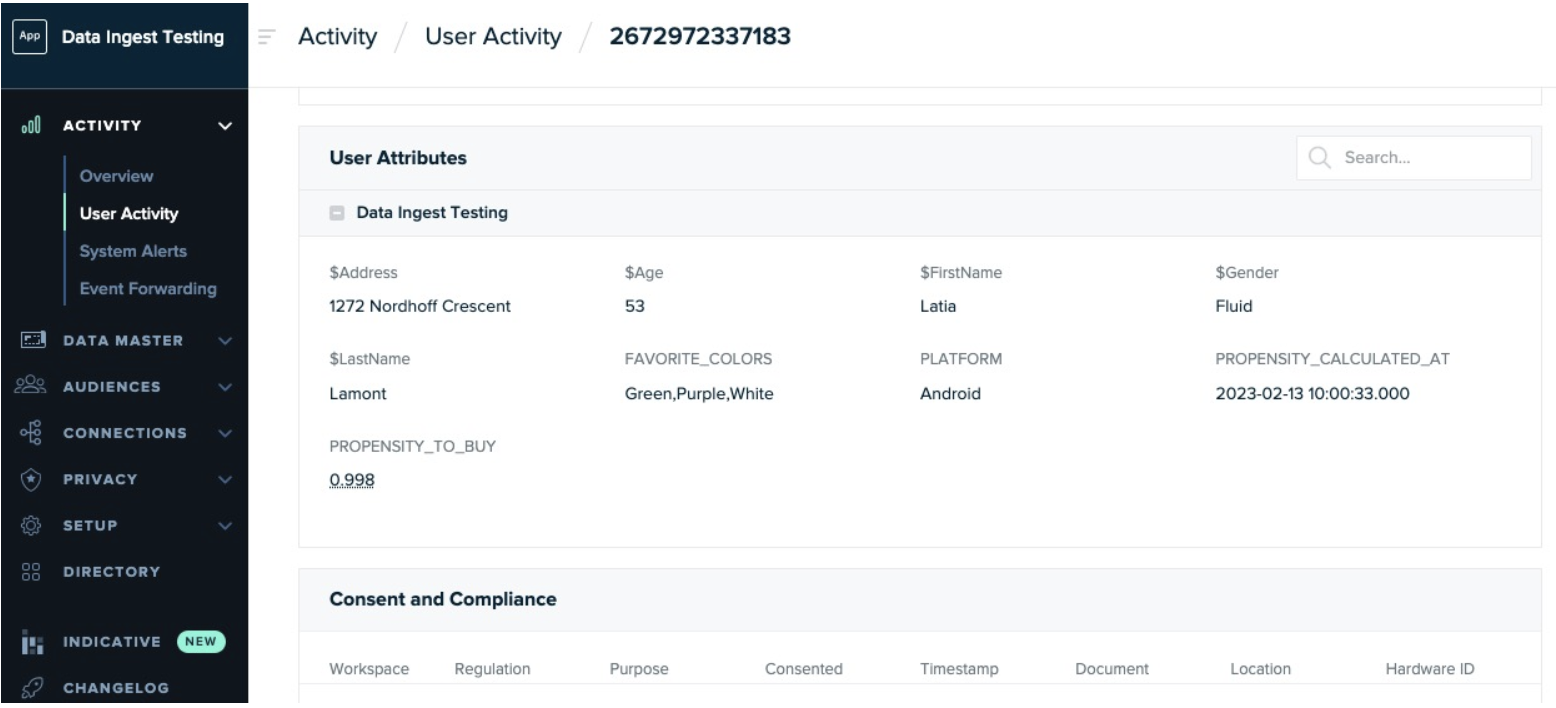
-
Once the data is ingested, you will see the data points appear on the User’s Profile. Go to Activity > User Activity and look up a sample profile. If the attributes do not show up the way you thought they would, validate the mapping/aliasing you provided in the SQL Query provided earlier.
Step 5. Activate the data
Now that the data has been loaded into mParticle, it’s time to activate it.
For this section of the tutorial, we will create an audience that uses the loaded data and sends it to a downstream integration.
Create an audience
Create an audience that uses one of the attributes we ingested as a qualifying criteria for it:
- In the mParticle app, go to Audiences > Standard.
- Click the green New Standard Audience in the upper right corner.
- Give the audience a name.
- Select a date range, or choose “All available data.”
- Select the Warehouse Sync feed you created in mParticle Setup.
-
Add an audience criteria that leverages one of the data points you ingested from your warehouse. In the example below, we only want to consider users who have a propensity-to-buy score that’s greater than 0.7.
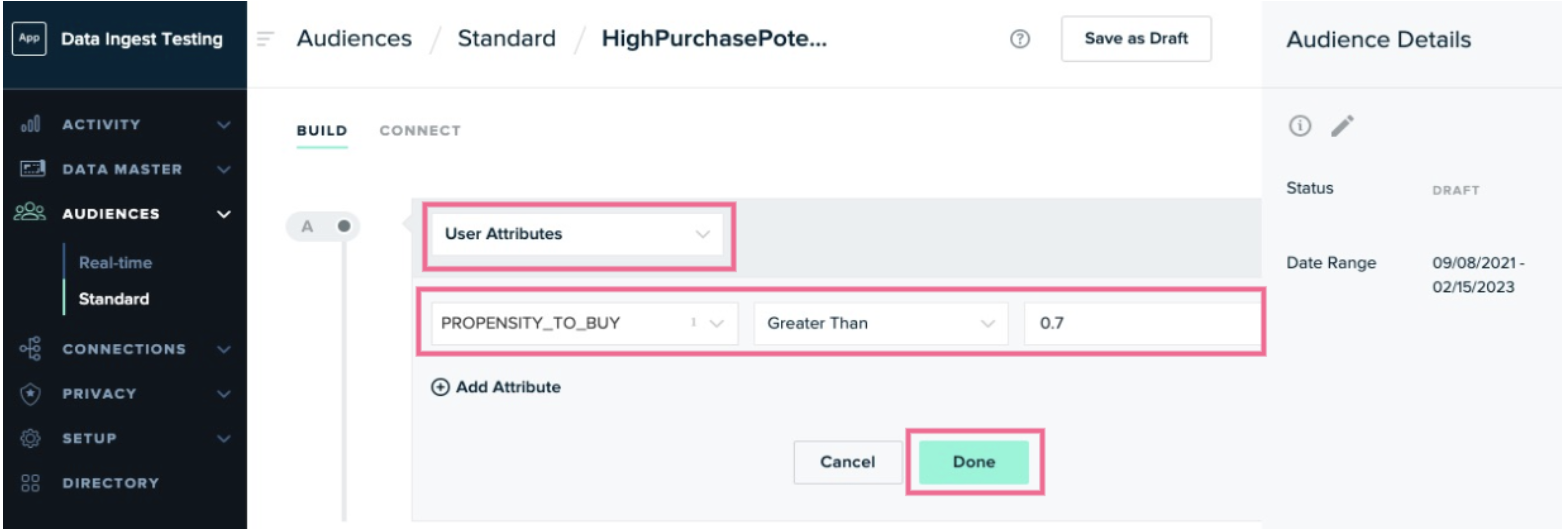
- Add any other criteria you want to be considered. Click Save As Draft when you are done.
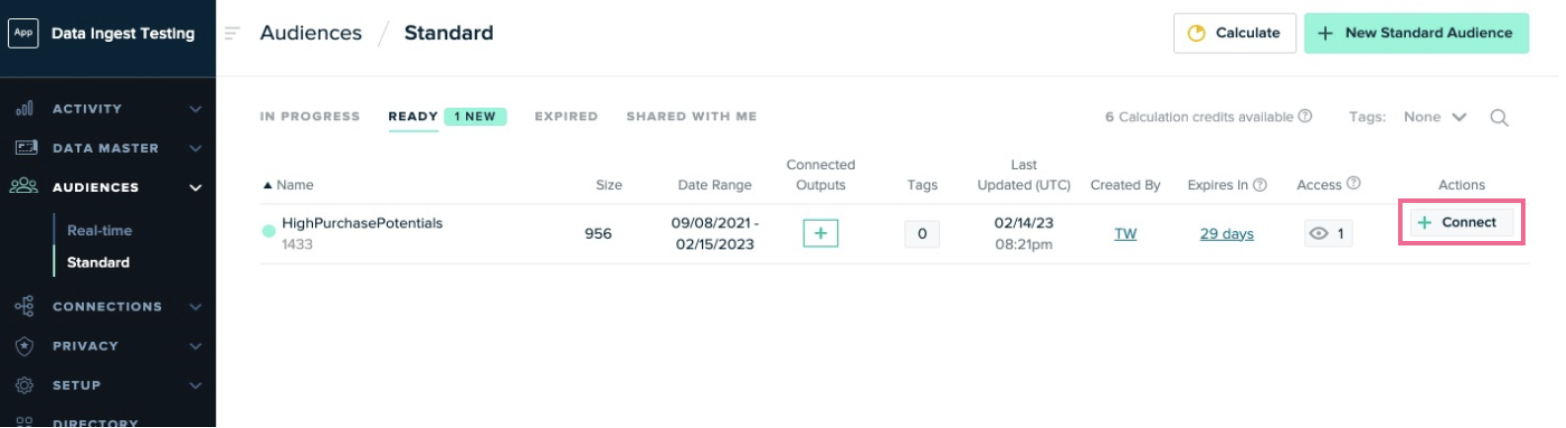
- Click Calculate to run the audience calculation.
Connect the audience to an output
In the final step, we will send users who qualified for this audience to Iterable for further targeting. If your organization doesn’t use Iterable, pick a different integration that your organization uses.
After the audience has been fully calculated, connect it to an output:
- If you aren’t still there, go to Audiences > Standard.
-
In the row for the audience you just created, click the Connect button in the Actions column.
-
Click Connect Output.
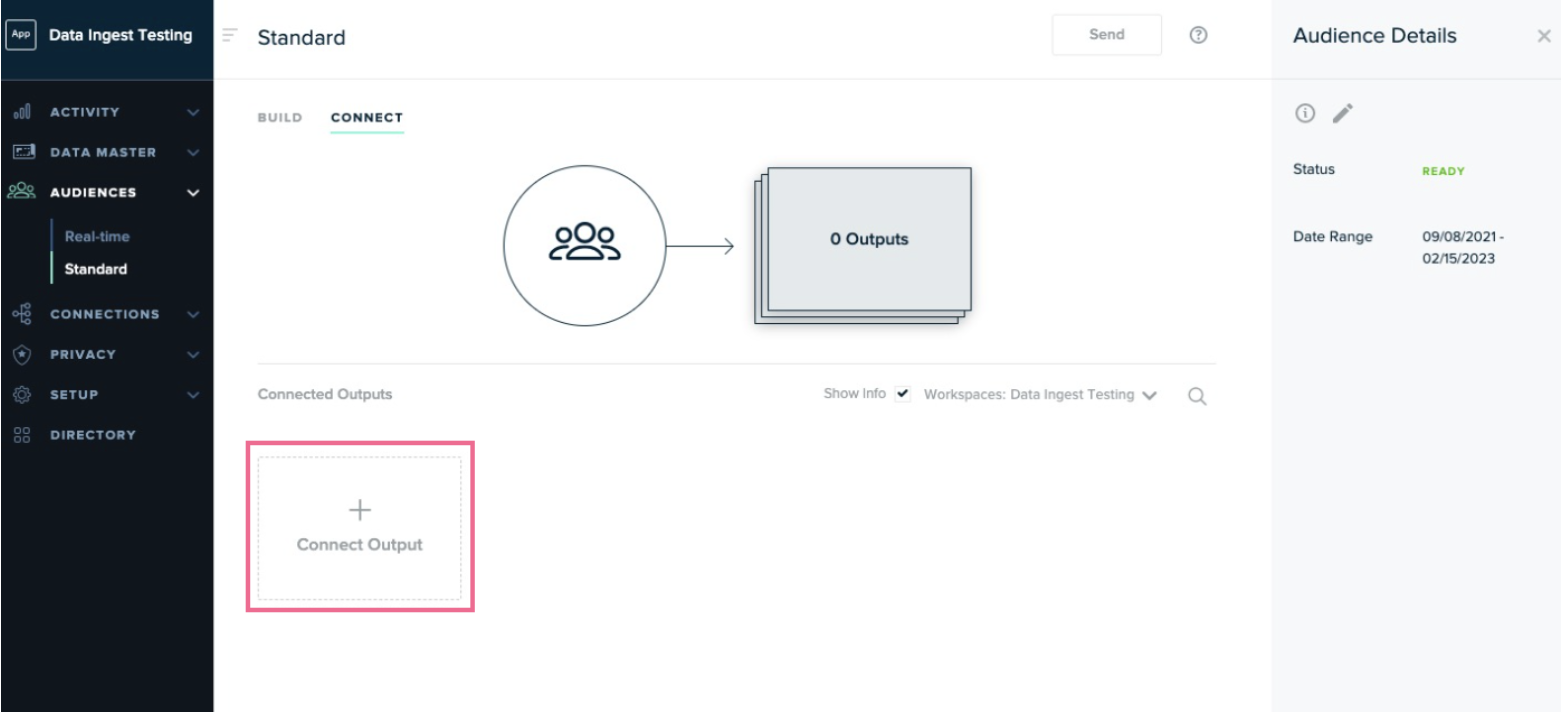
- Click the Add Output green button.
- Click the Iterable tile in the integrations directory, or pick another integration your organization uses if you don’t have Iterable.
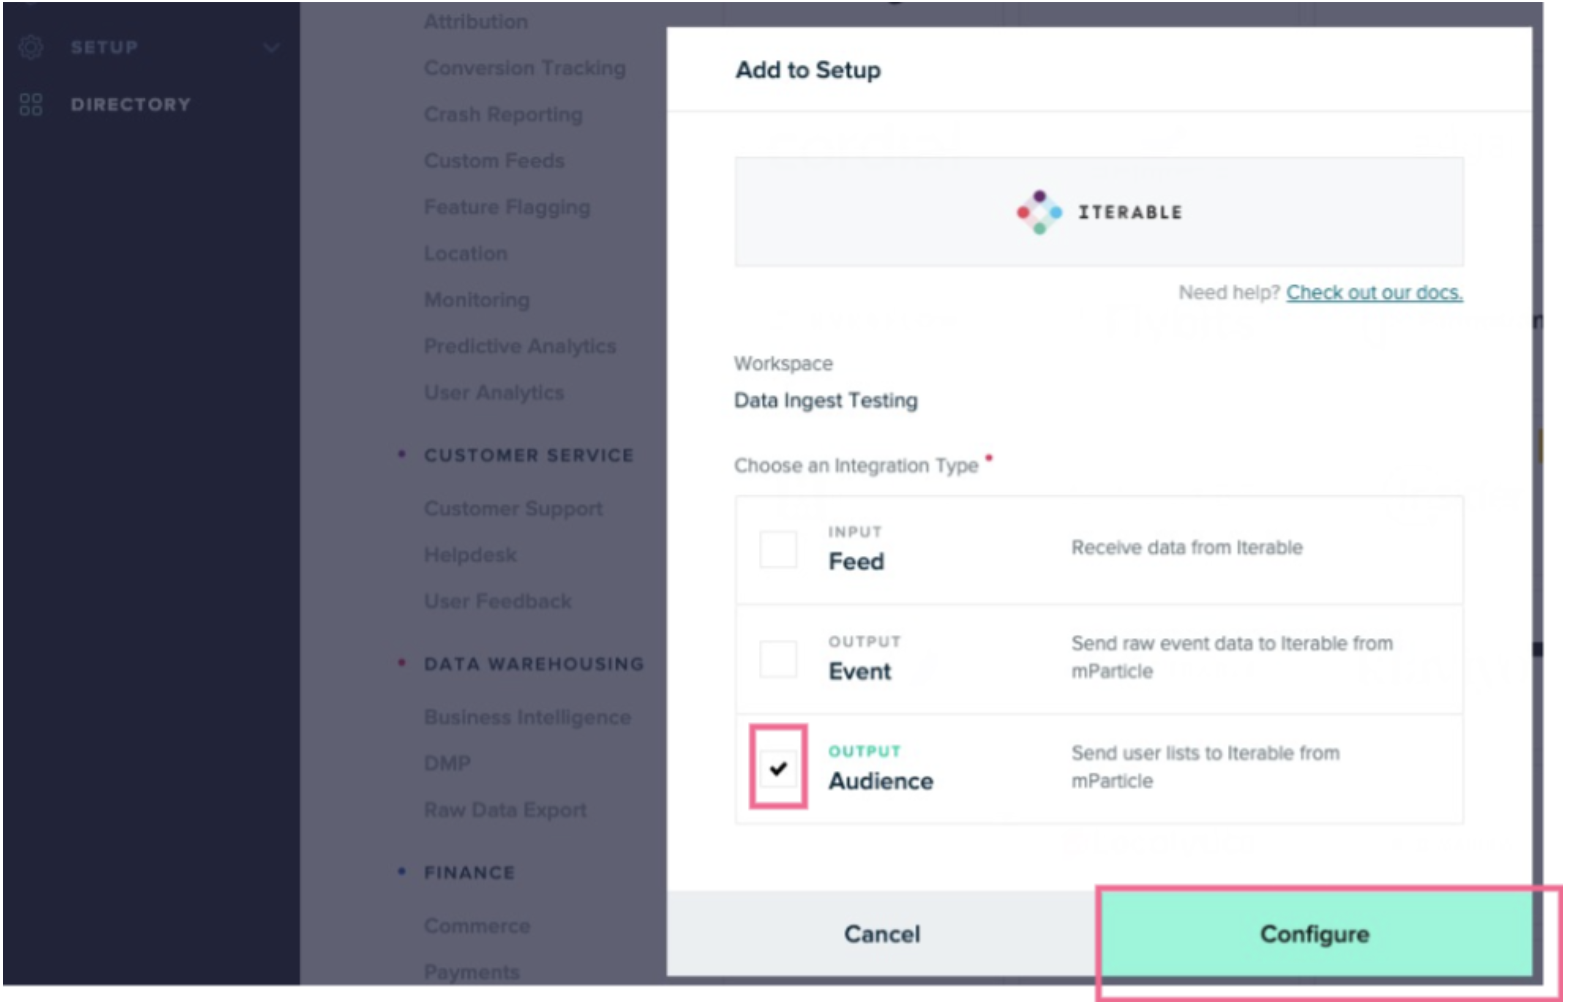
-
Select the Audience checkbox and click Configure.
-
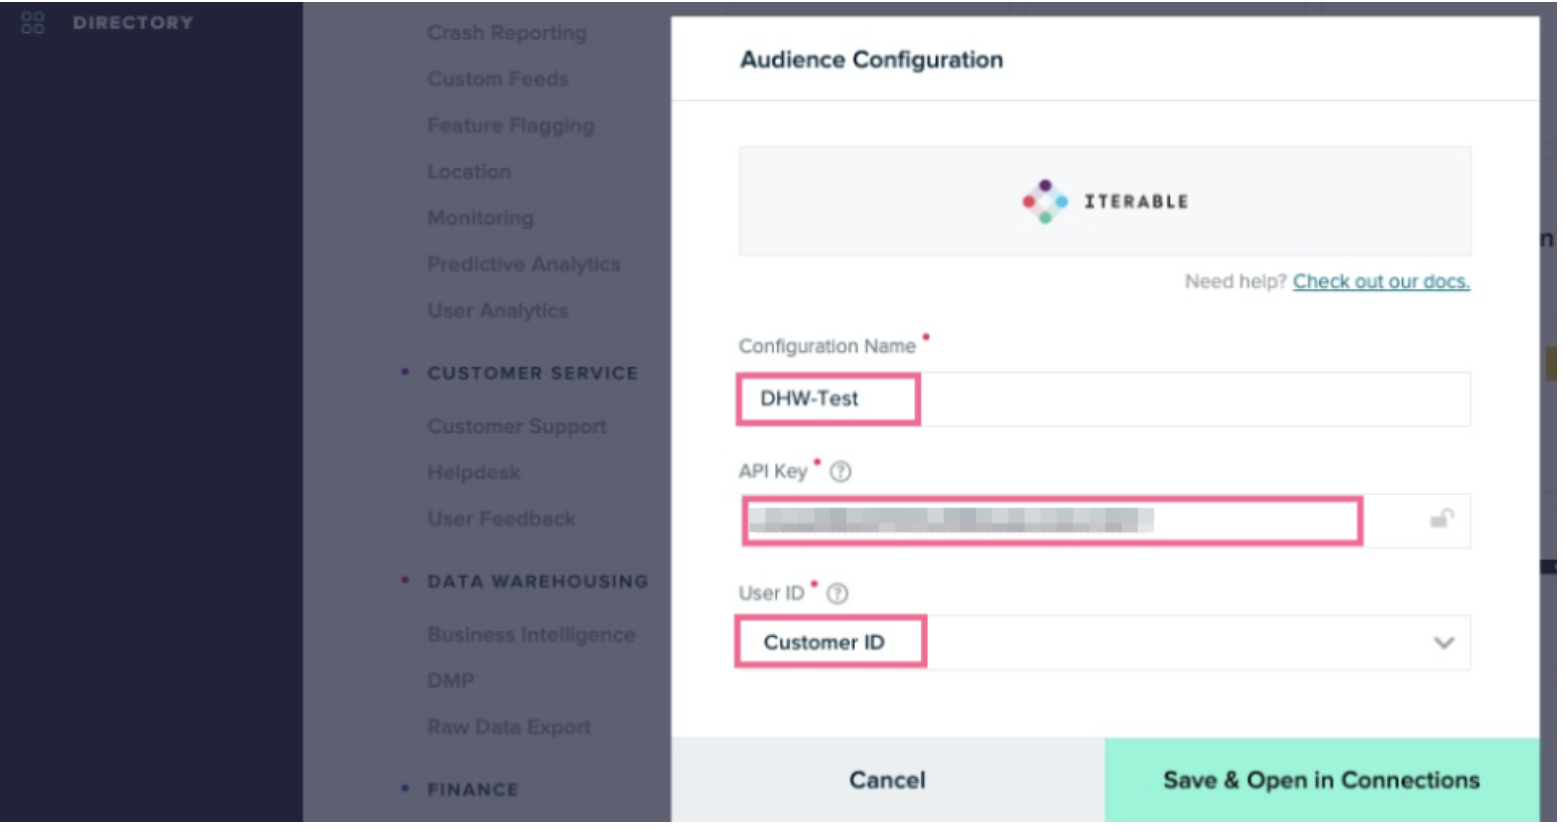
Enter a configuration name, your Iterable API key, and the user ID that is used to identify users, and then click Save & Open in Connections.
-
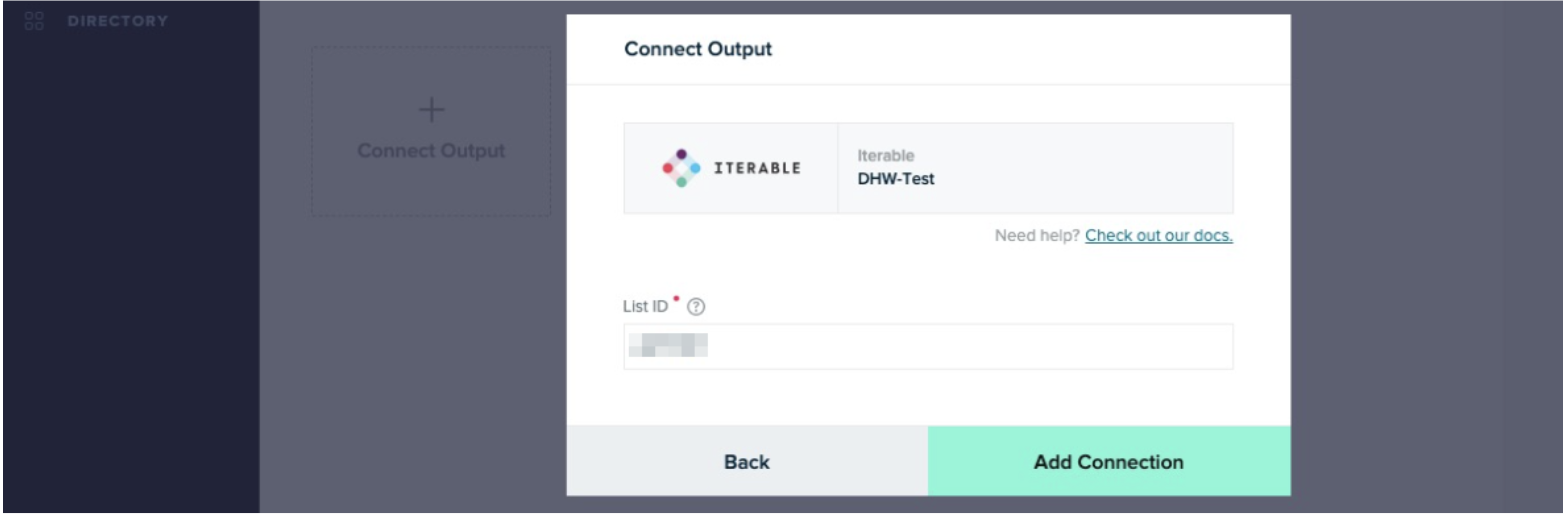
Provide the ID of the list in Iterable that the user data should be loaded into, and click Add Connection.
-
Click the Send button to send the audience to Iterable.

-
Data starts flowing to Iterable.
Now you can open the audience in Iterable and take the next step.
Was this page helpful?