Developers
Push Notifications
The mParticle SDK can be configured to receive, show, and track the results of push notifications from various integrations such as Urban Airship and Braze.
Setup Push Messaging for your App
To take advantage of push notifications you need to subscribe to a notification service. It is highly recommended that you use Firebase notifications if possible. The Google Cloud Messaging service is now deprecated. If you use any of Google’s Firebase SDKs you must use Firebase for push notifications.
Firebase
Follow Google’s instructions to set up a Firebase project and add Firebase to your Android project.
Get your Sender ID and Server Key
Firebase
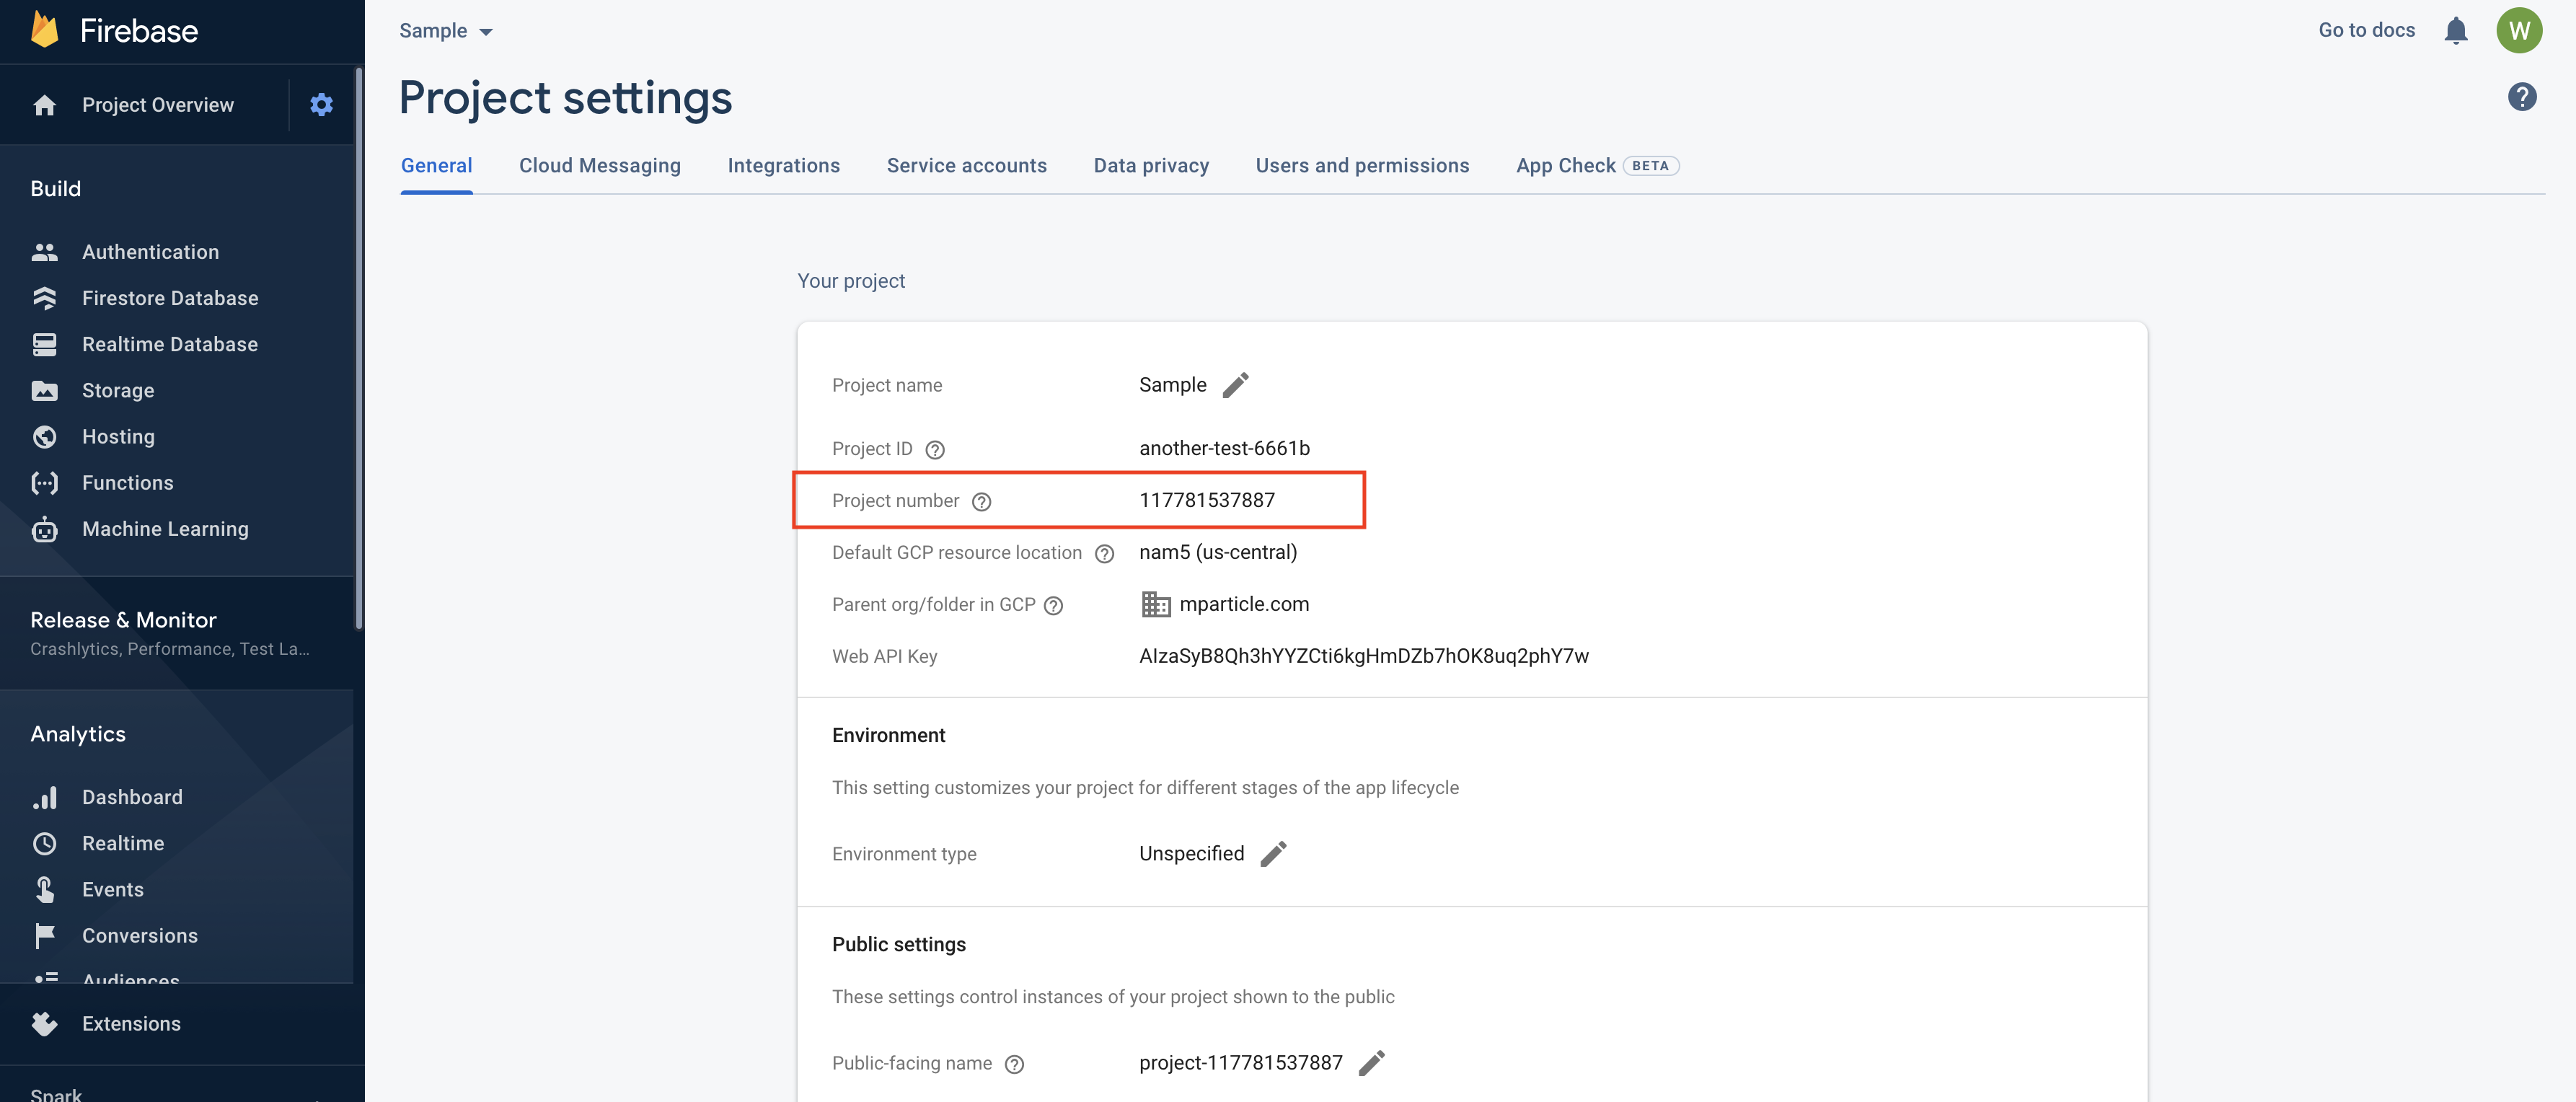
In the Firebase Console, navigate to Settings and copy the Project number value. This field was previous known as “Sender ID”
GCM (Sender ID portion deprecated)
In the Firebase Console, navigate to Settings and select the Cloud Messaging tab.
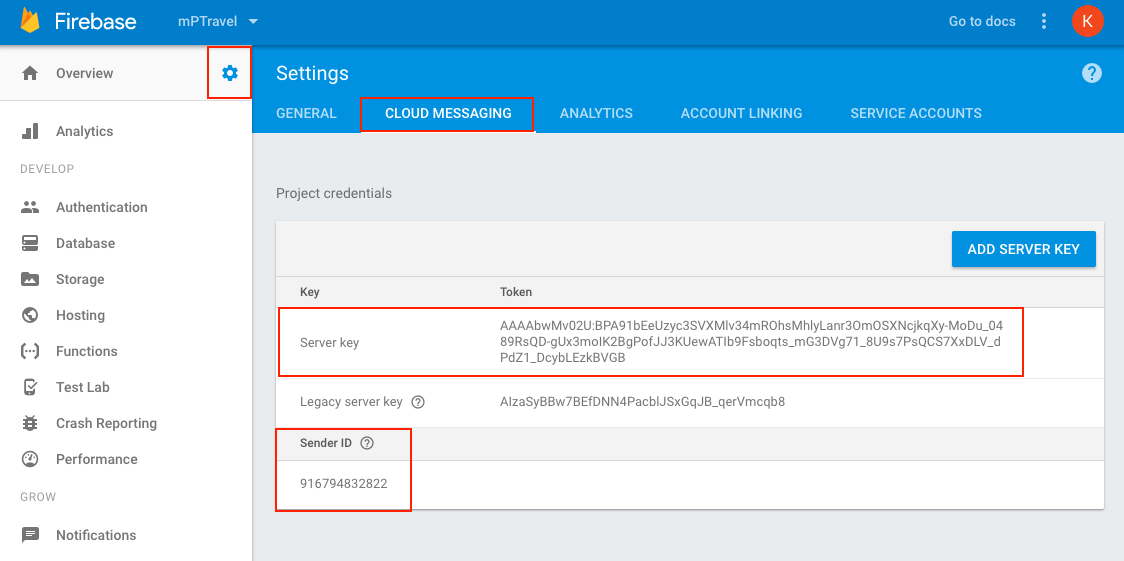
You’ll need your Sender ID to register for push notification in your app. You’ll also need to provide the Server Key to any mParticle partners you plan to use for push notifications.
Make sure Firebase is added to your project
Google offers many Firebase libraries, but to support push messaging, you only need the firebase-bom, which will ensure your Firebase dependencies and a valid versioning schema, and firebase-messaging. If you are experiencing issues fetching push token instances, you may also have to add firebase-iid. These dependencies should be included in your build.gradle file:
implementation(platform("com.google.firebase:firebase-bom:33.1.0"))
implementation("com.google.firebase:firebase-messaging")
implementation("com.google.firebase:firebase-iid:21.1.0")
Register for push notifications
Whether you are using FCM or GCM, you should now have a ‘Sender ID’ and a ‘Server Key’. Each device must use the ‘Sender ID’ to register for push notifications. You can either use mParticle’s messaging service to register, or you can use your own Push Instance ID service and pass the Push Token to mParticle, manually.
Option 1 - Use mParticle to Register
Once mParticle’s Instance ID Service is included in your app, the simplest way to manage registration is to use mParticle’s enablePushNotifications() and disablePushNotifications() methods.
First you will need to include the mParticle’s InstanceIdService in your project’s AndroidManifest.xml.
<service android:name="com.mparticle.messaging.InstanceIdService" />Then enable push notifications:
//Register for push notifications
MParticle.getInstance().Messaging().enablePushNotifications("YOUR SENDER ID");

//disable push notifications
MParticle.getInstance().Messaging().disablePushNotifications();
Option 2 - Use your own Push Instance ID service
If you are already using your own Push Instance ID service, you may continue to do so. Simply pass the token to mParticle manually using the logPushRegistration method:
MParticle.getInstance().logPushRegistration("TOKEN", "YOUR SENDER ID");Display push notifications
Enable mParticle’s Broadcast Receiver
The easiest way to deal with push notifications is to allow the mParticle SDK to handle them for you. Simply add the mParticle Service and BroadcastReceiver to the <application> section of your application’s AndroidManifest.xml.
<receiver
    android:name="com.mparticle.MPReceiver"
    android:permission="com.google.android.c2dm.permission.SEND">
    <intent-filter>
        <action android:name="com.google.android.c2dm.intent.RECEIVE" />

        <!-- Use your package name as the category -->
        <category android:name="YOURPACKAGENAME" />
    </intent-filter>
</receiver>
<!-- This is the service that does the heavy lifting in parsing, showing, and tracking FCM/GCM notifications. -->
<service android:name="com.mparticle.MPService" />
If your application targets Android Oreo (API level 26) or greater, you need to add the appcompat support library to your project by adding the following dependency to your app-level build.gradle file:
compile 'com.android.support:appcompat-v7:26.+'By default mParticle will not display push notifications. When a notification is received, mParticle first attempts to pass the Intent to any kit integrations with Push Notification functionality, such as Braze or Urban Airship. If no kits are able to handle the message, you can enable the mParticle SDK to display the message by setting:
MParticle.getInstance().Messaging().displayPushNotificationByDefault(true);Optional - Handle notifications with your own BroadcastReceiver
You can also create your own receiver to display notifications. If you choose to use your own receiver you will still need to follow the steps above to enable mParticle’s Broadcast Receiver. mParticle will pass an Intent to your receiver if there are no kits that can display the notification.
Setup
Create a class that extends the Android SDK’s PushAnalyticsReceiver BroadcastReceiver class:
public class MyReceiver extends PushAnalyticsReceiver {

    @Override
    public boolean onNotificationReceived(ProviderCloudMessage message) {
        //Do something
          return super.onNotificationReceived(message);
    }

    @Override
    public boolean onNotificationTapped(ProviderCloudMessage message) {
        //Do something
          return super.onNotificationTapped(message);
    }
}
class MyReceiver : PushAnalyticsReceiver {
override fun onNotificationReceived(message: ProviderCloudMessage) : Boolean {
//Do something
return super.onNotificationReceived(message);
}
override fun onNotificationTapped(message: ProviderCloudMessage) : Boolean {
//Do something
return super.onNotificationTapped(message);
}
}Then, you can register an Instance of your class with the registerPushAnalyticsReceiver method in the MessagingAPI
MParticle.getInstance().Messaging().registerPushAnalyticsReceiver(new MyReceiver());MParticle.getInstance().Messaging().registerPushAnalyticsReceiver(MyReceiver());Alternativly, if you would like to register your Instance manually, you can do so directly via the LocalBroadcastManager, using our publically available actions
IntentFilter intentFilter = new IntentFilter();
        intentFilter.addAction(BROADCAST_NOTIFICATION_RECEIVED);
        intentFilter.addAction(BROADCAST_NOTIFICATION_TAPPED);
LocalBroadcastManager.getInstance(mContext).registerReceiver(receiver, intentFilter);IntentFilter().apply {
addAction(BROADCAST_NOTIFICATION_RECEIVED);
addAction(BROADCAST_NOTIFICATION_TAPPED);
}.also {
LocalBroadcastManager.getInstance(mContext).registerReceiver(receiver, it)
}At any time, if you wish to stop receiving notifications via the PushAnalyticsReceiver’s callbacks, you can unregister your instance by calling following API method
MParticle.getInstance().Messaging().unregisterPushAnalyticsReceiver(myReceiver);or by interacting with the LocalBroadcastManager directly. Please be aware this is reference-based, so you need a reference to your original Instance in order to unregister it
Send Push events to mParticle
If choose to handle push notifications yourself, you should still notify mParticle that notifications have been received and opened, so that these events can be tracked. Send these events with the logNotification and logNotificationOpened methods:
//received
MParticle.getInstance().logNotification(intentObject);
//opened
MParticle.getInstance().logNotificationOpened(intentObject);
Kits
The following Kit integrations can receive push notifications:
- Braze
- CleverTap (Push message and push registration)
- Iterable
- Leanplum
- Localytics
- Urban Airship
Push notifications from any of these partners are displayed by the relevant kit instance. Note that you must provide your Server Key to the partner in order to send push notifications. See the docs for each integration for details.
Was this page helpful?