Warehouse Sync
Warehouse Sync is mParticle’s reverse-ETL solution, allowing you to use an external warehouse as a data source for your mParticle account. By ingesting data from your warehouse using either one-time, on-demand, or recurring syncs, you can benefit from mParticle’s data governance, personalization, and prediction features without having to modify your existing data infrastructure.
Supported warehouse providers
You can use Warehouse Sync to ingest both user and event from the following warehouse providers:
- Amazon Redshift
- Google BigQuery
- Snowflake
- Databricks
Warehouse Sync setup overview
- Prepare your data warehouse before connecting it to mParticle
- Create an input feed in your mParticle account for your warehouse
- Connect your warehouse to your new mParticle input feed
- Specify the data you want to ingest into mParticle by creating a SQL data model
-
Map your warehouse data to fields in mParticle
- For user data pipelines, this mapping is done by your data model
- For event data pipelines, you must complete an additional data mapping step
- Configure when and how often data is ingested from your warehouse
Warehouse Sync API
All functionality of Warehouse Sync is also available from an API. To learn how to create and manage syncs between mParticle and your data warehouse using the API, visit the mParticle developer documentation.
Warehouse Sync setup tutorial
Prerequisites
Before beginning the warehouse sync setup, obtain the following information for your mParticle account. Depending on which warehouse you plan to use, you will need some or all of these values:
- Your mParticle region ID, or pod: either
US1,US2,AU1, orEU1 -
Your Pod AWS Account ID that correlates with your mParticle region ID:
- US1:
338661164609 - US2:
386705975570 - AU1:
526464060896 - EU1:
583371261087
- US1:
- Your mParticle Org ID
- Your mParticle Account ID
How to find your mParticle Org, Account, Region, and Pod AWS Account IDs
To find your Org ID, Account ID, Pod ID, and Pod AWS Account ID:
- Log into the mParticle app at app.mparticle.com
-
From your web browser’s toolbar, navigate to view the page source for the mParticle app.
- For example, in Google Chrome: Navigate to View > Developer > View Page Source in the toolbar. In the resulting source for the page, find and save the values for
accountId,orgId,podName, andpodId, as shown in the screenshot below.
- For example, in Google Chrome: Navigate to View > Developer > View Page Source in the toolbar. In the resulting source for the page, find and save the values for

1 Prepare your data warehouse
Work with your warehouse administrator or IT team to ensure your warehouse is reachable and accessible by mParticle.
- Whitelist the mParticle IP address range so your warehouse will be able to accept inbound API requests from mParticle.
- Ask your database administrator to perform the following steps in your warehouse to create a new role that mParticle can use to access your database. Select the correct tab for your warehouse (Snowflake, Google BigQuery, Amazon Redshift, or Databricks) below.
1.1 Create a new user
First, you must create a user in your Snowflake account that mParticle can use to access your warehouse.
- Log into your Snowflake account at app.snowflake.com
-
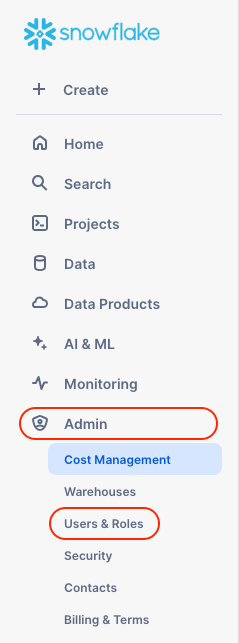
In the left nav, click Admin and select Users & Roles.
-
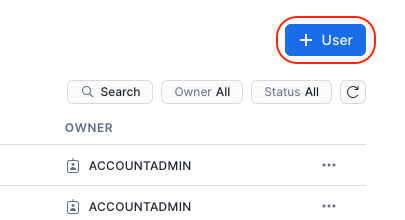
From the Users tab, click the + User button.
-
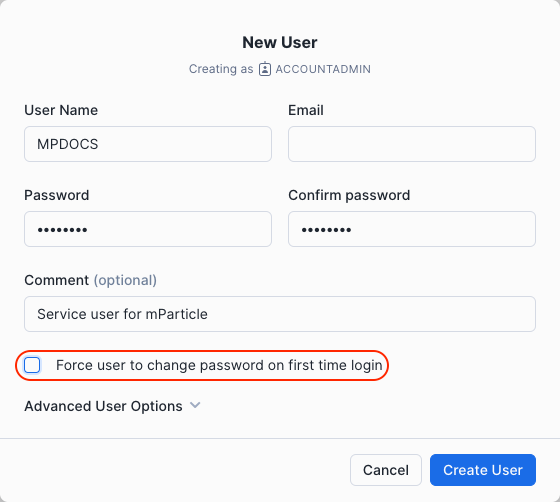
Enter a username and password for your new user, add an optional description, and uncheck Force user to change password on first time login.
1.2 Create a new role
mParticle recommends creating a dedicated role for your mParticle warehouse sync user created in step 1.1 above.
-
From the Users & Roles page of your Snowflake account’s Admin settings, select the Roles tab.

-
Click the + Role button.

-
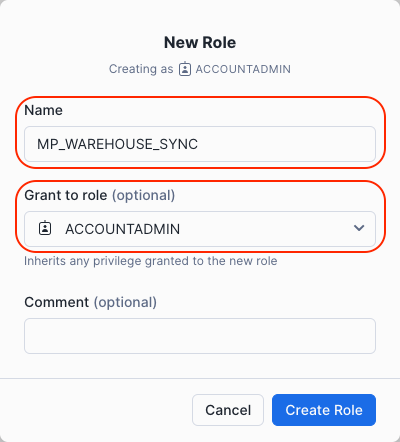
Enter a name for your new role, and select the set of permissions to assign to the role using the under Grant to role dropdown.
- Enter an optional description under Comment, and click Create Role.
-
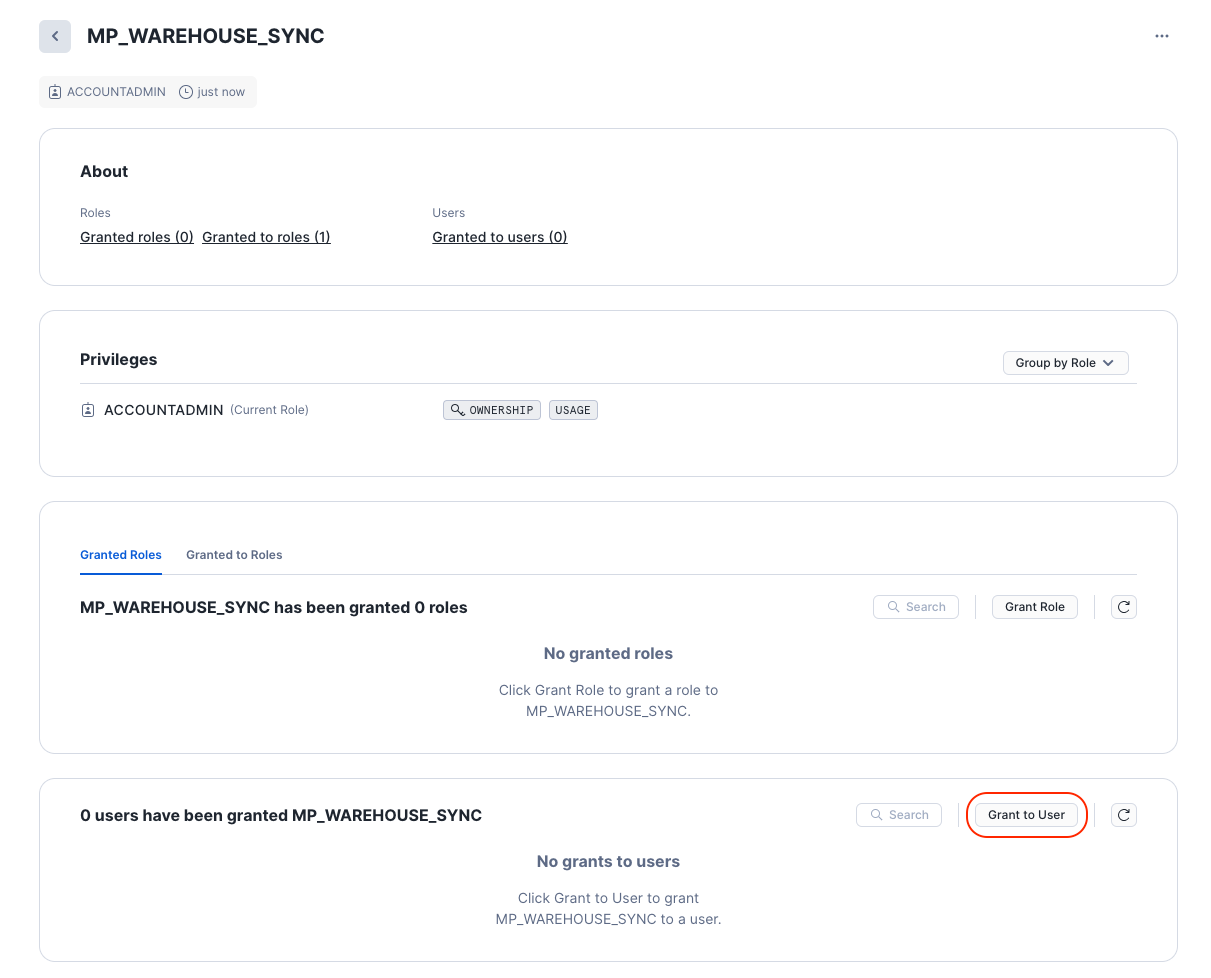
Select your new role from the list of roles, and click the Grant to User button.
-
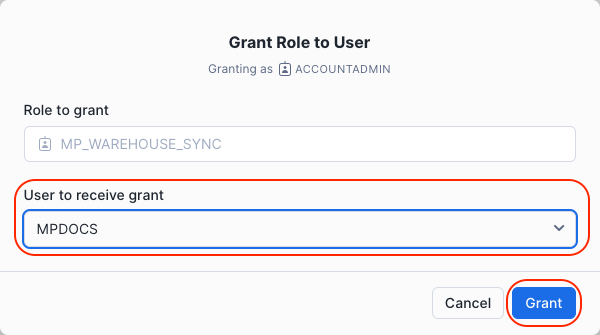
Under User to receive grant, select the new user you created in step 1.1, and click Grant.
Before continuing, make sure to save the following information, as you will need to refer to this when connecting Data Warehouse to your Snowflake account:
- Role name: The role mParticle will use while executing SQL commands on your Snowflake instance. mParticle recommends creating a unique role for warehouse sync.
- Warehouse name: The ID of the Snowflake virtual warehouse compute cluster where SQL commands will be executed.
- Database name: The ID of the database in your Snowflake instance from which you want to sync data.
- Schema name: The ID of the schema in your Snowflake instance containing the tables you want to sync data from.
- Table name: The ID of the table containing data you want to sync. Grant SELECT privileges on any tables/views mParticle needs to access.
1.1 Create a new service account for mParticle
- Go to console.cloud.google.com, log in, and navigate to IAM & Admin > Service Accounts.
- Select Create Service Account.
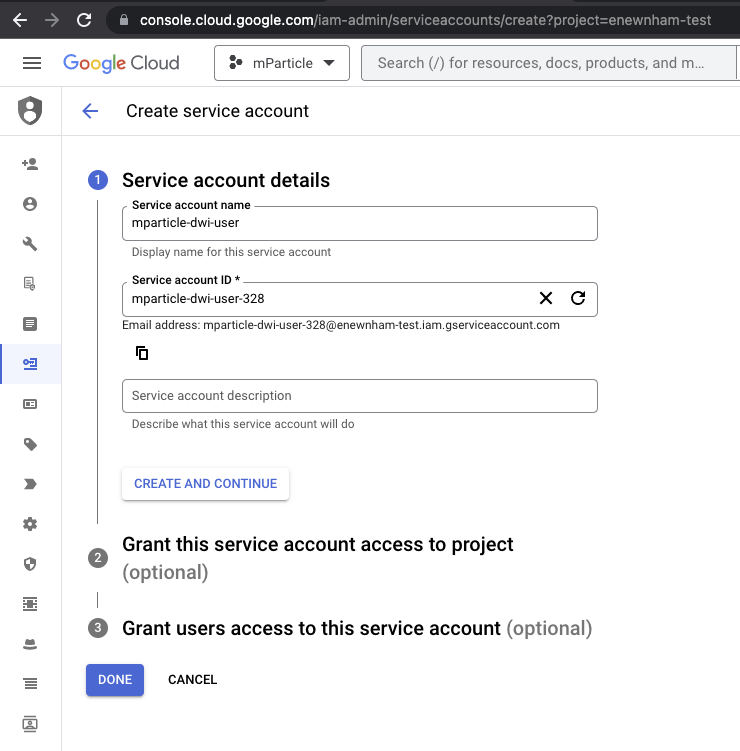
- Enter a new identifier for mParticle in Service account ID. In the example below, the email address is the service account ID. Save this value for your Postman setup.
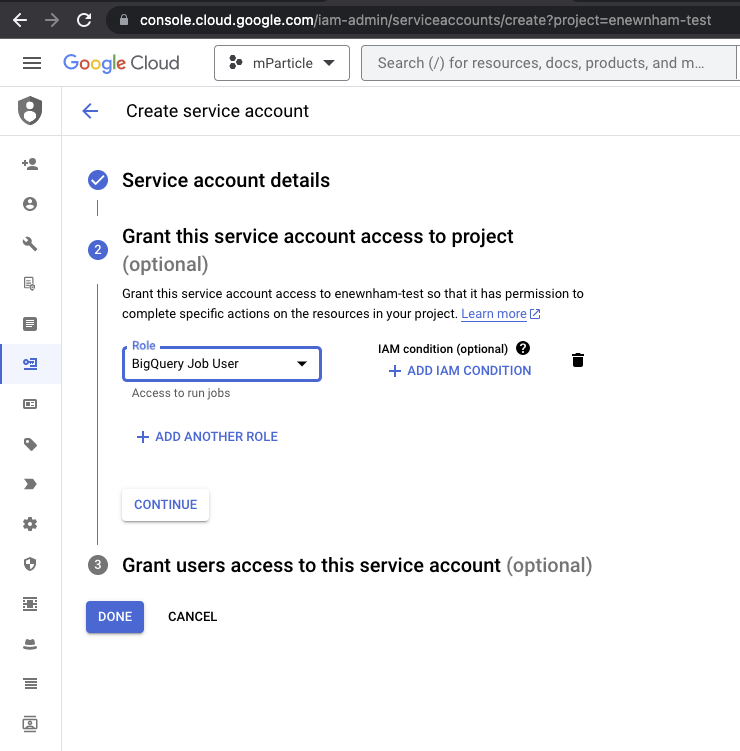
- Under Grant this service account access to project, select BigQuery Job User under the Role dropdown menu, and click DONE.
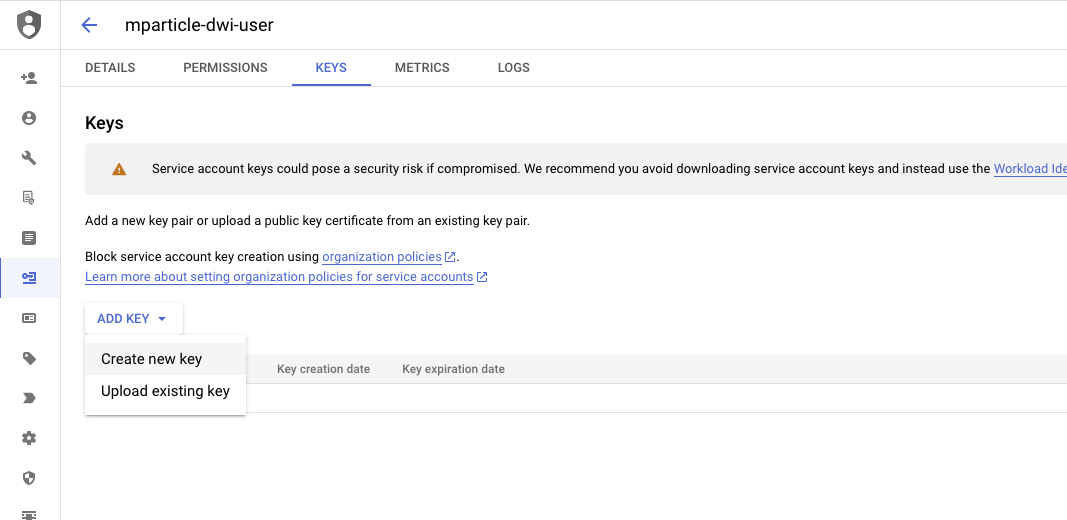
- Select your new service account and navigate to the Keys tab.
- Click ADD KEY and select Create new key. The value for
service_account_keywill be the contents of the generated JSON file. Save this value for your Postman setup.
1.2 Identify your BigQuery warehouse details
Navigate to your BigQuery instance from console.cloud.google.com.
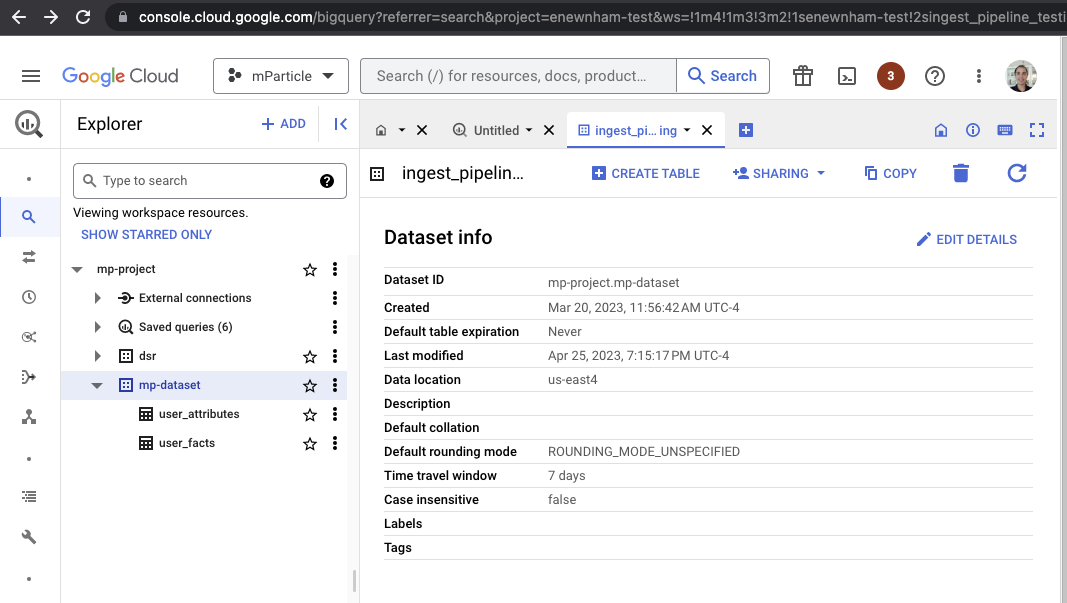
- Your
project_idis the first portion of Dataset ID (the portion before the.). In the example above, it ismp-project. - Your
dataset_idis the second portion of Dataset ID (the portion immediately after the.) In the example above, it ismp-dataset. - Your
regionis the Data location. This isus-east4in the example above.
1.3 Grant access to the dataset in BigQuery
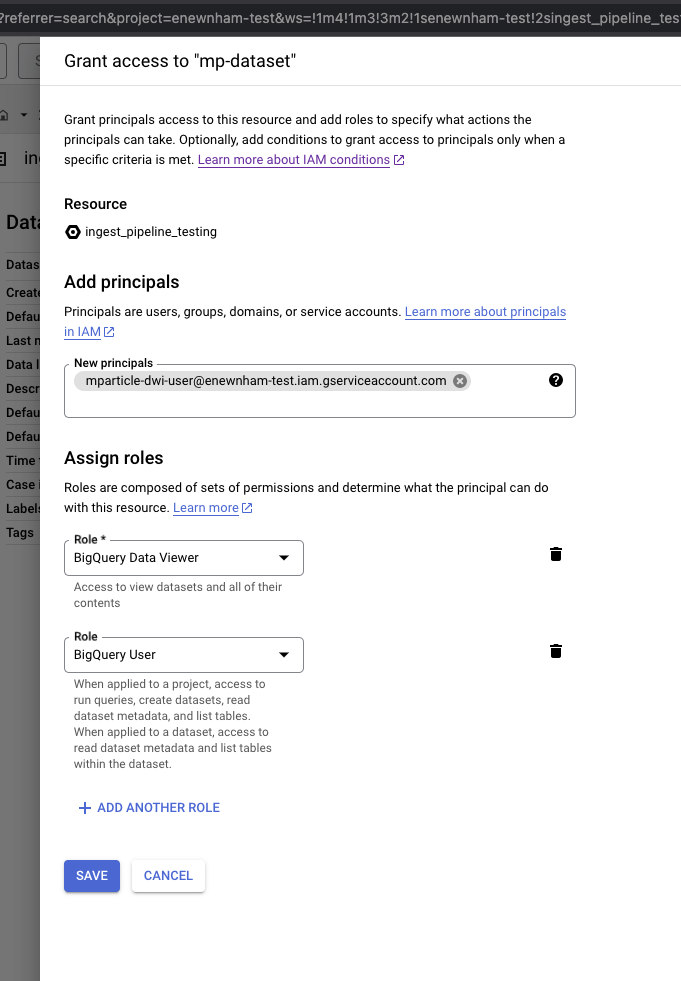
- From your BigQuery instance in console.cloud.google.com, click Sharing and select Permissions.
- Click Add Principle.
- Assign two Roles, one for BigQuery Data Viewer, and one for BigQuery User.
- Click Save.
- Navigate to your AWS Console, log in with your administrator account, and navigate to your Redshift cluster details.
- Run the following SQL statements to create a new user for mParticle, grant the necessary schema permissions to the new user, and grant the necessary access to your tables/views.
-- Create a unique user for mParticle
CREATE USER {{user_name}} WITH PASSWORD '{{unique_secure_password}}'

-- Grant schema usage permissions to the new user
GRANT USAGE ON SCHEMA {{schema_name}} TO {{user_name}}

-- Grant SELECT privilege on any tables/views mP needs to access to the new user
GRANT SELECT ON TABLE {{schema_name}}.{{table_name}} TO {{user_name}}- Navigate to the Identity And Access Management (IAM) dashboard, select Roles under the left hand nav bar, and click Create role.

- In Step 1 Select trusted entity, click AWS service under Trusted entity
- Select Redshift from the dropdown menu titled “Use cases for other AWS services”, and select Redshift - Customizable. Click Next.

- In Step 2 Add permissions, click Create Policy.
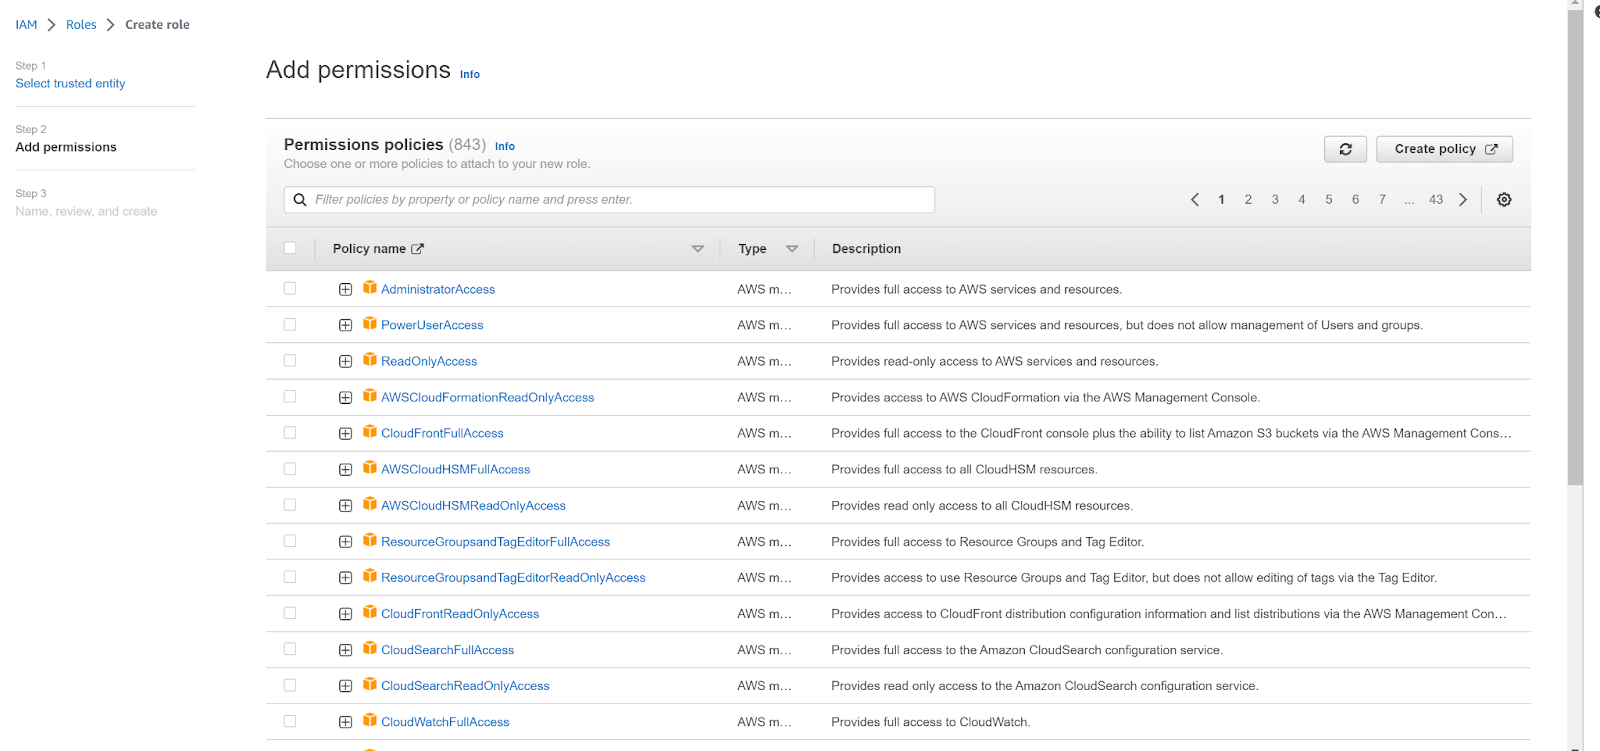
- Click JSON in the policy editor, and enter the following permissions before clicking Next.
-
Replace
{mp_pod_aws_account_id}with one of the following values according to your mParticle instance’s location:- US1 =
338661164609 - US2 =
386705975570 - AU1 =
526464060896 - EU1 =
583371261087
- US1 =
{
    "Statement": [
        {
            "Action": "sts:AssumeRole",
            "Effect": "Allow",
            "Resource": "arn:aws:iam::{{mp_pod_aws_account_id}}:role/ingest-pipeline-data-external-{{mp_org_id}}-{{mp_acct_id}}",
            "Sid": ""
        }
    ],
    "Version": "2012-10-17"
}
- Enter a meaningful name for your new policy, such as
mparticle_redshift_assume_role_policy, and click Create policy.
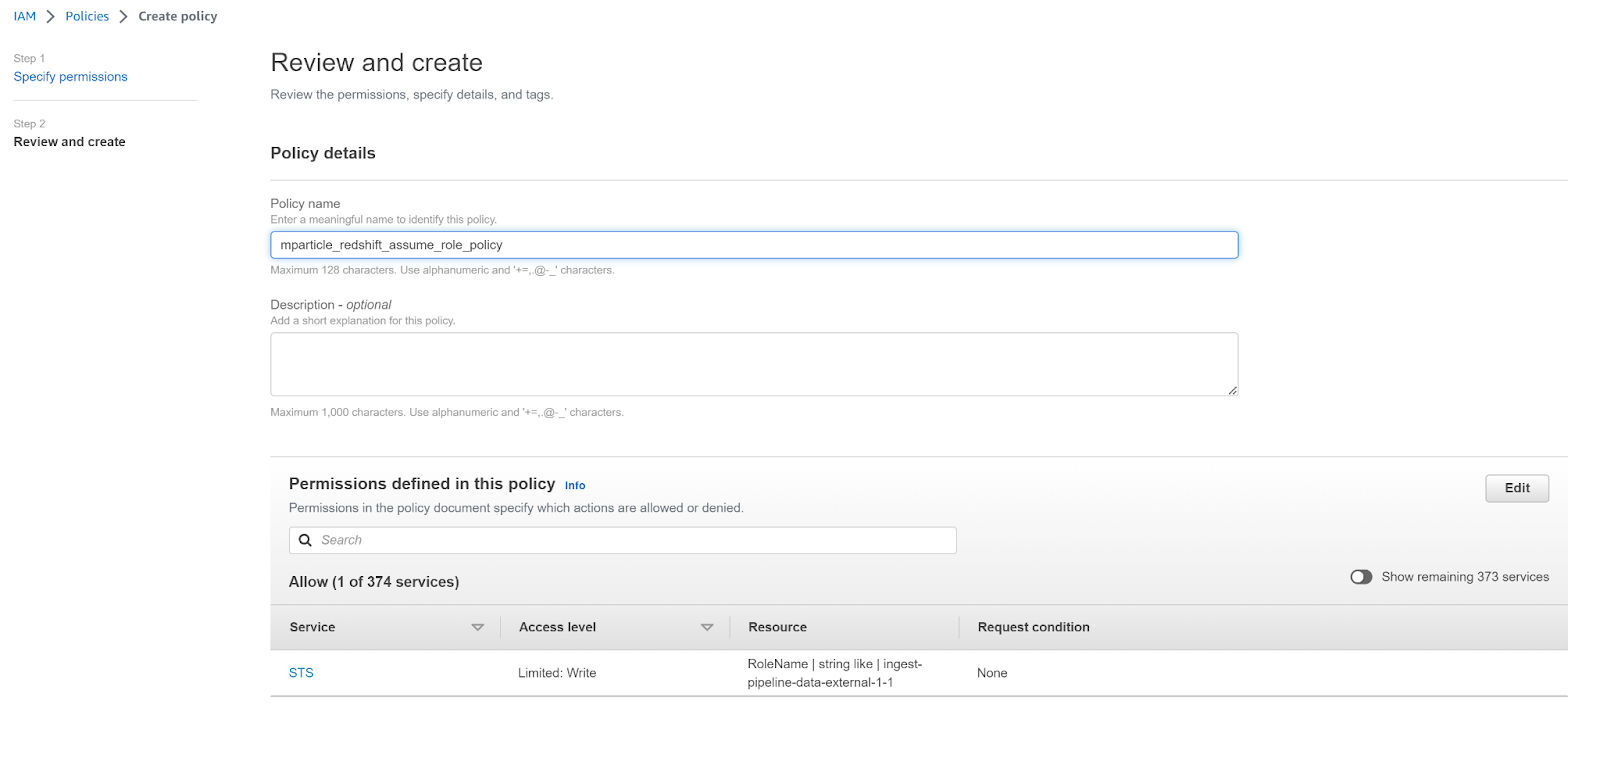
- Return to the Create role tab, click the refresh button, and select your new policy. Click Next.
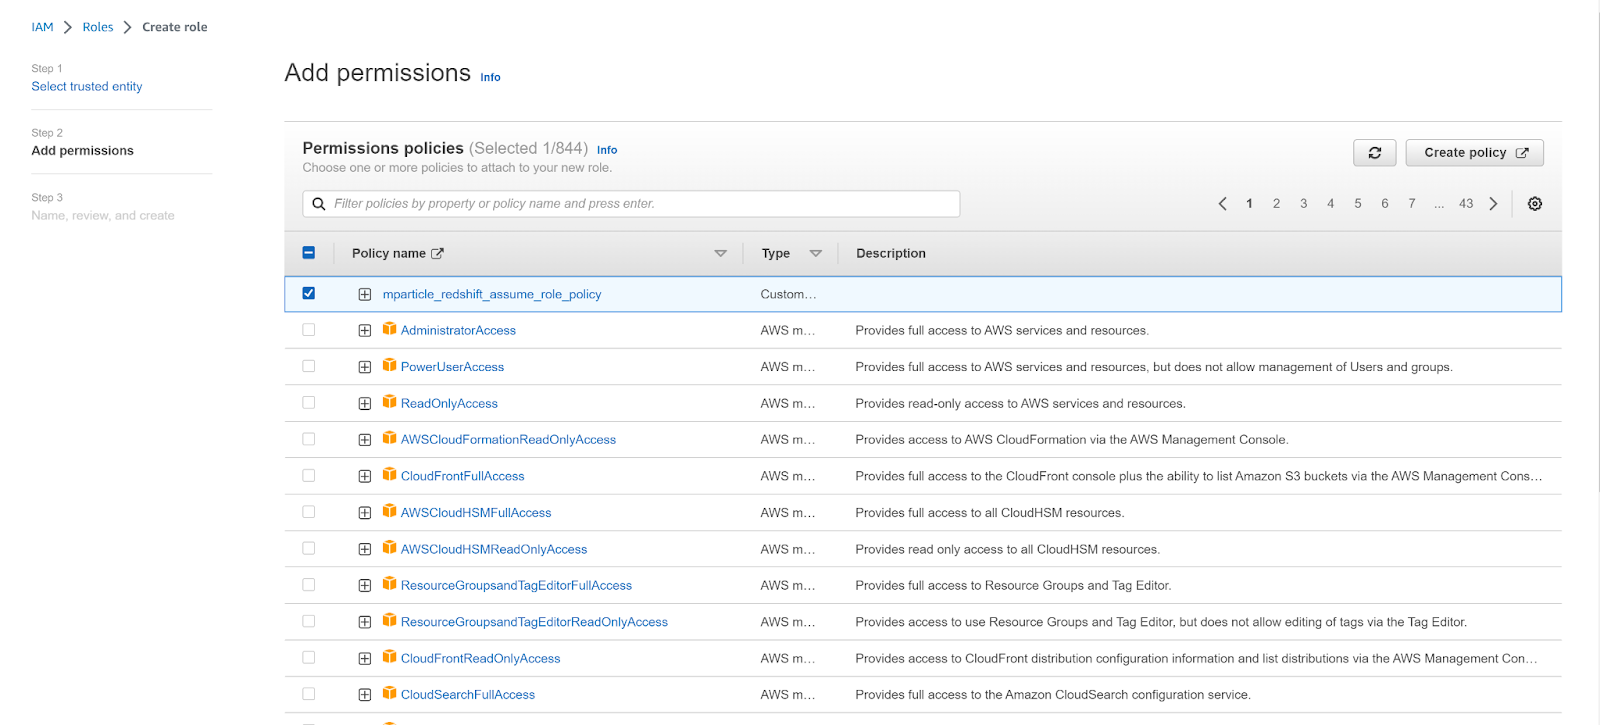
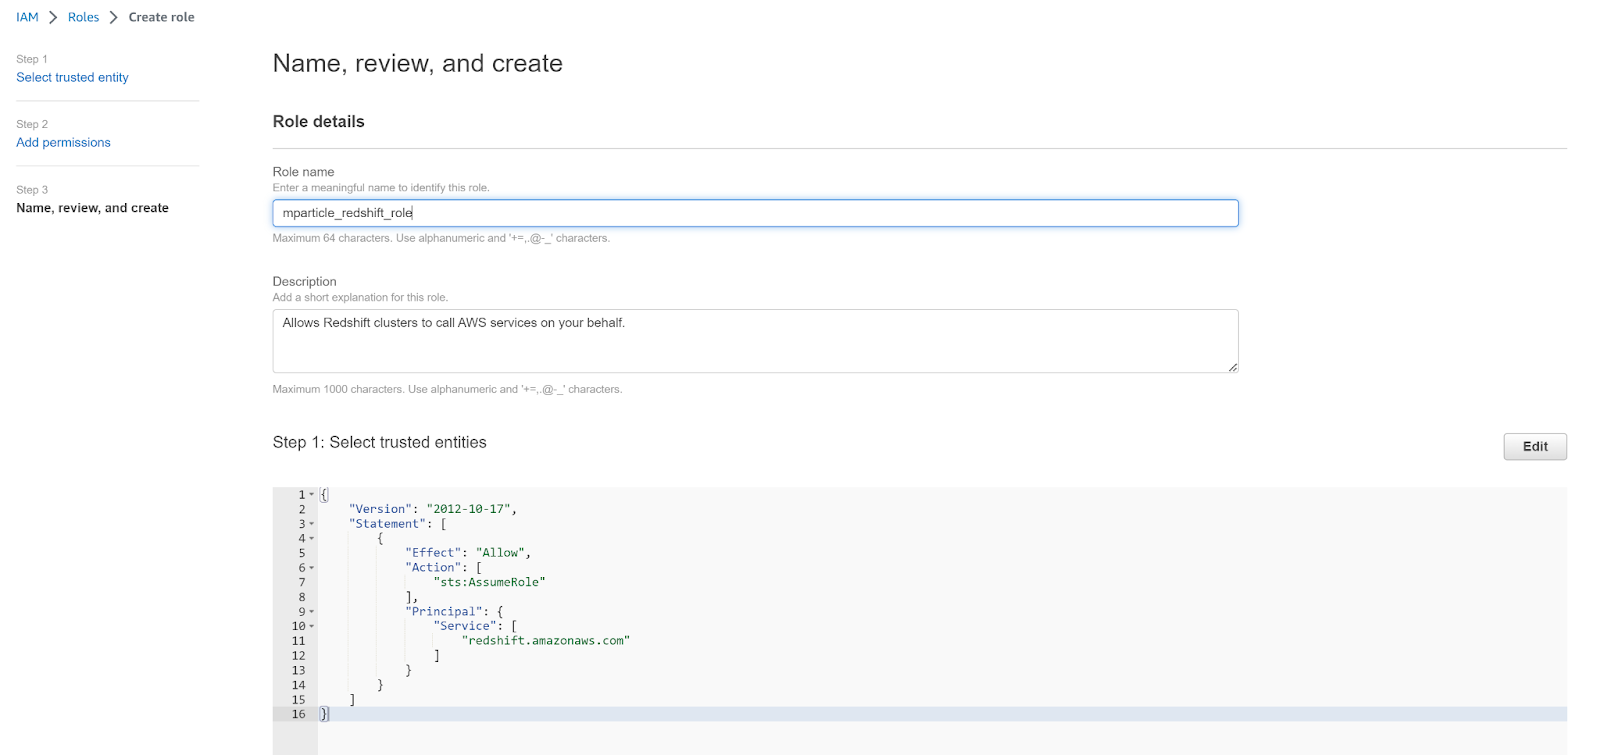
- Enter a meaningful name for your new role, such as
mparticle_redshift_role, and click Create role.
Your configuration will differ between Amazon Redshift and Amazon Redshift Serverless. To complete your configuration, follow the appropriate steps for your use case below.
Make sure to save the value of your new role’s ARN. You will need to use this when setting up Postman in the next section.
Amazon Redshift (not serverless)
- Navigate to your AWS Console, then navigate to Redshift cluster details. Select the Properties tab.
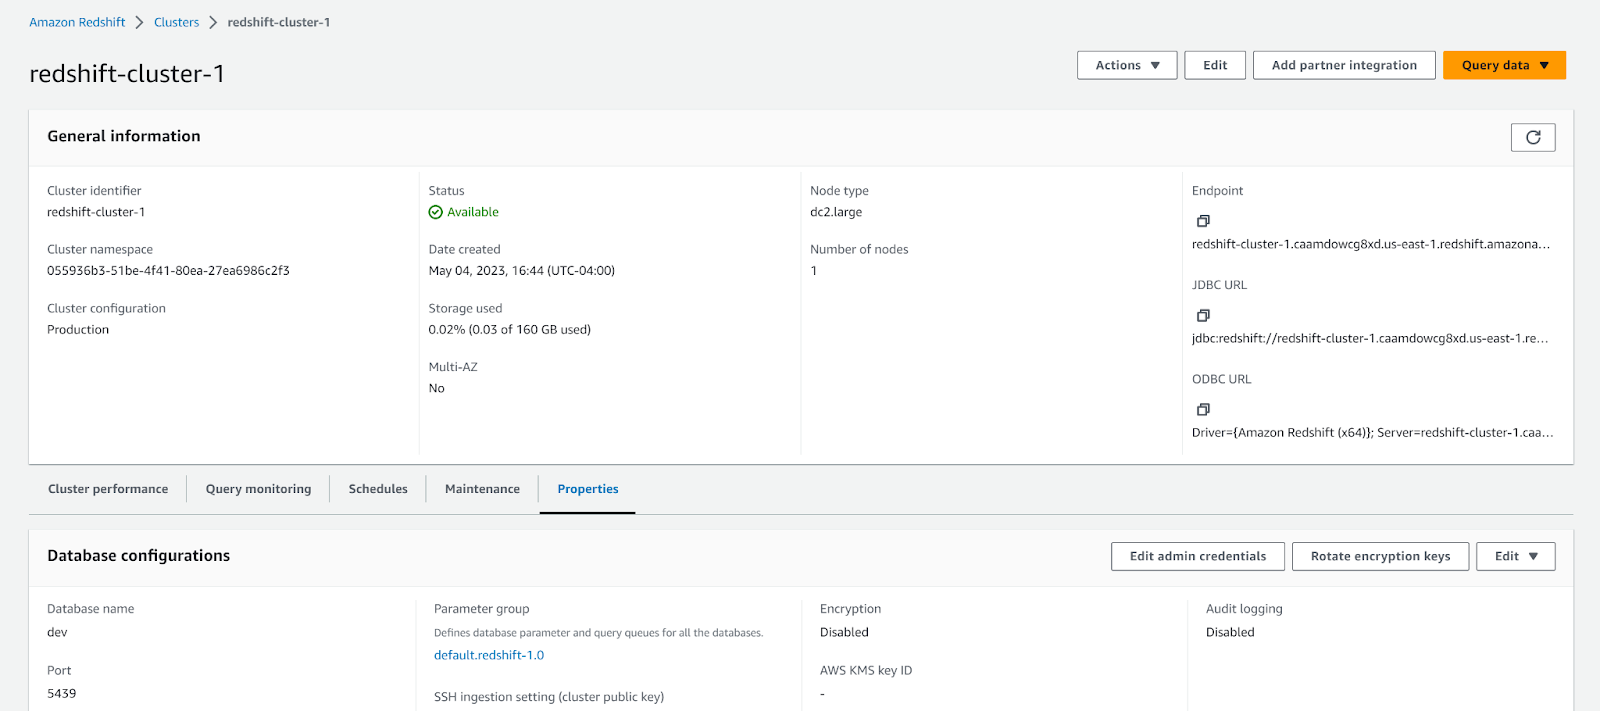
- Scroll to Associated IAM roles, and select Associate IAM Roles from the Manage IAM roles dropdown menu.
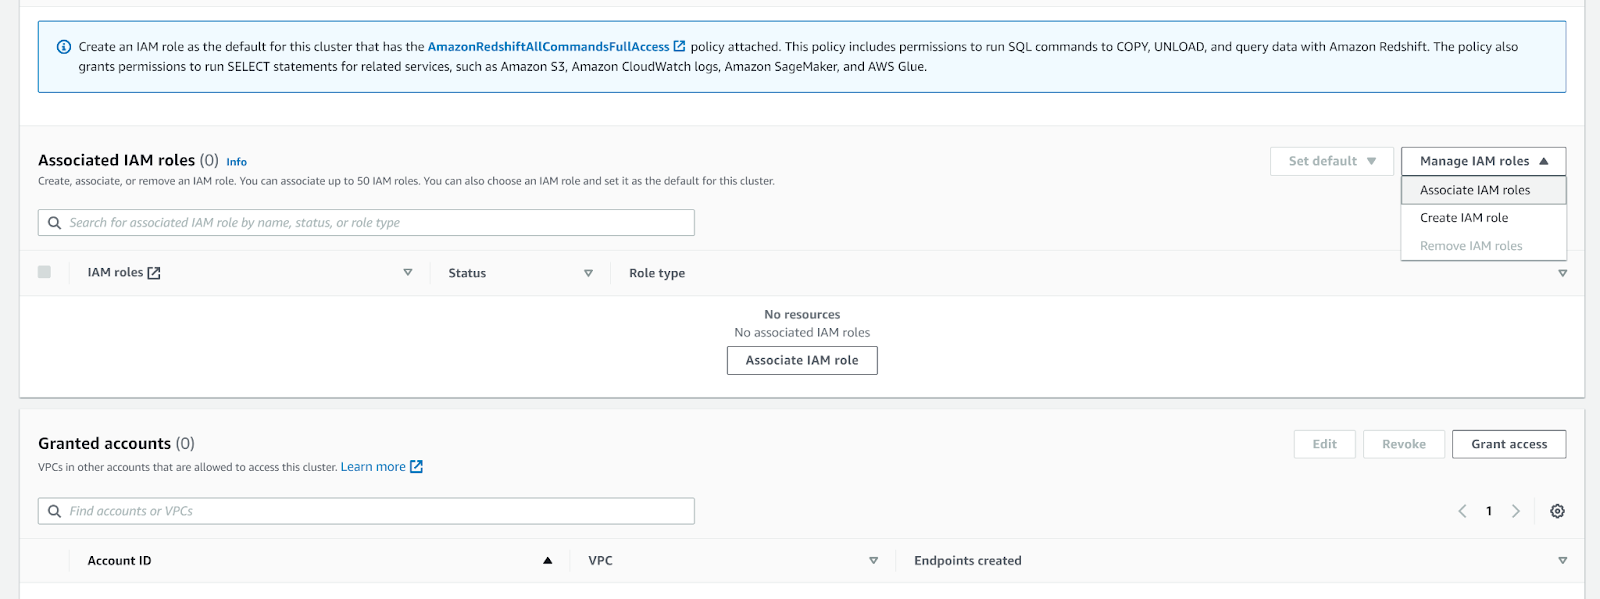
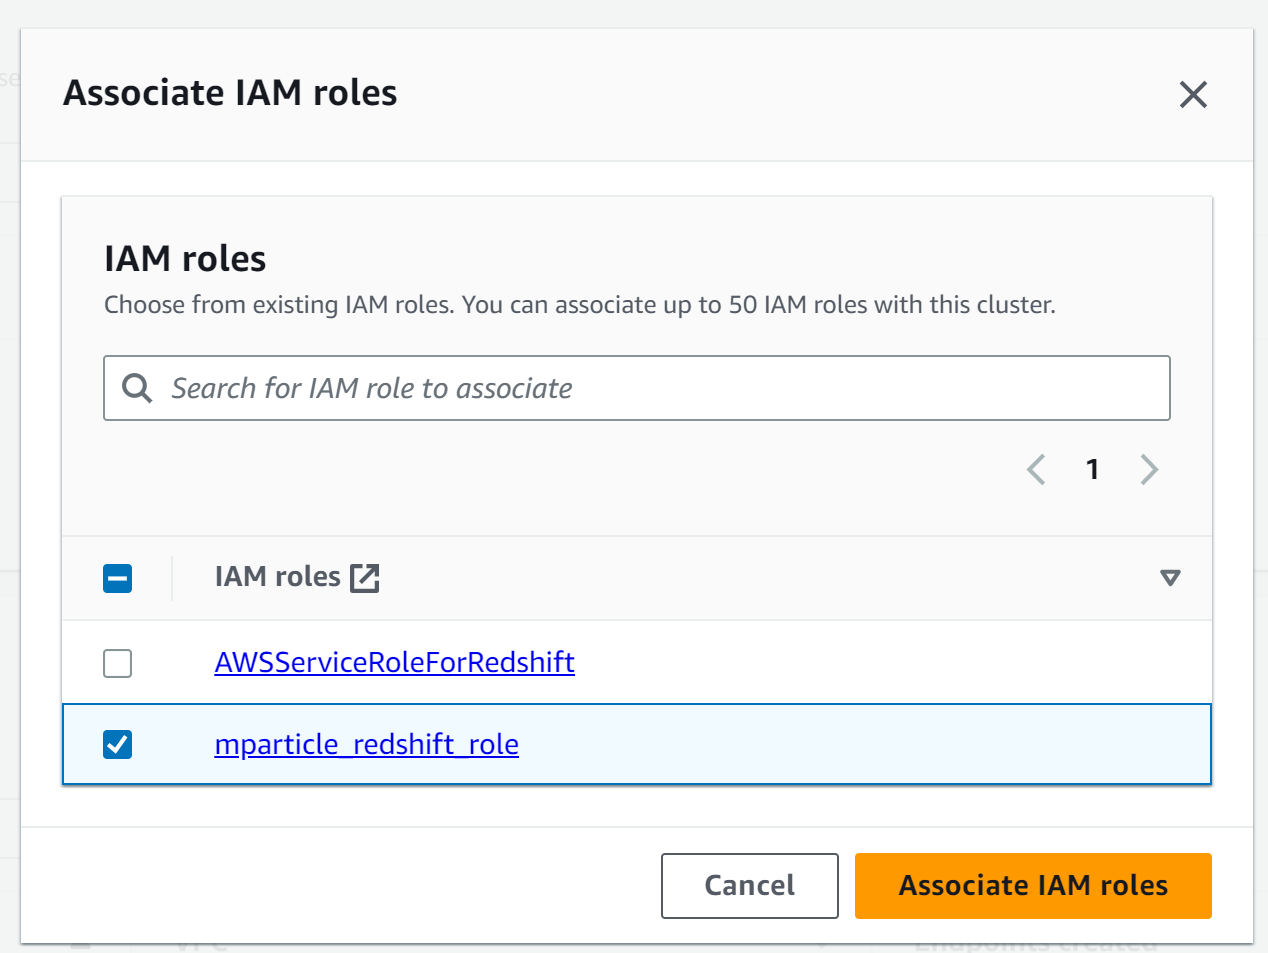
- Select the new role you just created. The name for the role in this example is
mparticle_redshift_role.
Amazon Redshift Serverless
- Navigate to your AWS Console, then navigate to your Redshift namespace configuration. Select the Security & Encryption tab, and click Manage IAM roles.
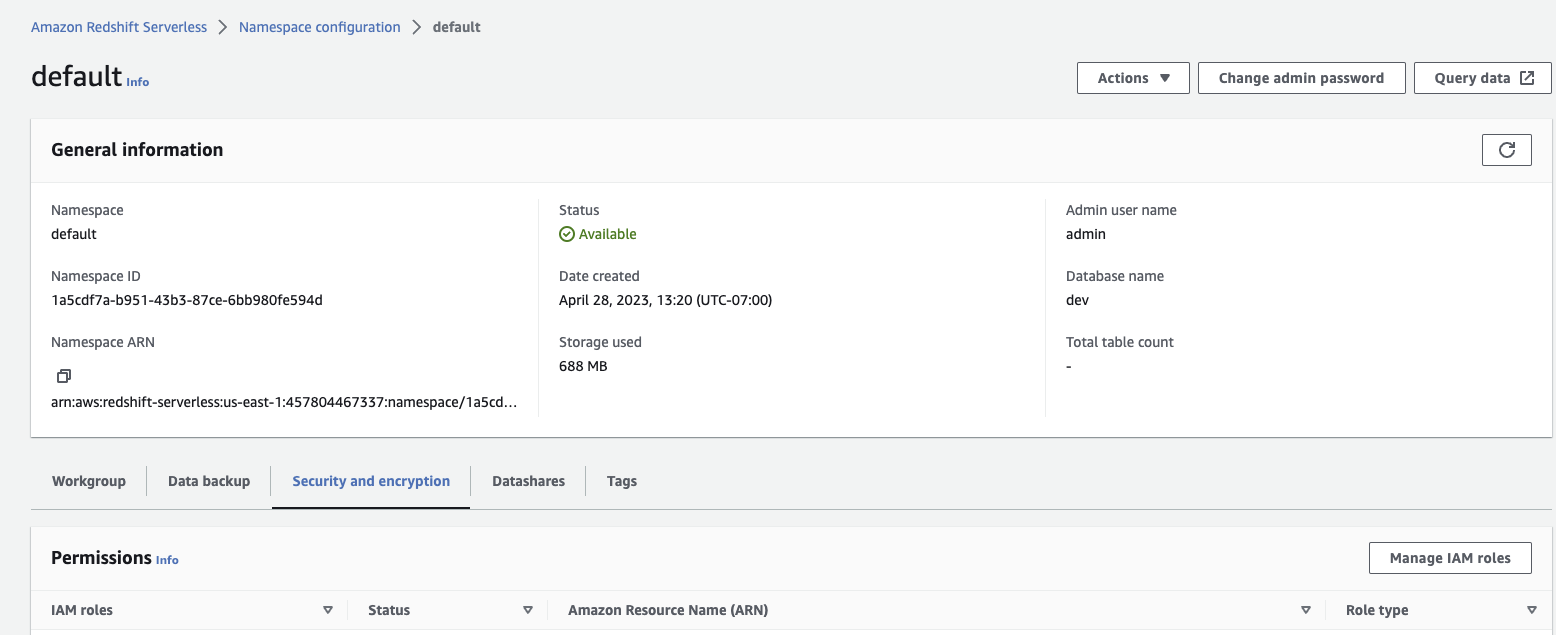
- Select Associate IAM roles from the Manage IAM roles dropdown menu.
- Select the new role you just created. The name for the role in this example is
mparticle_redshift_role.
Warehouse Sync uses the Databricks-to-Databricks Delta Sharing protocol to ingest data from Databricks into mParticle.
Complete the following steps to prepare your Databricks instance for Warehouse Sync.
1.1 Enable Delta Sharing
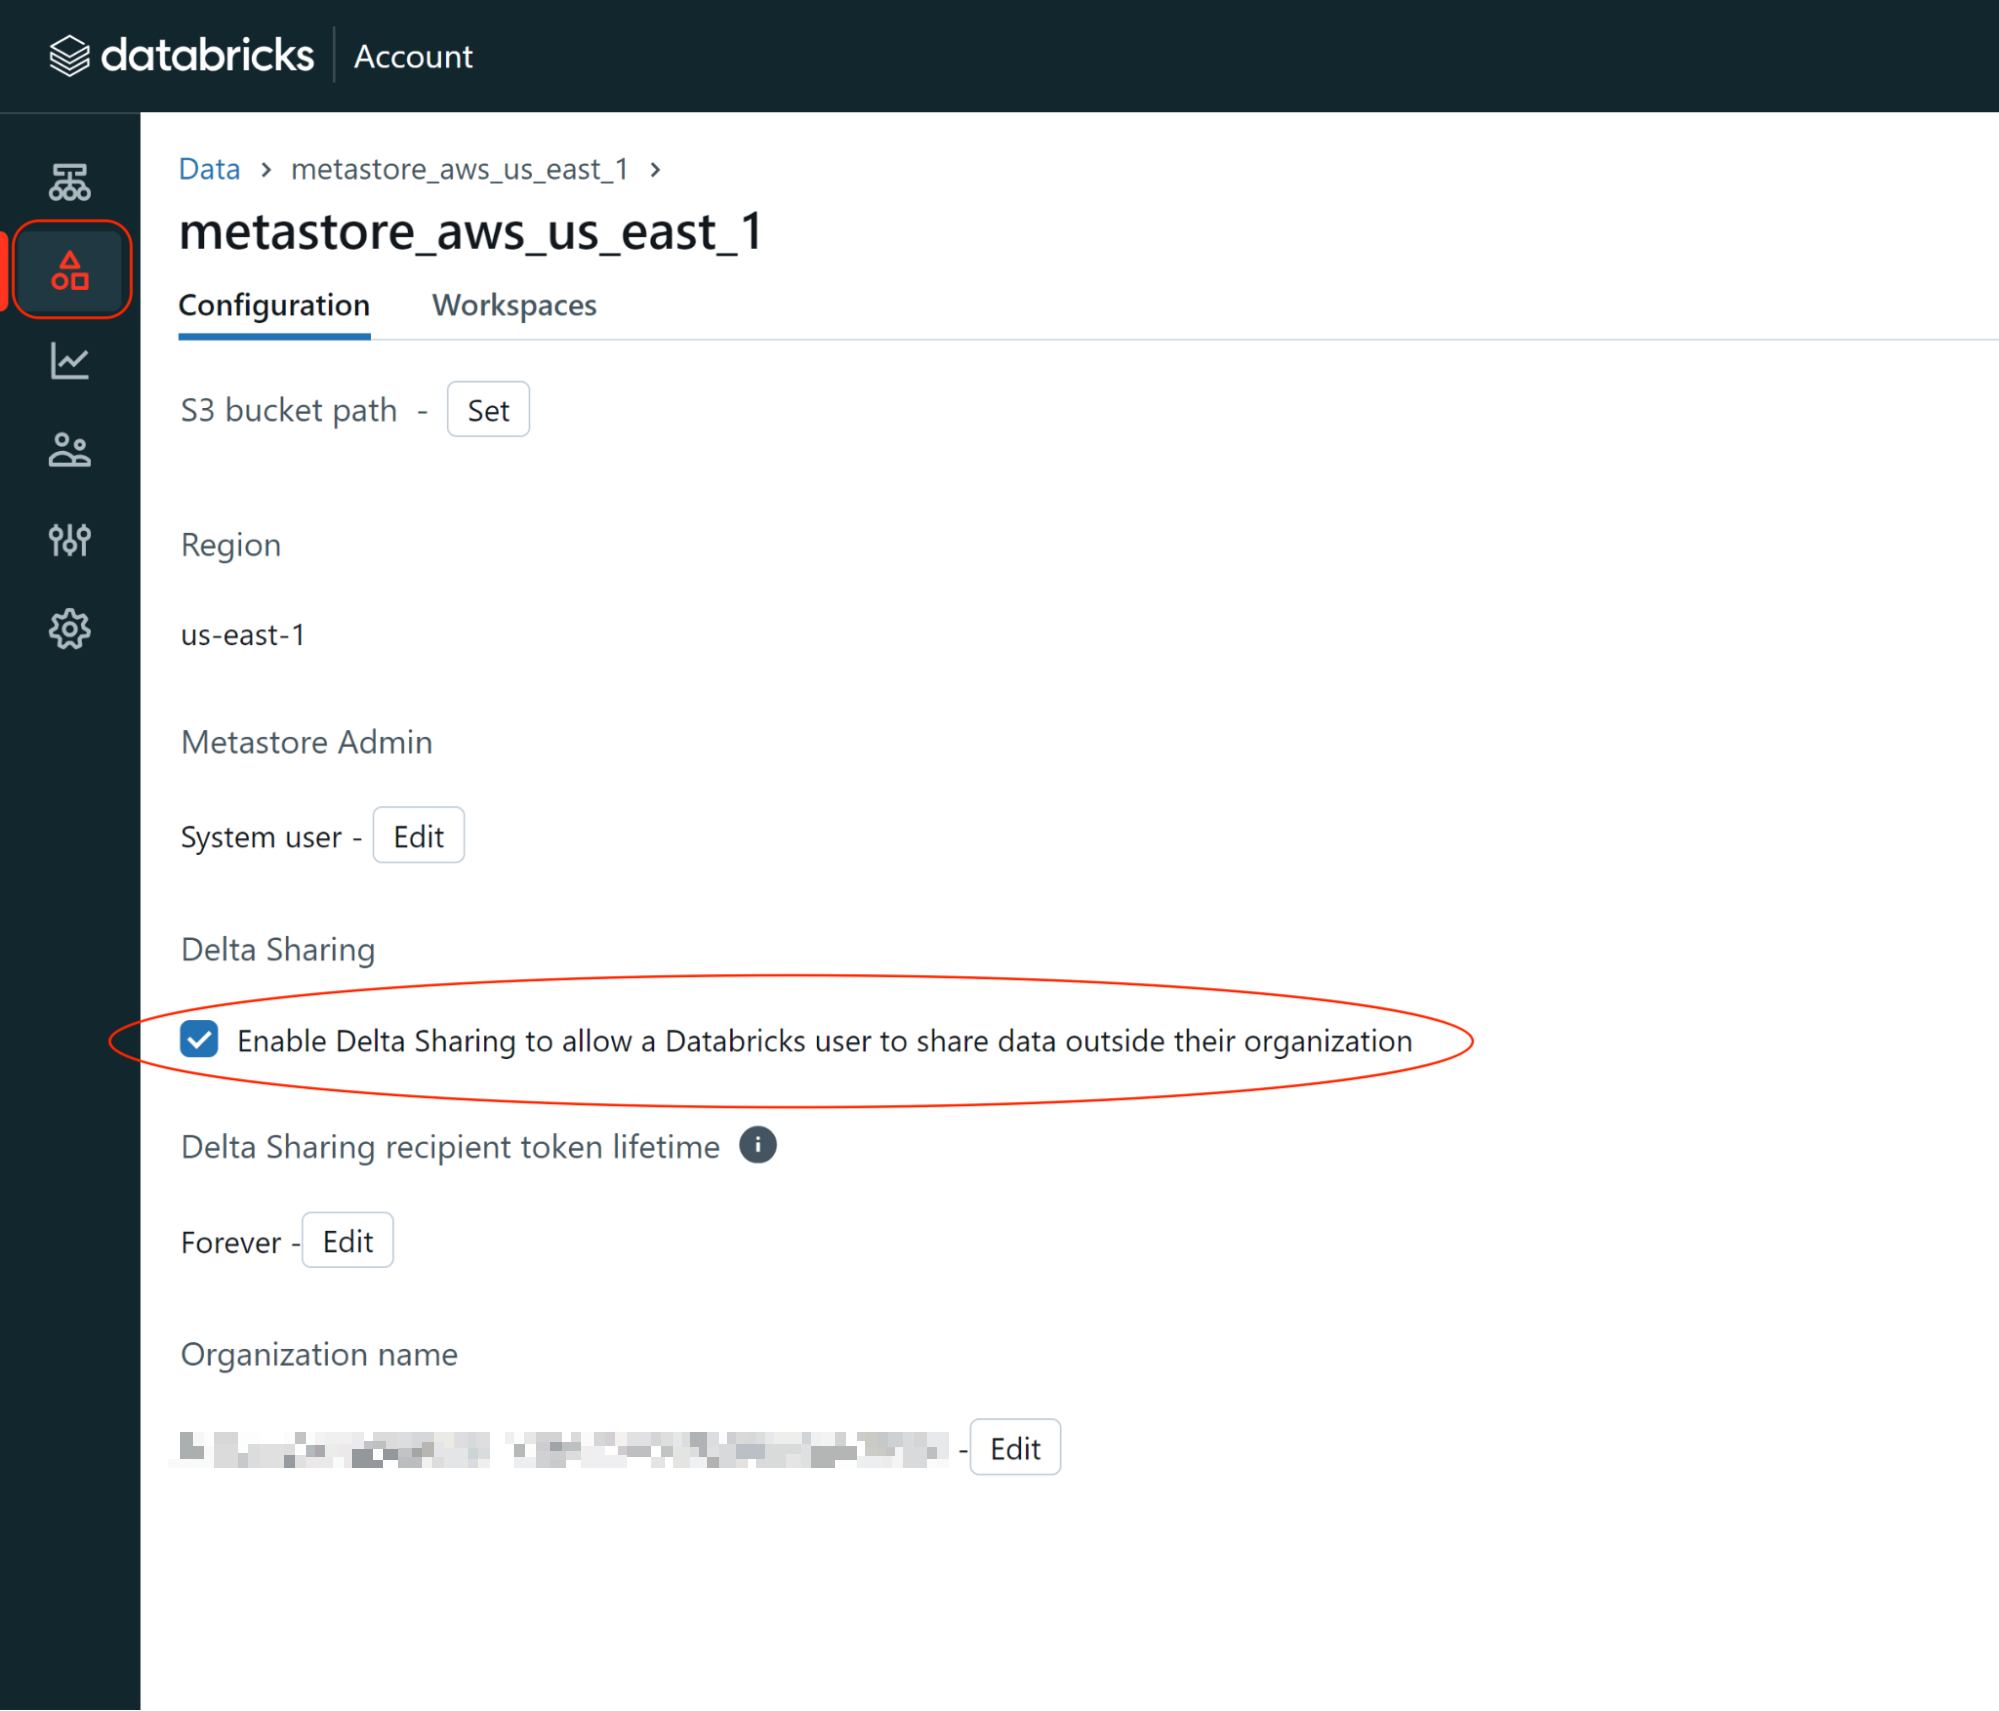
- Log into your Databricks account and navigate to the Account Admin Console. You must have Account Admin user privileges.
- Click Data from the left hand nav bar, and select the metastore you want to ingest data from.
- Select the Configuration tab. Under Delta Sharing, check the box labeled “Enable Delta Sharing to allow a Databricks user to share data outside their organization”
1.2 Configure a Delta Sharing recipient for mParticle
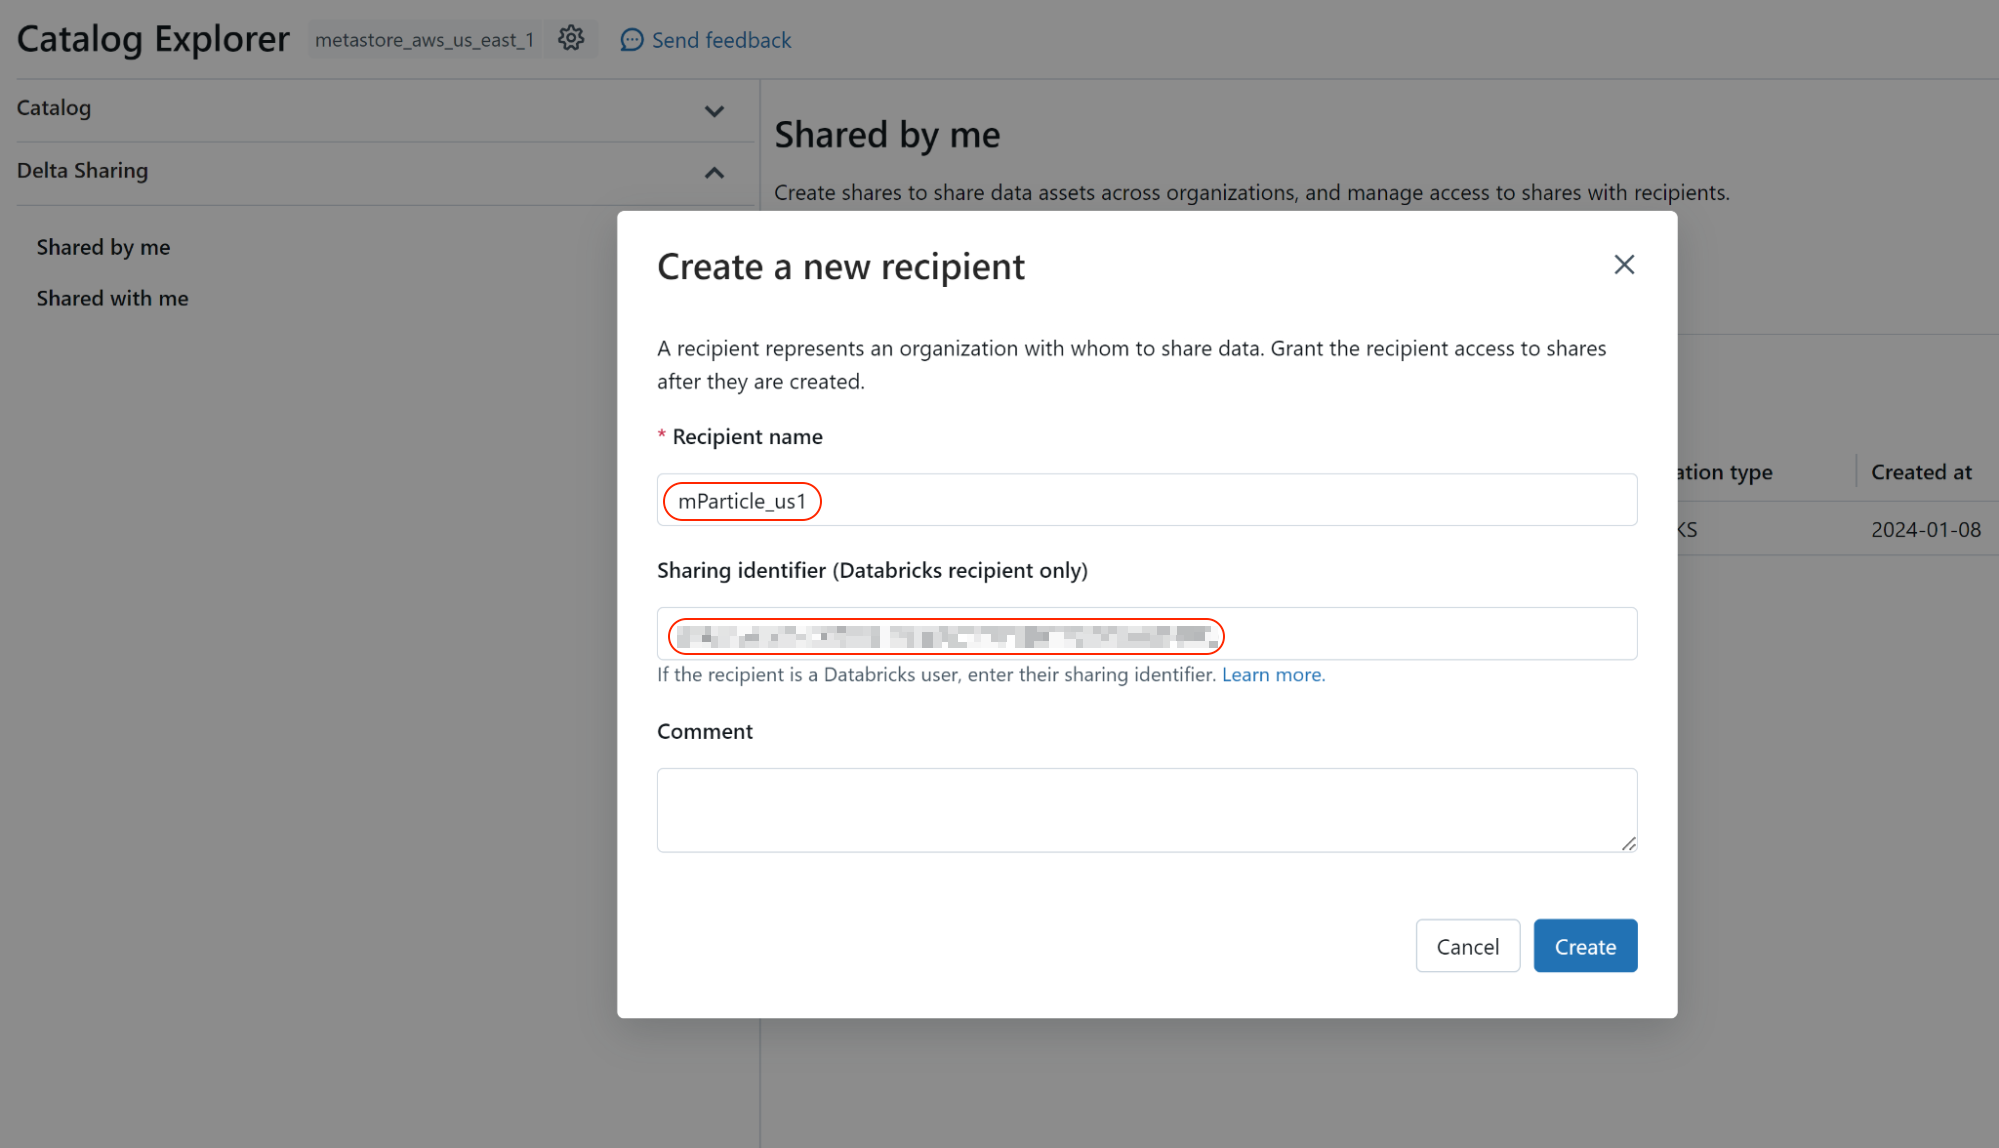
- From the Unity Catalog explorer in your Databricks account, expand the Delta Sharing dropdown menu in the left hand nav, and select Shared by me.
- Click New Recipient in the top right corner.
- Within the Create a new recipient window, enter
mParticle_{YOUR-DATA-POD}under Recipient name where{YOUR-DATA-POD}is eitherus1,us2,eu1, orau1depending on the location of the data pod configured for your mParticle account. -
In Sharing identifier, enter one of the following identifiers below, depending on the location of your mParticle account’s data pod:
- US1:
aws:us-east-1:e92fd7c1-5d24-4113-b83d-07e0edbb787b - US2:
aws:us-east-1:e92fd7c1-5d24-4113-b83d-07e0edbb787b - EU1:
aws:eu-central-1:2b8d9413-05fe-43ce-a570-3f6bc5fc3acf - AU1:
aws:ap-southeast-2:ac9a9fc4-22a2-40cc-a706-fef8a4cd554e
- US1:
1.3 Share your Databricks tables and schema with your new Delta Sharing recipient
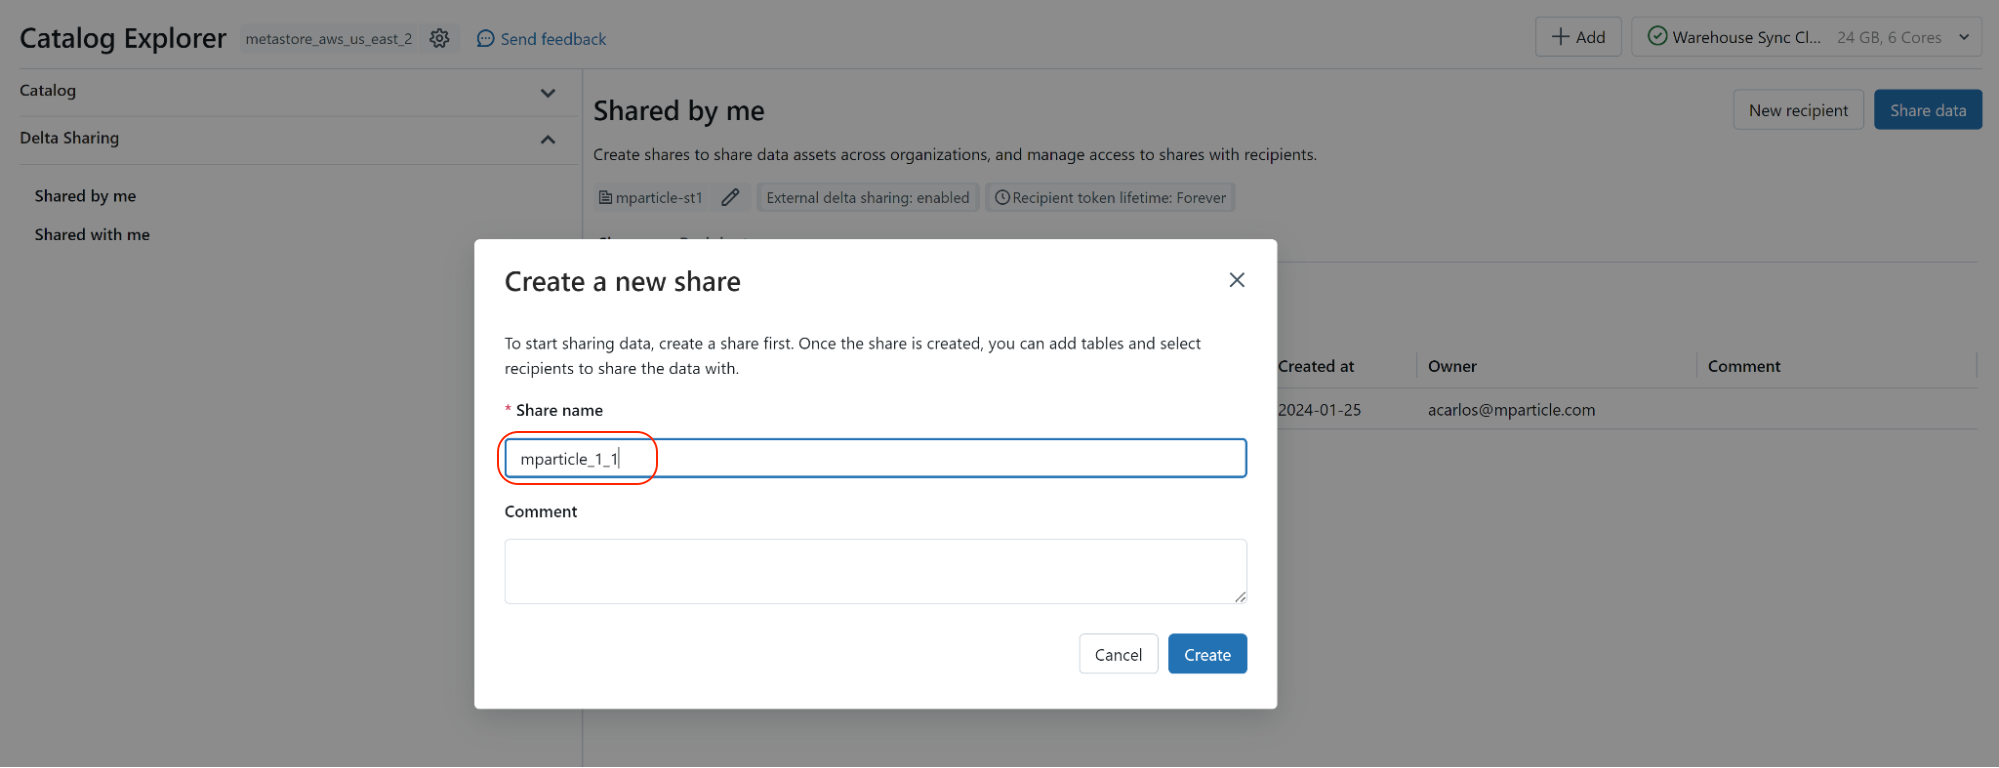
- From the Unity Catalog explorer in your Databricks account, expand the Delta Sharing dropdown menu in the left hand nav, and select Share Data.
- Click Share Data in the top right.
-
Within the Create a new share window, enter
mparticle_{YOUR-MPARTICLE-ORG-ID}_{YOUR-MPARTICLE-ACCOUNT-ID}under Share name where{YOUR-MPARTICLE-ORG-ID}and{YOUR-MPARTICLE-ACCOUNT-ID}are your mParticle Org and Account IDs.- To find your Org ID, log into the mParticle app. View the page source. For example, in Google Chrome, go to View > Developer > View Page Source. In the resulting source for the page, look for “orgId”:xxx. This number is your Org ID.
- Follow a similar process to find your Account ID (“accountId”:yyy) and Workspace ID (“workspaceId”:zzz).
- Click Create.
- From the Share details page, select the Assets tab and use the Add assets dropdown to add the schema and tables you want to send to mParticle.

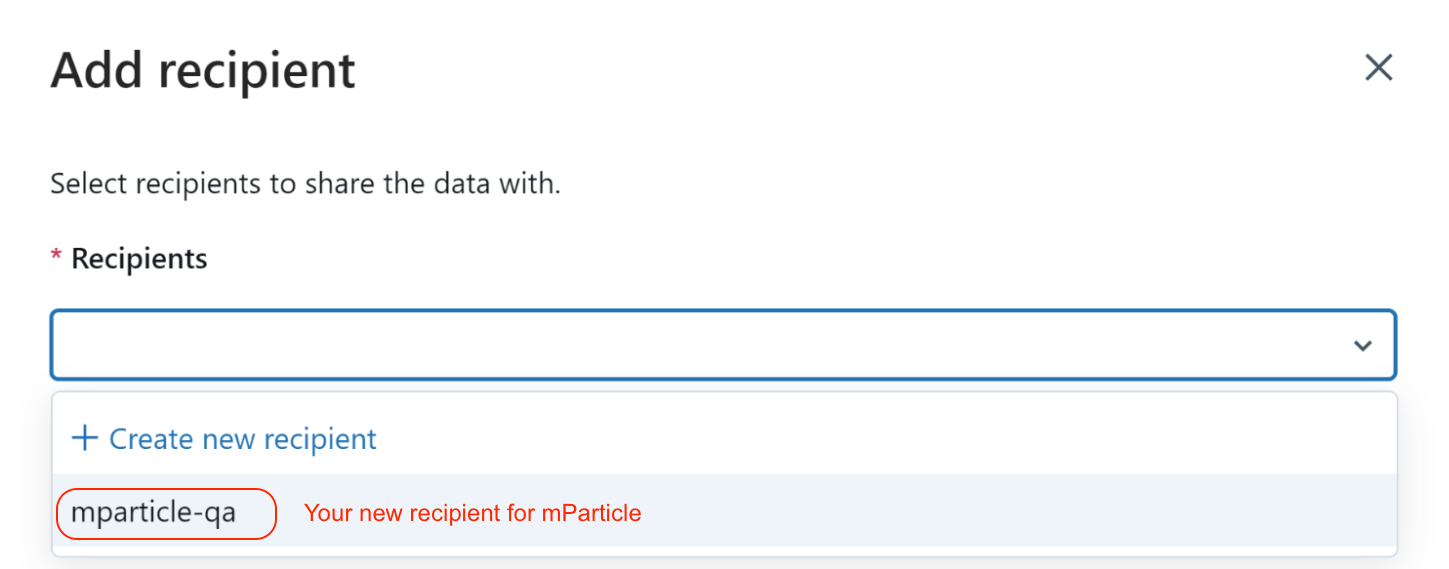
- From the Recipients tab, make sure to add your new mParticle recipient you created in step 2.
1.4 Find and save your Databricks provider name
- Navigate to the Account Admin Console for your Databricks account.
- Click Data in the left hand nav bar.
- Select the metastore you are ingesting data from.
- Save the value displayed under Organization name. You will use this value for your provider name when creating the connection between the mParticle Warehouse Sync API and Databricks.
Unsupported data types between mParticle and Databricks
Databricks Delta Sharing does not currently support the TIMESTAMP_NTZ data type.
Other data types that are not currently supported by the Databricks integration for Warehouse Sync (for both user and events data) include:
If you are ingesting events data through Warehouse Sync, the following data types are unsupported:
While multi-dimensional, or nested, arrays are unsupported, you can still ingest simple arrays with events data.
2 Create a new warehouse input
- Log into your mParticle account
- Navigate to Setup > Inputs in the left-hand nav bar and select the Feeds tab
- Under Add Feed Input, search for and select your data warehouse provider.

You can also create a new warehouse input from the Integrations Directory:
- Log into your mParticle account, and click Directory in the left hand nav.
- Search for either Google BigQuery, Snowflake, Amazon Redshift, or Databricks.

After selecting your warehouse provider, the Warehouse Sync setup wizard will open where you will:
- Enter your warehouse details
- Create your data model
- Create any necessary mappings between your warehouse data and mParticle fields
- Enter your sync schedule settings
3 Connect warehouse
The setup wizard presents different configuration options depending on the warehouse provider you select. Use the tabs below to view the specific setup instructions for Amazon Redshift, Google BigQuery, and Snowflake.
Connect to Amazon Redshift

3.1 Enter a configuration name
The configuration name is specific to mParticle and will appear in your list of warehouse inputs. You can use any configuration name, but it must be unique since this name is used when configuring the rest of your sync settings.
3.2 Enter your Amazon Redshift database name
The database name identifies your database in Amazon Redshift. This must be a valid Amazon Redshift name, and it must exactly match the name for the database you want to connect to.
3.3 Enter your Redshift AWS IAM Role ARN
This is the unique string used to identify an IAM (Identity and Access Management) role within your AWS account. AWS IAM Role ARNs follow the format arn:aws:iam::account:role/role-name-with-path where account is replaced with your AWS account number, role is replaced with the role type in AWS, and role-name-with-path is replaced with the name and location for the role in your AWS account.
Learn more about AWS identifiers in IAM identifiers in the AWS documentation.
3.4 Enter your warehouse host and port
mParticle uses the host name and port number when connecting to, and ingesting data from, your warehouse.
3.5 Enter your Amazon Redshift credentials
Provide the username and password associated with the AWS IAM Role you entered in step 1.4. mParticle will use these credentials when logging into AWS before syncing data.
Connect to Google BigQuery

3.1 Enter a configuration name
The configuration name is specific to mParticle and will appear in your list of warehouse inputs. You can use any configuration name, but it must be unique since this name is used when configuring the rest of your sync settings.
3.2 Enter your BigQuery project ID
Enter the ID for the project in BigQuery containing the dataset. You can find your Project ID from the Google BigQuery Console.
3.3 Enter your BigQuery Dataset ID
Enter the ID for the dataset you’re connecting to. You can find your Dataset ID from the Google BigQuery Console.
3.4 Enter the region
Enter the region where your dataset is localized. For example, aws-us-east-1 or aws-us-west-2. You can find the region for your data set from the Google BigQuery Console.
3.5 Add your BigQuery credentials
Finally, enter the service account ID and upload a JSON file containing your source account key associated with the Project ID you entered in step 1.3. mParticle uses this information to log into BigQuery on your behalf when syncing data.
Your service account ID must match the source account key.
Connect to Snowflake

3.1 Enter a configuration name
The configuration name is specific to mParticle and will appear in your list of warehouse inputs. You can use any configuration name, but it must be unique since this name is used when configuring the rest of your sync settings.
3.2 Select the environment type where your data originates
Select either Prod or Dev depending on whether your want your warehouse data sent to the mParticle development or production environments. This setting determines how mParticle processes ingested data.
3.3 Enter your Snowflake account ID
Your Snowflake account ID uniquely identifies your Snowflake account. You can find your Snowflake account ID by logging into your Snowflake account and finding your account_locator, cloud_region_id, and cloud. More details here and here.
3.4 Enter your Snowflake warehouse name
The Snowflake warehouse name is used to find the specific database you are connecting to. Each Snowflake warehouse can contain multiple databases.
3.5 Enter your Snowflake database name
The specific database you want to sync data from.
3.6 Enter the region
Enter the region identifier for where your Snowflake data is localized.
3.7 Add your Snowflake credentials
Finally, you must provide the username, password, and role specific to the database in Snowflake you are connecting to. These credentials are independent from the username and password you use to access the main Snowflake portal. If you don’t have these credentials, contact the Snowflake database administrator on your team.
Connect to Databricks

3.1 Enter a configuration name
The configuration name is specific to mParticle and will appear in your list of warehouse inputs. You can use any configuration name, but it must be unique since this name is used when configuring the rest of your sync settings.
3.2 Enter your Databricks provider
The value you enter for your Databricks provider must match the value of the Databricks organization that contains the schema you want to ingest data from. This is the same value that you saved when following Step 4 of the Data Warehouse setup, Find and save your Databricks provider name, prior to creating your warehouse connection.
3.3 Enter your Databricks schema
Enter the name of the schema in your Databricks account that you want to ingest data from. Databricks uses the terms database and schema interchangeably, so in this situation the schema is the specific collection of tables and views that mParticle will access through this Warehouse Sync connection.
4 Create data model
Your data model describes which columns from your warehouse to ingest into mParticle, and which mParticle fields each column should map to. While mParticle data models are written in SQL, all warehouse providers process SQL slightly differently so it is important to use the correct SQL syntax for the warehouse provider you select.
For a detailed reference of all SQL commands Warehouse Sync supports alongside real-world example SQL queries, see Warehouse Sync SQL reference.
Steps to create a data model
- Write a SQL query following the guidelines outlined below and the Warehouse Sync SQL reference. Make sure to use SQL commands supported by your warehouse provider.
- Enter the SQL query in the SQL query text box, and click Run Query.
- Click Next.

mParticle submits the SQL query you provide to your warehouse to retrieve specific columns of data. Depending on the SQL operators and functions you use, the columns selected from your database are transformed, or mapped, to user profile attributes in your mParticle account.
If you use an attribute name in your SQL query that doesn’t exist in your mParticle account, mParticle creates an attribute with the same name and maps this data to the new attribute.
mParticle automatically maps matching column names in your warehouse to reserved mParticle user attributes and device ids. For example, if your database contains a column named customer_id, it is automatically mapped to the customer_id user identifier in mParticle. For a complete list of reserved attribute names, see Reserved mParticle user or device identity column names.
Example database and SQL query
Below are several example data tables and a SQL query that creates a data model based on them:
Table name: mp.demo.attr
| Columns | date_updated | customer_id | firstname |
|---|---|---|---|
| Data rows | … | … | … |
Table name: mp.demo.calc
| Columns | propensity_to_buy | customer_id |
|---|---|---|
| Data rows | … | … |
Table name: mp.demo.favs
| Columns | value | customer_id |
|---|---|---|
| Data rows | … | … |
Example SQL query:
SELECT
    a.date_updated,
    a.customer_id,
    a.firstname AS "$firstname",
    c.propensity_to_buy AS "propensity_to_buy",
    ARRAY_AGG(f.value) WITHIN GROUP (ORDER BY f.value ASC) AS "favorite_categories"
FROM mp.demo.attr a
JOIN mp.demo.calc c ON a.customer_id = c.customer_id
JOIN mp.demo.favs f ON a.customer_id = f.customer_id
GROUP BY
    a.date_updated,
    a.customer_id,
    a.firstname,
    c.propensity_to_buy
The SQL query above performs several selections and operations on the data in the sample tables:
- The columns
date_updated,customer_id, andfirstnameare selected from the database tablemp.demo.att. - The column
firstnamemaps to the mParticle attributefirstnameusing theASSQL operator.date_updatedandcustomer_idare automatically mapped to their corresponding reserved attributes in mParticle. - The column
propensity_to_buyin the tablemp.demo.calcmaps to the mParticle attributepropensity_to_buy. - The aggregate function
ARRAY_ARG()creates an array namedfavorite_categoriescontaining each user’s favorite categories in ascending order from the tablemp.demo.favs.
Note that the query joins the three tables on their shared customer_id column. The result of the query as it exists in mParticle would then be:
| mParticle attributes names | date_updated | customer_id | firstname | propensity_to_buy |
|---|---|---|---|---|
| Attribute values | … | … | … | … |
5 Create data mapping
After creating a data model that specifies which columns in your warehouse you want to ingest, you must map each column to its respective field within mParticle with a data mapping.
To create a data mapping, first use the dropdown menu titled Type of data to sync to select either User Attributes & Identities Only or Events, depending on whether you want to ingest user data or event data.
User Attributes & Identities Only
Create a user data mapping
You must always create a user_attributes or user_identities object to contain user attribute and identity mappings.
- Click Add Mapping.
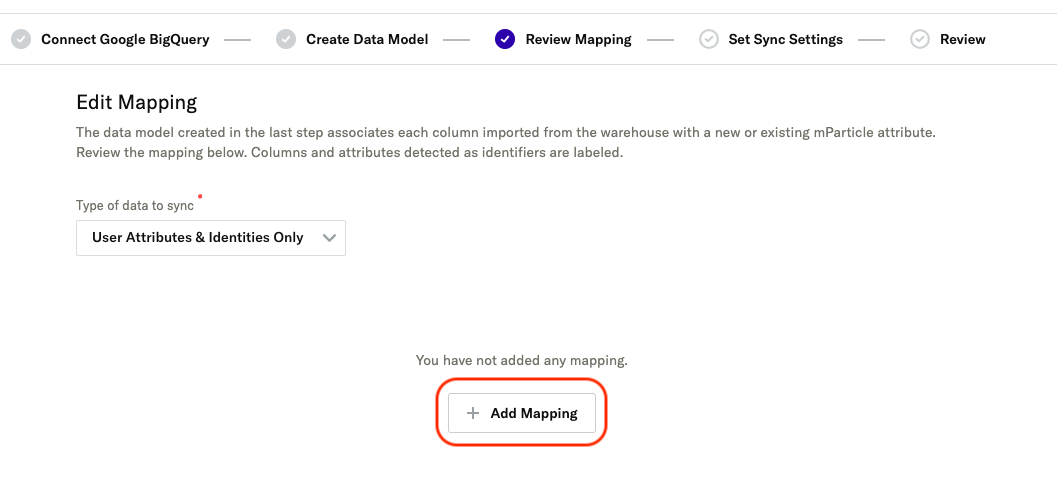
- Under Mapping Type, select
Object. - Under Field in mParticle, select
user_attributesif you want to map user attributes, oruser_identitiesif you want to map user identities.
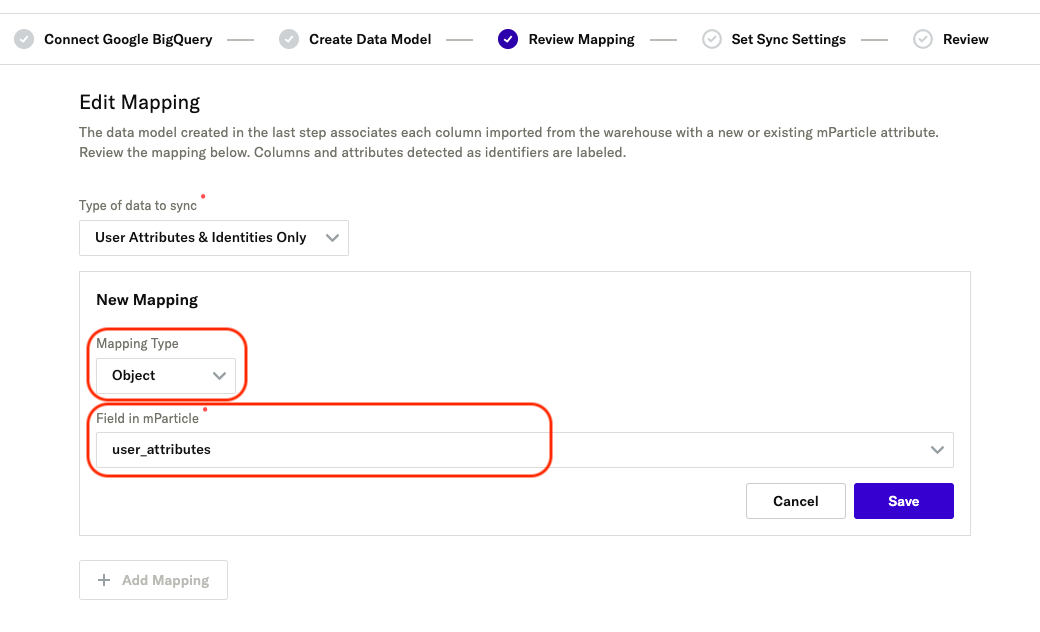
- Click Save.
- Within your new
user_attributesoruser_identitiesobject, click the + button.
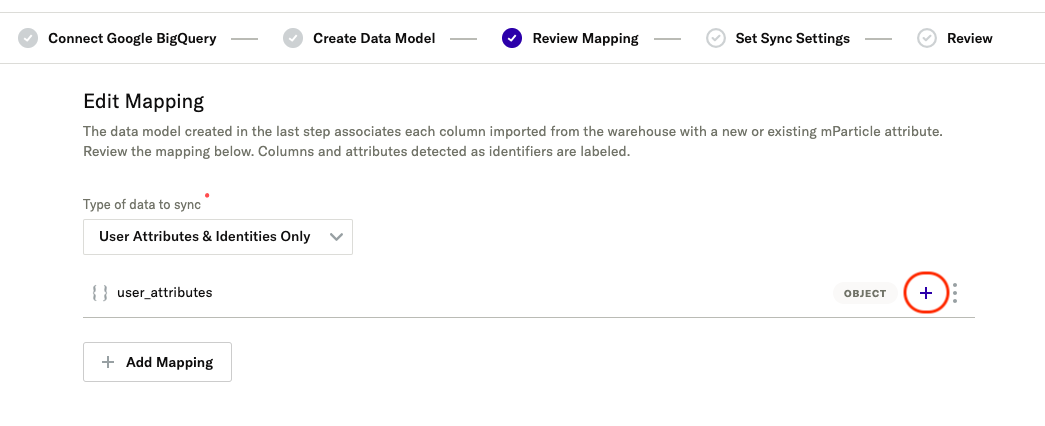
- Under Mapping Type, select
Column. - Under Column in warehouse select the name of the column that contains your user attribute or user identity field.
- Under Field in mParticle enter the name of the user attribute or identity you want to map your warehouse field to.
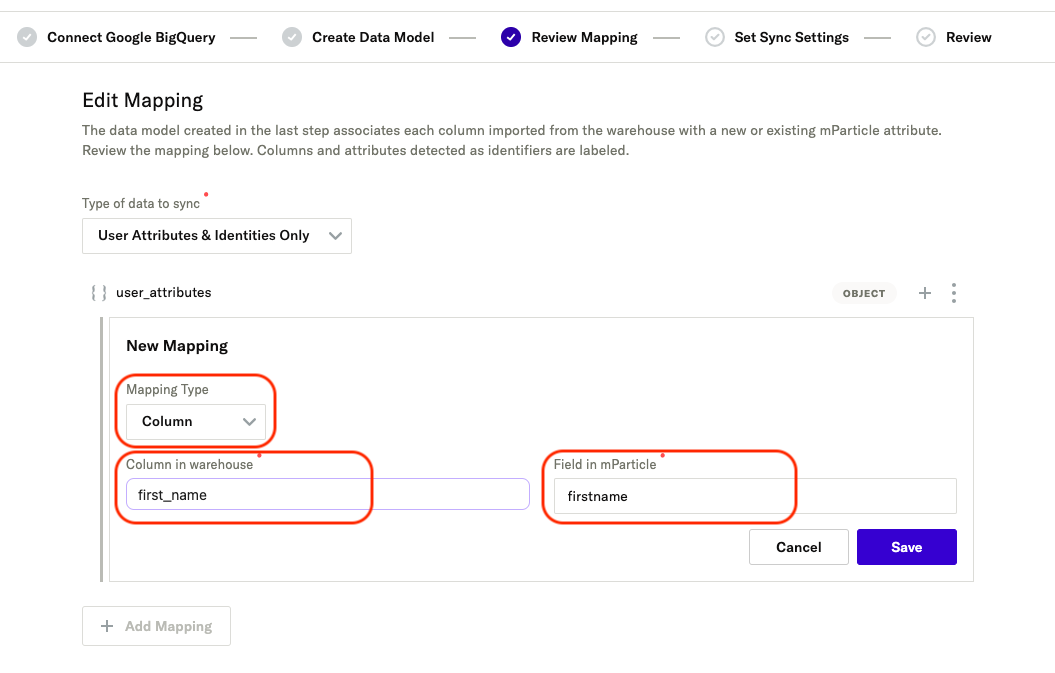
- Click Save.
- Repeat steps 5-9 for each attribute or identity you want to map.
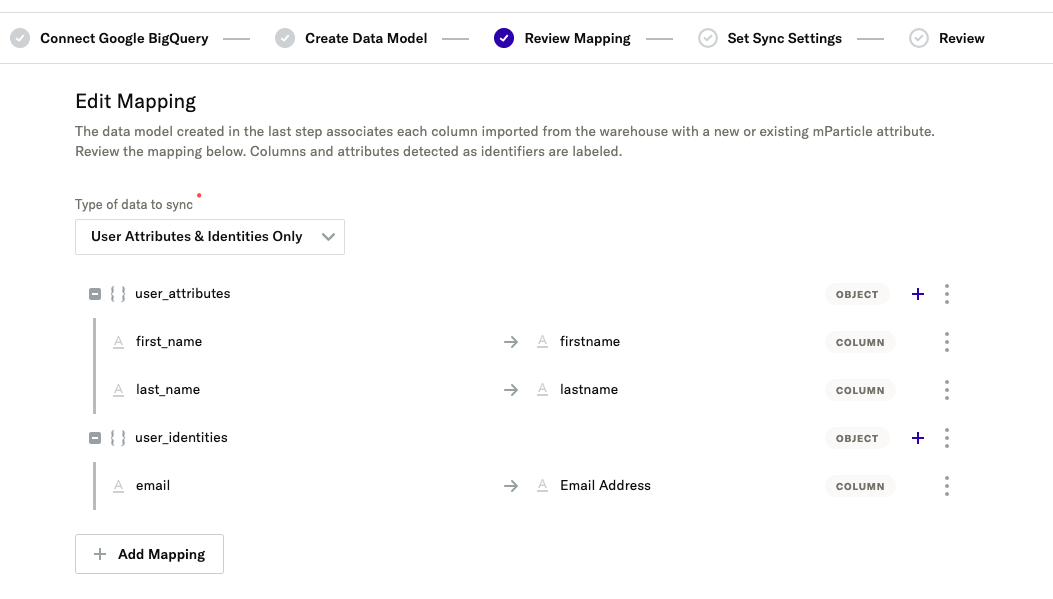
Events
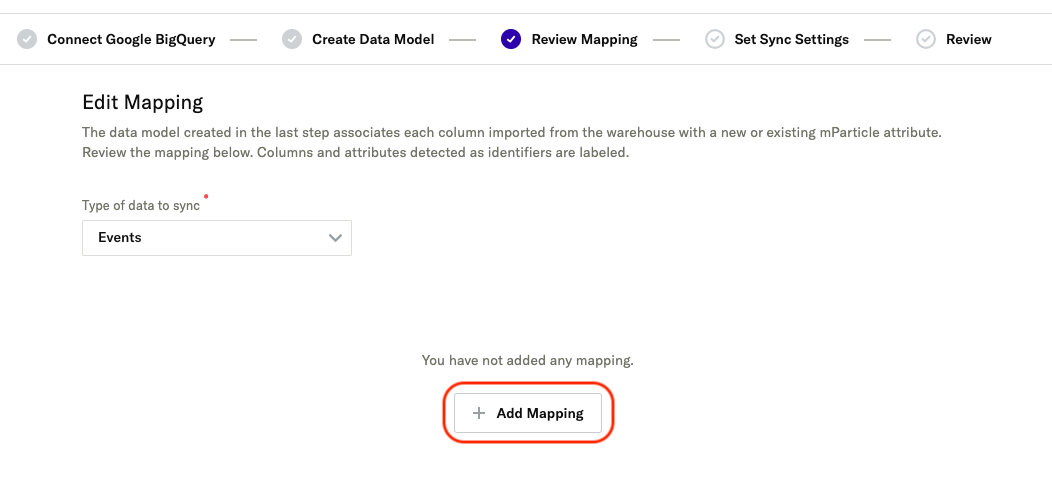
You must always create an events object to contain your event attribute mappings.
- Click Add Mapping.
- Under Mapping Type, select
Object. - Under Field in mParticle, select
events.
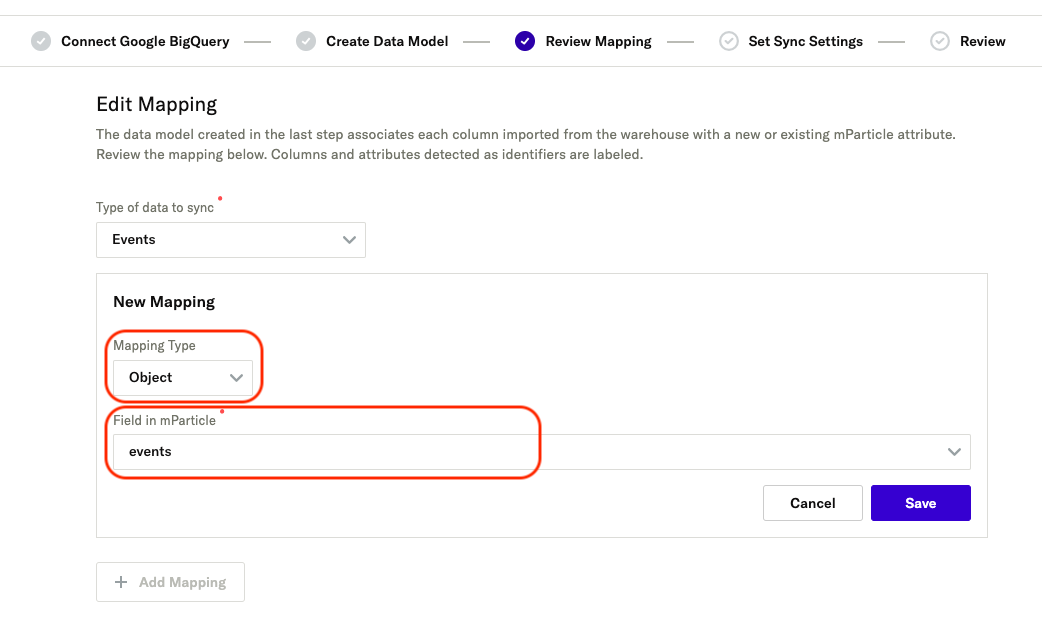
- Click Save.
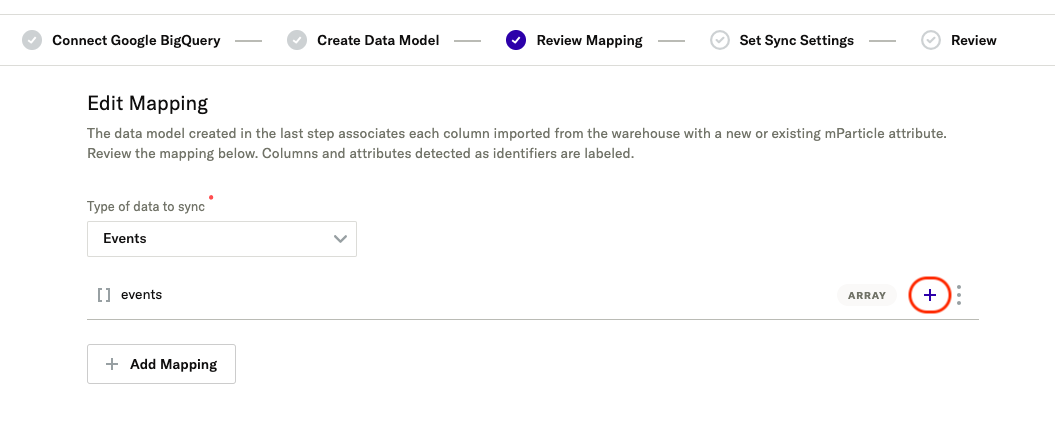
- Within the new
eventsobject, click the + button to add a new mapping.
-
Select the type of mapping you want to use from the Mapping Type dropdown:
Column- maps a column from your database to a field in mParticleStatic- maps a static value that you define to a field in mParticleIgnore- prevents a field that you specify from being ingested into mParticle
The next steps vary depending on the mapping type you select:
Column mapping
- Under Column in warehouse, select the name of the column in your database you are mapping fields from.
- Under Field in mParticle, select the field in mParticle you are mapping fields to.
- Click Save.

Static mapping
- Under Input Value select either
String,Number, orBooleanfor the data type of the static value you are mapping. - In the entry box, enter the static value you are mapping.
- Under Field in mParticle, select the field you want to map your static value to.
- Click Save.

Ignore mapping
- Under Column in warehouse, select the name of the column that you want your pipeline to ignore when ingesting data.
- Click Save.

To add additional mappings, click Add Mapping. You must create a mapping for every column you selected in your data model.
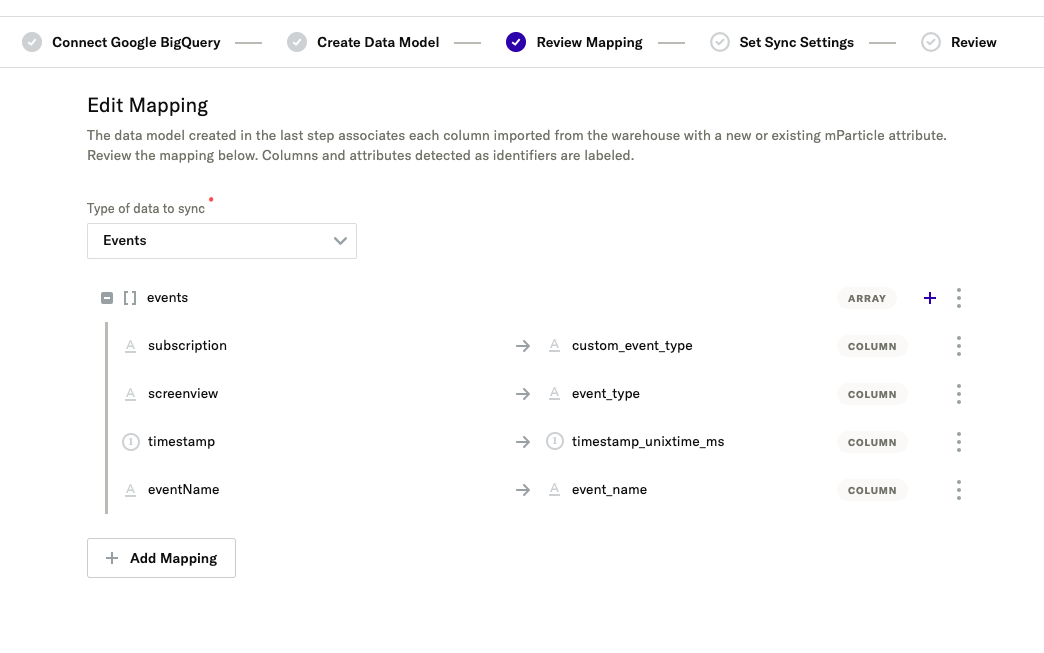
When you have finished creating your mappings, click Next.
6 Set sync settings
The sync frequency settings determine when the initial sync with your database will occur, and how frequently any subsequent syncs will be executed.
6.1 Select environment
Select either Prod or Dev depending on whether you want your warehouse data sent to the mParticle development or production environments. This setting determines how mParticle processes ingested data.
6.2 Select input protection level
Input protection levels determine how data ingested from your warehouse can contribute to new or existing user profiles in mParticle:
- Create & Update: the default setting for all inputs in mParticle. This setting allows ingested user data to initiate the creation of a new profile or to be added to an existing profile.
- Update Only: allows ingested data to be added to existing profiles, but not initiate the creation of new profiles.
- Read Only: prevents ingested data from updating or creating user profiles.
To learn more about these settings and how they can be used in different scenarios, see Input protections.
6.3 Select sync mode and schedule
There are two sync modes: incremental and full.
- Incremental: Use this sync mode to only ingest data that has changed or been added between sync runs as indicated by your warehouse column you use as an iterator. The first run for incremental sync modes is always be a full sync.
- Full: Use this sync mode to sync all data from your warehouse each time you execute a sync run. Use caution when selecting this sync mode, as it can incur to very high costs due to the volume of data ingested.
The remaining setting options change depending on the mode you select from the Sync mode dropdown menu. Navigate between the two configuration options using the tabs below:
Following are the sync settings for incremental syncs:
The main difference between full and incremental sync configurations is the use of an iterator field for incremental syncs. Both full and incremental syncs support all three sync modes (Interval, Once, and On Demand).
Iterator
Select the column name from your warehouse using the Iterator dropdown menu. The options are generated from the SQL query you ran when creating your data model.
mParticle uses the iterator to determine which data to include and exclude during each incremental sync.
Iterator data type
Select the iterator data type using the Iterator data type dropdown. This value must match the datatype of the iterator as it exists in your warehouse.
Sync schedule type
Select one of the following schedule types:
- Interval: for recurring syncs that are run automatically based on a set frequency.
- Once: for a single sync between a warehouse and mParticle that will not be repeated.
- On Demand: for a sync that can run multiple times, but must be triggered manually.
Frequency of sync
Sync frequencies can be either Hourly, Daily, Weekly, or Monthly.
The date and time you select for your initial sync is used to calculate the date and time for the next sync. For example, if you select Hourly for your frequency and 11/15/2023 07:00 PM UTC for your initial sync, then the next sync will occur at 11/15/2023 08:00 PM UTC.
Date & time of sync
Use the date and time picker to select the calendar date and time (in UTC) for your initial sync. Subsequent interval syncs will be scheduled based on this initial date and time.
Following are the sync settings for full syncs:
The main difference between full and incremental sync configurations is the use of an iterator field for incremental syncs. Both full and incremental syncs support all three sync modes (Interval, Once, and On Demand).
Sync schedule type
Select one of the following schedule types:
- Interval: for recurring syncs that is run automatically based on a set frequency.
- Once: for a single sync between a warehouse and mParticle that will not be repeated.
- On Demand: for a sync that can run multiple times, but must be triggered manually.
Frequency of sync
Sync frequencies can be either Hourly, Daily, Weekly, or Monthly.
The date and time you select for your initial sync is used to calculate the date and time for the next sync. For example, if you select Hourly for your frequency and 11/15/2023 07:00 PM UTC for your initial sync, then the next sync will occur at 11/15/2023 08:00 PM UTC.
Date & time of initial sync
Use the date and time picker to select the calendar date and time (in UTC) for your initial sync. Subsequent interval syncs will be scheduled based on this initial date and time.
6.4 Sync historical data
The value you select for Sync Start Date determines how much old, historical data mParticle ingests from your warehouse in your initial sync. When determining how much historical data to ingest, mParticle uses to the column in your database you selected as the Timestamp field in the Create Data Model step.
After your initial sync begins, mParticle begins ingesting any historical data. If mParticle hasn’t finished ingesting historical data before the time a subsequent sync is due to start, the subsequent sync is still executed, and the historical data continues syncing in the background.
Historical data syncing doesn’t contribute to any rate limiting on subsequent syncs.

After entering your sync settings, click Next.
7 Review
mParticle generates a preview for Data Warehouse syncs that have been configured, but not yet activated. Use this page and the sample enriched user profiles to confirm the following:
- Your data model correctly maps columns from your database to mParticle attributes
- Your sync is scheduled to occur at the correct interval
- Your initial sync is scheduled to occur at the correct time
- Your initial sync includes any desired historical data in your warehouse
After reviewing your sync configuration, click Activate to activate your sync.
View and manage existing warehouse syncs
- Log into your mParticle account.
- Navigate to Setup > Inputs in the left hand nav bar and select the Feeds tab.
-
Any configured warehouse syncs are listed on this page, grouped by warehouse provider. Expand a warehouse provider to view and manage a sync.
- To edit an existing sync, select it from the list under a warehouse provider. This loads the Warehouse Sync setup wizard, where you can modify your sync settings.
- Connect a sync to an output by clicking the green + icon under Connected Outputs.
- Configure rules for a sync by clicking the + Setup button under Rules Applied.
- Delete a sync configuration by clicking the trash icon under Actions.
- To add a new sync for a warehouse provider, click the + icon next to the provider.
Manage a sync
To view details for an existing sync, select it from the list of syncs. A summary page is displayed, showing the current status (Active or Paused), sync frequency, and a list of recent or in-progress syncs.
To pause a sync, click Pause Sync. Paused syncs will only resume running on their configured schedule after you click Resume.
To run an on-demand sync, click Run Sync under Sync Frequency.
Use the Data Model, Mapping, and Settings tabs to view and edit your sync configuration details. Clicking Edit from any of these tabs opens the respective step of the setup wizard where you can make and save your changes.
Was this page helpful?