Documentation
Developers
API References
Platform API
Platform API Overview
Accounts
Apps
Audiences
Calculated Attributes
Data Points
Feeds
Field Transformations
Services
Users
Workspaces
Data Subject Request API
Data Subject Request API Version 1 and 2
Data Subject Request API Version 3
Warehouse Sync API
Warehouse Sync API Overview
Warehouse Sync API Tutorial
Warehouse Sync API Reference
Data Mapping
Warehouse Sync SQL Reference
Warehouse Sync Troubleshooting Guide
ComposeID
Warehouse Sync API v2 Migration
Calculated Attributes Seeding API
Bulk Profile Deletion API Reference
Custom Access Roles API
Data Planning API
Group Identity API Reference
Pixel Service
Profile API
Events API
mParticle JSON Schema Reference
IDSync
Client SDKs
AMP
AMP SDK
Android
Initialization
Configuration
Network Security Configuration
Event Tracking
User Attributes
IDSync
Screen Events
Commerce Events
Location Tracking
Media
Kits
Application State and Session Management
Data Privacy Controls
Error Tracking
Opt Out
Push Notifications
WebView Integration
Logger
Preventing Blocked HTTP Traffic with CNAME
Linting Data Plans
Troubleshooting the Android SDK
API Reference
Upgrade to Version 5
Cordova
Cordova Plugin
Identity
Direct Url Routing
Direct URL Routing FAQ
Web
Android
iOS
iOS
Initialization
Configuration
Event Tracking
User Attributes
IDSync
Screen Tracking
Commerce Events
Location Tracking
Media
Kits
Application State and Session Management
Data Privacy Controls
Error Tracking
Opt Out
Push Notifications
Webview Integration
Upload Frequency
App Extensions
Preventing Blocked HTTP Traffic with CNAME
Linting Data Plans
Troubleshooting iOS SDK
Social Networks
iOS 14 Guide
iOS 15 FAQ
iOS 16 FAQ
iOS 17 FAQ
iOS 18 FAQ
API Reference
Upgrade to Version 7
React Native
Getting Started
Identity
Unity
Upload Frequency
Getting Started
Opt Out
Initialize the SDK
Event Tracking
Commerce Tracking
Error Tracking
Screen Tracking
Identity
Location Tracking
Session Management
Web
Initialization
Configuration
Content Security Policy
Event Tracking
User Attributes
IDSync
Page View Tracking
Commerce Events
Location Tracking
Media
Kits
Application State and Session Management
Data Privacy Controls
Error Tracking
Opt Out
Custom Logger
Persistence
Native Web Views
Self-Hosting
Multiple Instances
Web SDK via Google Tag Manager
Preventing Blocked HTTP Traffic with CNAME
Facebook Instant Articles
Troubleshooting the Web SDK
Browser Compatibility
Linting Data Plans
API Reference
Upgrade to Version 2 of the SDK
Xamarin
Getting Started
Identity
Web
Alexa
Server SDKs
Node SDK
Go SDK
Python SDK
Ruby SDK
Java SDK
Quickstart
Android
Overview
Step 1. Create an input
Step 2. Verify your input
Step 3. Set up your output
Step 4. Create a connection
Step 5. Verify your connection
Step 6. Track events
Step 7. Track user data
Step 8. Create a data plan
Step 9. Test your local app
iOS Quick Start
Overview
Step 1. Create an input
Step 2. Verify your input
Step 3. Set up your output
Step 4. Create a connection
Step 5. Verify your connection
Step 6. Track events
Step 7. Track user data
Step 8. Create a data plan
Python Quick Start
Step 1. Create an input
Step 2. Create an output
Step 3. Verify output
Guides
Partners
Introduction
Outbound Integrations
Outbound Integrations
Firehose Java SDK
Inbound Integrations
Compose ID
Data Hosting Locations
Glossary
Migrate from Segment to mParticle
Migrate from Segment to mParticle
Migrate from Segment to Client-side mParticle
Migrate from Segment to Server-side mParticle
Segment-to-mParticle Migration Reference
Rules Developer Guide
API Credential Management
The Developer's Guided Journey to mParticle
Guides
Getting Started
Create an Input
Start capturing data
Connect an Event Output
Create an Audience
Connect an Audience Output
Transform and Enhance Your Data
Personalization
Introduction
Profiles
Audiences
Audiences Overview
Create an Audience
Connect an Audience
Manage Audiences
Real-time Audiences (Legacy)
Standard Audiences (Legacy)
Calculated Attributes
Calculated Attributes Overview
Using Calculated Attributes
Create with AI Assistance
Calculated Attributes Reference
Predictive Audiences
Predictive Audiences Overview
Using Predictive Audiences
Journeys
Journeys Overview
Manage Journeys
Download an audience from a journey
Audience A/B testing from a journey
Journeys 2.0
Predictive Attributes
What are predictive attributes?
Platform Guide
Billing
Usage and Billing Report
The New mParticle Experience
The new mParticle Experience
The Overview Map
Observability
Observability Overview
Observability User Guide
Observability Troubleshooting Examples
Observability Span Glossary
Introduction
Data Retention
Connections
Activity
Live Stream
Data Filter
Rules
Tiered Events
mParticle Users and Roles
Analytics Free Trial
Troubleshooting mParticle
Usage metering for value-based pricing (VBP)
Analytics
Introduction
Setup
Sync and Activate Analytics User Segments in mParticle
User Segment Activation
Welcome Page Announcements
Settings
Project Settings
Roles and Teammates
Organization Settings
Global Project Filters
Portfolio Analytics
Analytics Data Manager
Analytics Data Manager Overview
Events
Event Properties
User Properties
Revenue Mapping
Export Data
UTM Guide
Query Builder
Data Dictionary
Query Builder Overview
Modify Filters With And/Or Clauses
Query-time Sampling
Query Notes
Filter Where Clauses
Event vs. User Properties
Group By Clauses
Annotations
Cross-tool Compatibility
Apply All for Filter Where Clauses
Date Range and Time Settings Overview
User Attributes at Event Time
Understanding the Screen View Event
Analyses
Analyses Introduction
Segmentation: Basics
Getting Started
Visualization Options
For Clauses
Date Range and Time Settings
Calculator
Numerical Settings
Segmentation: Advanced
Assisted Analysis
Properties Explorer
Frequency in Segmentation
Trends in Segmentation
Did [not] Perform Clauses
Cumulative vs. Non-Cumulative Analysis in Segmentation
Total Count of vs. Users Who Performed
Save Your Segmentation Analysis
Export Results in Segmentation
Explore Users from Segmentation
Funnels: Basics
Getting Started with Funnels
Group By Settings
Conversion Window
Tracking Properties
Date Range and Time Settings
Visualization Options
Interpreting a Funnel Analysis
Funnels: Advanced
Group By
Filters
Conversion over Time
Conversion Order
Trends
Funnel Direction
Multi-path Funnels
Analyze as Cohort from Funnel
Save a Funnel Analysis
Explore Users from a Funnel
Export Results from a Funnel
Saved Analyses
Manage Analyses in Dashboards
Dashboards
Dashboards––Getting Started
Manage Dashboards
Dashboard Filters
Organize Dashboards
Scheduled Reports
Favorites
Time and Interval Settings in Dashboards
Query Notes in Dashboards
User Aliasing
Analytics Resources
The Demo Environment
Keyboard Shortcuts
Tutorials
Analytics for Marketers
Analytics for Product Managers
Compare Conversion Across Acquisition Sources
Analyze Product Feature Usage
Identify Points of User Friction
Time-based Subscription Analysis
Dashboard Tips and Tricks
Understand Product Stickiness
Optimize User Flow with A/B Testing
User Segments
IDSync
IDSync Overview
Use Cases for IDSync
Components of IDSync
Store and Organize User Data
Identify Users
Default IDSync Configuration
Profile Conversion Strategy
Profile Link Strategy
Profile Isolation Strategy
Best Match Strategy
Aliasing
Data Master
Group Identity
Overview
Create and Manage Group Definitions
Introduction
Catalog
Live Stream
Data Plans
Data Plans
Blocked Data Backfill Guide
Warehouse Sync
Data Privacy Controls
Data Subject Requests
Default Service Limits
Feeds
Cross-Account Audience Sharing
Approved Sub-Processors
Import Data with CSV Files
Import Data with CSV Files
CSV File Reference
Glossary
Video Index
Analytics (Deprecated)
Identity Providers
Single Sign-On (SSO)
Setup Examples
Introduction
Developer Docs
Introduction
Integrations
Introduction
Rudderstack
Google Tag Manager
Segment
Data Warehouses and Data Lakes
Advanced Data Warehouse Settings
AWS Kinesis (Snowplow)
AWS Redshift (Define Your Own Schema)
AWS S3 Integration (Define Your Own Schema)
AWS S3 (Snowplow Schema)
BigQuery (Snowplow Schema)
BigQuery Firebase Schema
BigQuery (Define Your Own Schema)
GCP BigQuery Export
Snowflake (Snowplow Schema)
Snowplow Schema Overview
Snowflake (Define Your Own Schema)
Developer Basics
Aliasing
Create an Audience
Prerequisites
Before you start this activity, you should have already:
Get some more data
Up until this point, you’ve been testing your account with a single development build of your app. This works well to establish basic data throughput.
The Audiences feature allows you to target segments of your users based on their activity or attributes. So to effectively use Audiences, even at the testing stage, your app needs multiple users!
If you’re not ready to enable the mParticle SDKs in your Production app yet, you can either spin up multiple development environments, or try using the Events API to supply some test data in bulk.
Create your Audience
The mPTravel app lets users watch video content about travel destinations. This tutorial creates an audience to allow mPTravel to target users who view content about a paticular destination with deals for that destination.
Create Criteria
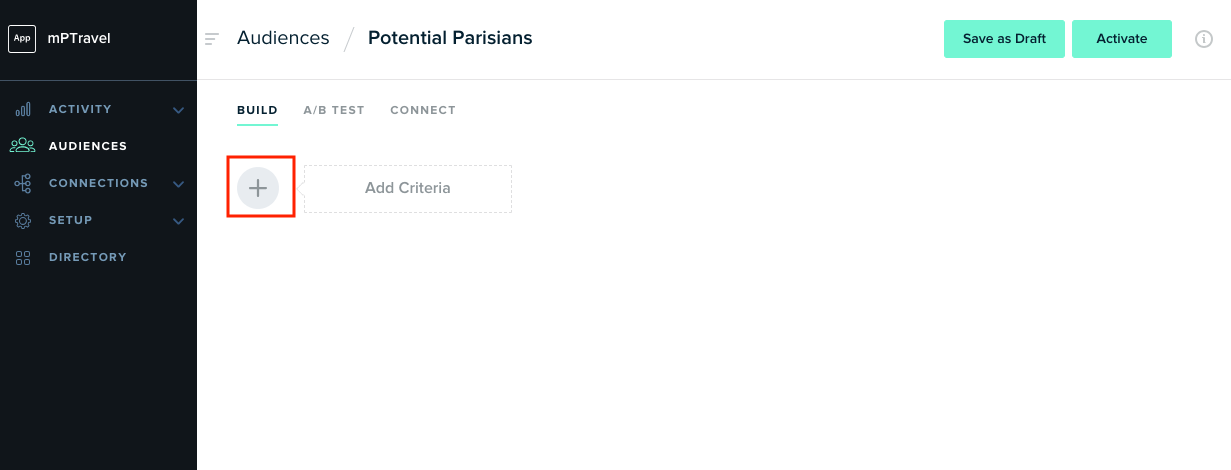
- To define an audience, you need to specify some selection criteria. Click Add Criteria.
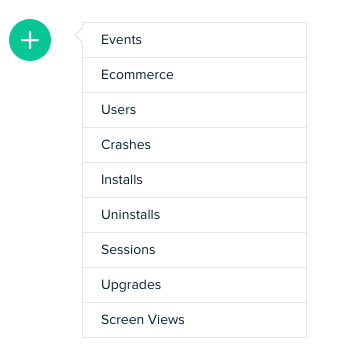
- Choose the type of criteria you want to create. Except for the Users type, which is covered below, these criteria all correspond to mParticle event types. Click Events to target custom events.
-
There are three distinct aspects of an event criteria that you can define:
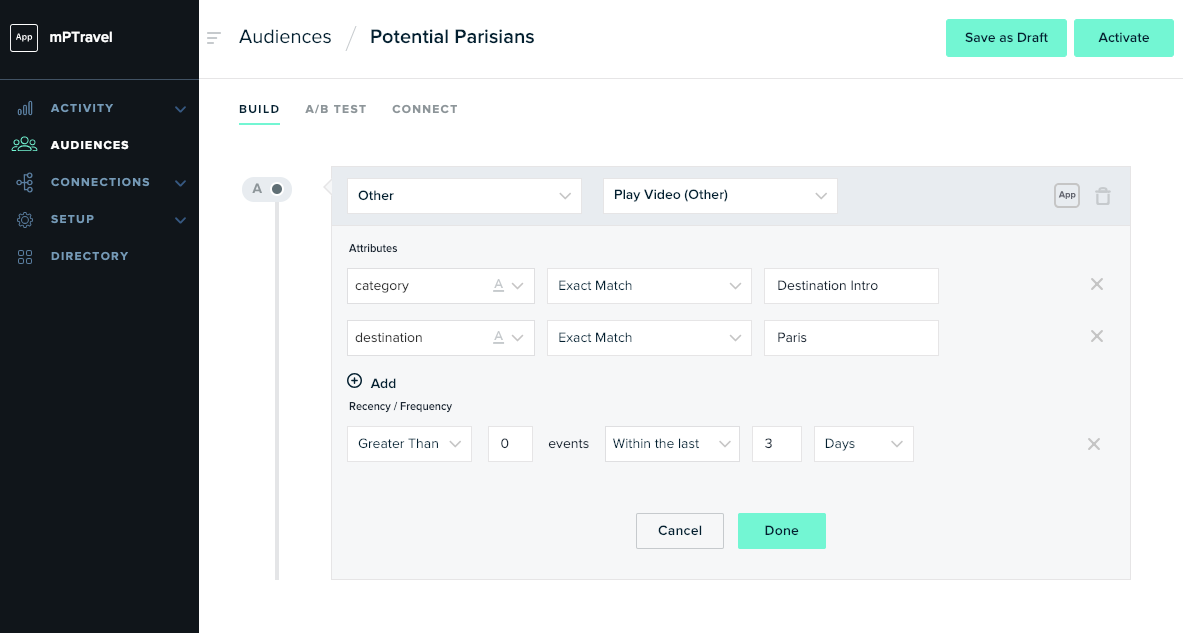
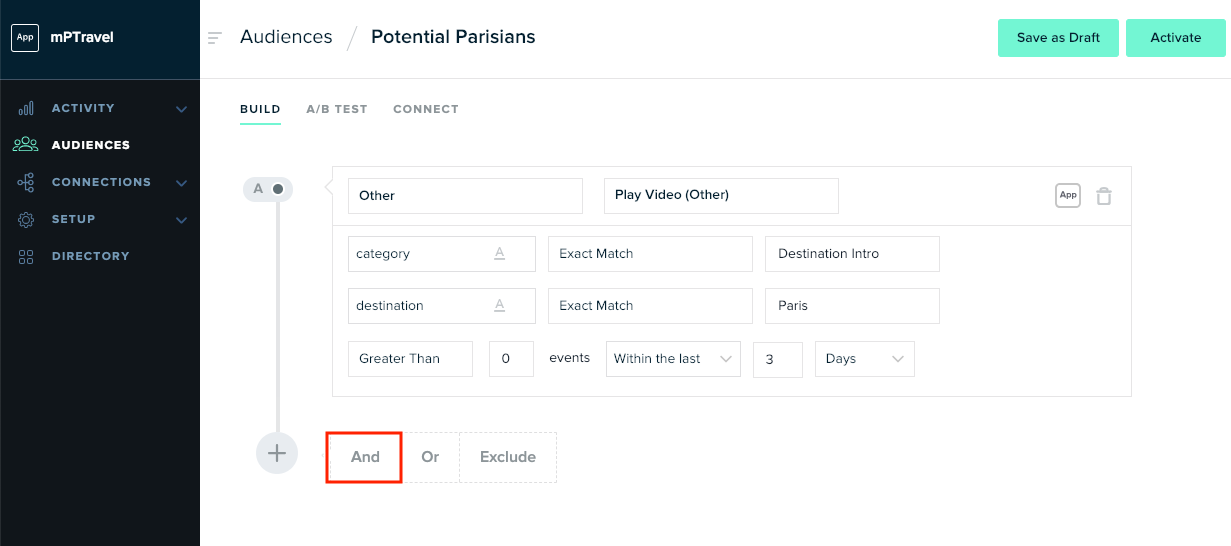
- Event name - mParticle populates a dropdown list based on all event names received for the workspace. This means that you can only select events that have already been captured by mParticle. This example targets the “Play Video” event name.
-
Attributes - you can refine your criteria further by setting attribute conditions. This example targets only instances of the Play Video event where the “category” attribute has a value of “Destination Intro” and the “destination” attribute has a value of “Paris”.
Note that this example creates an Exact Match condition, but there are other types of condition to explore. For example, if you set “destination” Contains “France”, then you could match events with a “destination” of both “Paris, France” and “Cannes, France”.
The types of condition available depend on what kind of data an attribute holds. For example, an attribute that records a number value will have Greater Than and Less Than conditions. mParticle automatically detects what type of data an attribute holds. However, you can manually set the data type by clicking the type symbol.
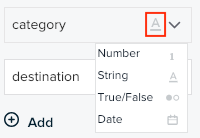
Don’t change the data type unless you really know what you’re doing. If you force the data type to be Number, and all your attribute values are strings, your condition will always fail! As long as you’re sending the same type of data consistently for each attribute, you shouldn’t have to worry about it. - Recency / Frequency - Sets how many times the user needs to trigger a matching event, and in what time period, in order to meet the condition. If you don’t specify anything here, the default for Recency / Frequency is “Greater than 0 events in the last 30 days”.
- When you’re happy with your criteria, click Done.
Add Multiple Criteria
You could save this audience right now and target all users who have watched mPTravel’s Paris content in the past three days. But, what if you have some extra special limited deals that you want to save for your premium members? You can’t just tell everyone! You need to add a second criteria. Whenever you have multiple criteria, you need to decide how to evaluate them together. There are three options:
- And - both conditions have to be true for a user to be added to the audience
- Or - a user will be added to the audience if either condition is true
- Exclude - a user will be added only if the first condition is true, but the second is false. Exclude is great for use cases like abandoned cart targeting. You can select users who triggered an Add to Cart event, then exclude users who triggered a Purchase event.
To target users who watched Paris content, AND are premium members, choose And.
This is a good opportunity to look at the User criteria type, as it’s a little different. Where the other criteria match users who have triggered a particular event, the User criteria looks at all other information you might know about your users: the type of device they use, where they live, their custom user attributes, etc. This example targets users with a user attribute of “status”, with a value of “Premium”.
When you’ve added as many criteria as you need, click Save as Draft to come back to your definition later, or Activate to start calculating.
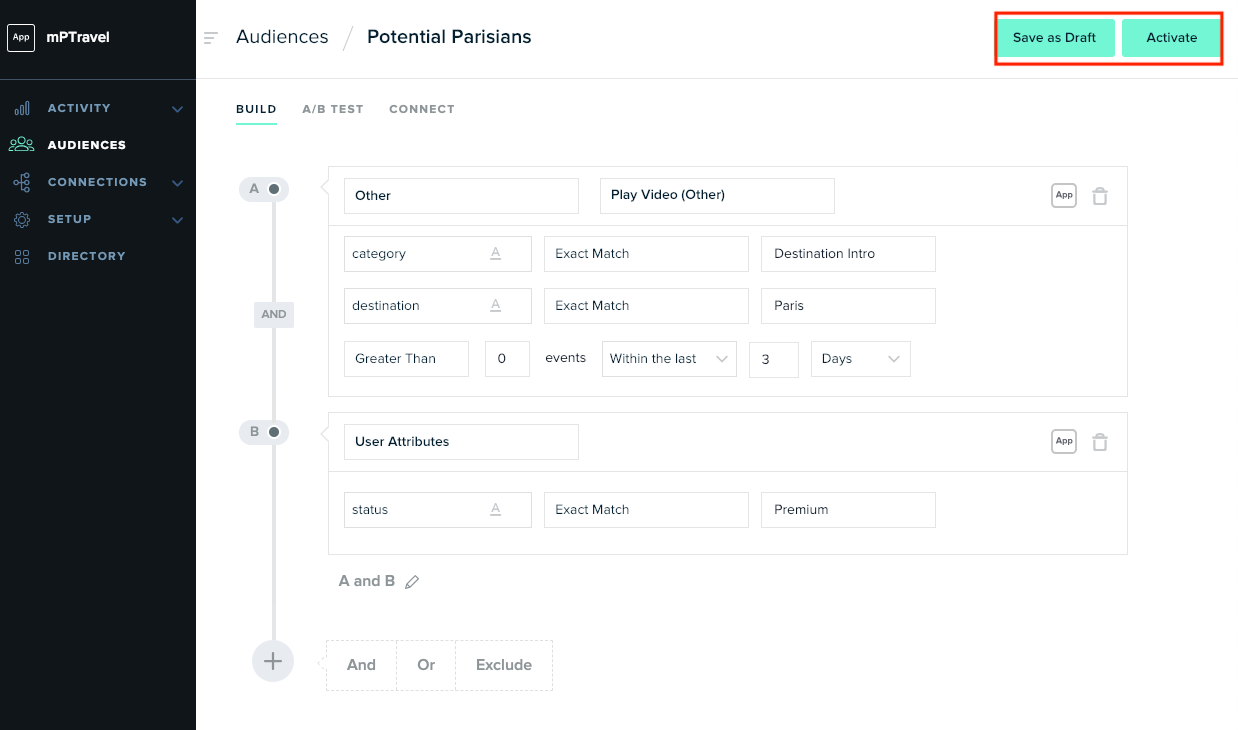
When you activate the audience, you’ll be asked if you want to set up an A/B Test. Select No for now, to go to the Connections Screen.
Verify your Audience
Check that size is greater than zero
After you finish defining your audience you will be taken straight to the Audience Connection screen. Connecting an audience will be covered in the next section.
First, check that your audience definition is working as expected. Start by selecting Audiences from the left column to go to the main Audiences page. Audiences take time to calculate, so if you’ve only just activated it, you’ll probably see a Size of 0 for your audience. Mouseover the pie chart to see how far along the calculation process is.
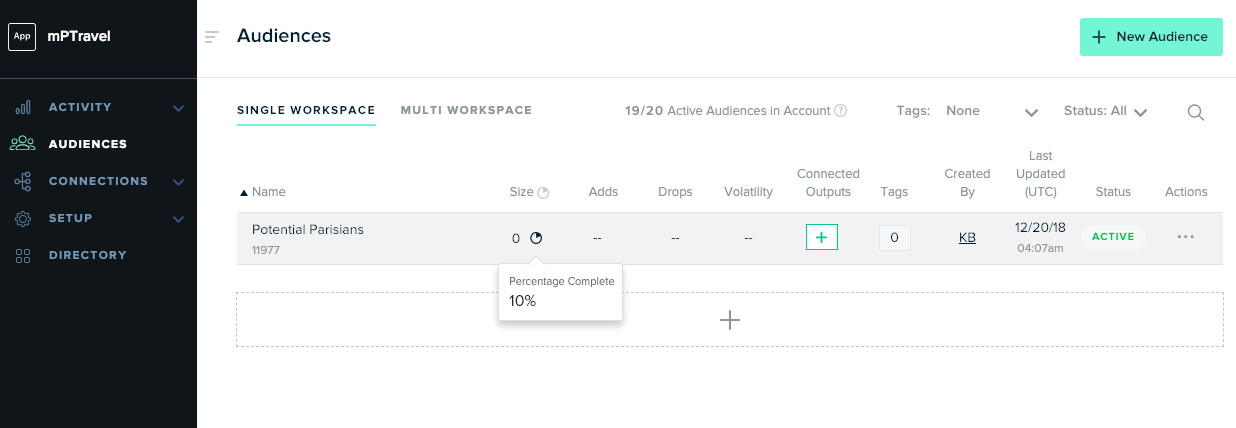
After a while, as long as you have users that match your criteria, you should start to see the value of the Size column increase.
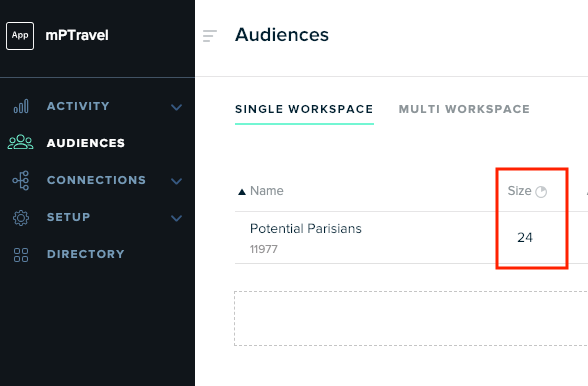
If the audience is 100% calculated, and your size is still zero, there may be an issue with your conditions.
Download to verify individual memberships
In some cases, it might be enough just to know that your audience is matching users. However, if you know specific identities of users who should match your criteria, you can check that they matched by downloading your entire audience in CSV form. Follow the instructions here to download your audience.
Troubleshoot
For simple audiences, it’s a good idea to check your Live Stream to see if you can find an event that should match your criteria. Here, you can see a user who has triggered the correct event.
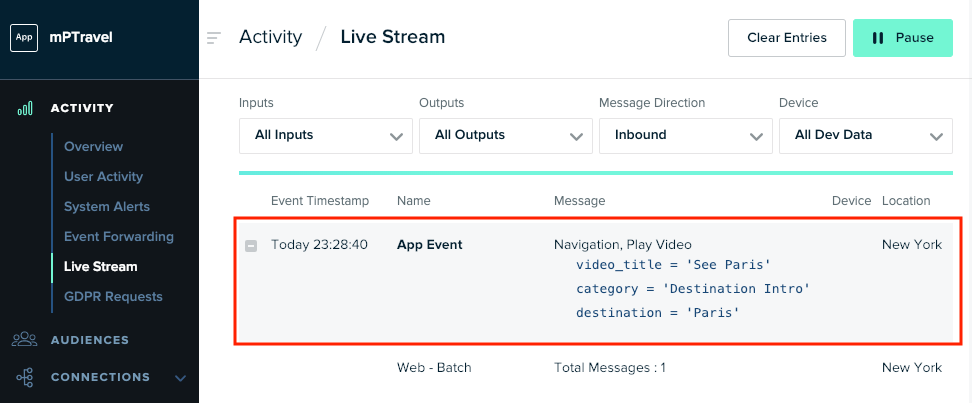
Some things to check:
- Make sure you selected the right platforms. If the matching events are all from iOS, and you only selected the Android platform when creating the audience, you won’t match any users.
- Examine each of your conditions against your test data from the Live Stream. Matches in the Audience Builder are not case sensitive. If you’ve set attribute conditions, do the attribute values in your test data exactly match the value you’ve provided in your condition?
- If you have multiple criteria, make sure your chaining statements are correct. Did you select And when you meant Or?
Remember that recalculating an audience will take some time, so check your criteria thoroughly before you save your changes.
Next steps
Congratulations on making your first audience in mParticle! You will have noticed that mParticle populates your options in the Audience Builder based on the data you have captured. This means that as you add new sources, and send more data, you will unlock new options for building audiences. Check in periodically to make sure that you’re getting the most out of your data. Some mParticle clients create hundreds of audiences, each with dozens of chained criteria to target hyper-specific user segments. You’re only limited by the data you can capture and your imagination.
A few things to read or think about:
- The Audience docs in the Platform Guide provide more detail about building criteria and advanced features like A/B Testing, and Audience Sharing.
- Audiences are a part of mParticle where the quality and consistency of your data plan become apparent. If your developers name an attribute
favorite_colorin your Web implementation, andfavoriteColorin your Android implementation, it’s going to be much harder to build a cross-platform audience to capture your users who lovegreen. Check out some docs about the importance of names here.
Next up, you will learn how to connect an audience to one of mParticle’s Audience partners.
Was this page helpful?
- Last Updated: February 27, 2025