Documentation
Developers
API References
Platform API
Platform API Overview
Accounts
Apps
Audiences
Calculated Attributes
Data Points
Feeds
Field Transformations
Services
Users
Workspaces
Data Subject Request API
Data Subject Request API Version 1 and 2
Data Subject Request API Version 3
Warehouse Sync API
Warehouse Sync API Overview
Warehouse Sync API Tutorial
Warehouse Sync API Reference
Data Mapping
Warehouse Sync SQL Reference
Warehouse Sync Troubleshooting Guide
ComposeID
Warehouse Sync API v2 Migration
Calculated Attributes Seeding API
Bulk Profile Deletion API Reference
Custom Access Roles API
Data Planning API
Group Identity API Reference
Pixel Service
Profile API
Events API
mParticle JSON Schema Reference
IDSync
Client SDKs
AMP
AMP SDK
Android
Initialization
Configuration
Network Security Configuration
Event Tracking
User Attributes
IDSync
Screen Events
Commerce Events
Location Tracking
Media
Kits
Application State and Session Management
Data Privacy Controls
Error Tracking
Opt Out
Push Notifications
WebView Integration
Logger
Preventing Blocked HTTP Traffic with CNAME
Linting Data Plans
Troubleshooting the Android SDK
API Reference
Upgrade to Version 5
Cordova
Cordova Plugin
Identity
Direct Url Routing
Direct URL Routing FAQ
Web
Android
iOS
iOS
Initialization
Configuration
Event Tracking
User Attributes
IDSync
Screen Tracking
Commerce Events
Location Tracking
Media
Kits
Application State and Session Management
Data Privacy Controls
Error Tracking
Opt Out
Push Notifications
Webview Integration
Upload Frequency
App Extensions
Preventing Blocked HTTP Traffic with CNAME
Linting Data Plans
Troubleshooting iOS SDK
Social Networks
iOS 14 Guide
iOS 15 FAQ
iOS 16 FAQ
iOS 17 FAQ
iOS 18 FAQ
API Reference
Upgrade to Version 7
React Native
Getting Started
Identity
Unity
Upload Frequency
Getting Started
Opt Out
Initialize the SDK
Event Tracking
Commerce Tracking
Error Tracking
Screen Tracking
Identity
Location Tracking
Session Management
Web
Initialization
Configuration
Content Security Policy
Event Tracking
User Attributes
IDSync
Page View Tracking
Commerce Events
Location Tracking
Media
Kits
Application State and Session Management
Data Privacy Controls
Error Tracking
Opt Out
Custom Logger
Persistence
Native Web Views
Self-Hosting
Multiple Instances
Web SDK via Google Tag Manager
Preventing Blocked HTTP Traffic with CNAME
Facebook Instant Articles
Troubleshooting the Web SDK
Browser Compatibility
Linting Data Plans
API Reference
Upgrade to Version 2 of the SDK
Xamarin
Getting Started
Identity
Web
Alexa
Server SDKs
Node SDK
Go SDK
Python SDK
Ruby SDK
Java SDK
Quickstart
Android
Overview
Step 1. Create an input
Step 2. Verify your input
Step 3. Set up your output
Step 4. Create a connection
Step 5. Verify your connection
Step 6. Track events
Step 7. Track user data
Step 8. Create a data plan
Step 9. Test your local app
iOS Quick Start
Overview
Step 1. Create an input
Step 2. Verify your input
Step 3. Set up your output
Step 4. Create a connection
Step 5. Verify your connection
Step 6. Track events
Step 7. Track user data
Step 8. Create a data plan
Python Quick Start
Step 1. Create an input
Step 2. Create an output
Step 3. Verify output
Guides
Partners
Introduction
Outbound Integrations
Outbound Integrations
Firehose Java SDK
Inbound Integrations
Compose ID
Data Hosting Locations
Glossary
Migrate from Segment to mParticle
Migrate from Segment to mParticle
Migrate from Segment to Client-side mParticle
Migrate from Segment to Server-side mParticle
Segment-to-mParticle Migration Reference
Rules Developer Guide
API Credential Management
The Developer's Guided Journey to mParticle
Guides
Getting Started
Create an Input
Start capturing data
Connect an Event Output
Create an Audience
Connect an Audience Output
Transform and Enhance Your Data
Personalization
Introduction
Profiles
Audiences
Audiences Overview
Create an Audience
Connect an Audience
Manage Audiences
Real-time Audiences (Legacy)
Standard Audiences (Legacy)
Calculated Attributes
Calculated Attributes Overview
Using Calculated Attributes
Create with AI Assistance
Calculated Attributes Reference
Predictive Audiences
Predictive Audiences Overview
Using Predictive Audiences
Journeys
Journeys Overview
Manage Journeys
Download an audience from a journey
Audience A/B testing from a journey
Journeys 2.0
Predictive Attributes
What are predictive attributes?
Platform Guide
Billing
Usage and Billing Report
The New mParticle Experience
The new mParticle Experience
The Overview Map
Observability
Observability Overview
Observability User Guide
Observability Troubleshooting Examples
Observability Span Glossary
Introduction
Data Retention
Connections
Activity
Live Stream
Data Filter
Rules
Tiered Events
mParticle Users and Roles
Analytics Free Trial
Troubleshooting mParticle
Usage metering for value-based pricing (VBP)
Analytics
Introduction
Setup
Sync and Activate Analytics User Segments in mParticle
User Segment Activation
Welcome Page Announcements
Settings
Project Settings
Roles and Teammates
Organization Settings
Global Project Filters
Portfolio Analytics
Analytics Data Manager
Analytics Data Manager Overview
Events
Event Properties
User Properties
Revenue Mapping
Export Data
UTM Guide
Query Builder
Data Dictionary
Query Builder Overview
Modify Filters With And/Or Clauses
Query-time Sampling
Query Notes
Filter Where Clauses
Event vs. User Properties
Group By Clauses
Annotations
Cross-tool Compatibility
Apply All for Filter Where Clauses
Date Range and Time Settings Overview
User Attributes at Event Time
Understanding the Screen View Event
Analyses
Analyses Introduction
Segmentation: Basics
Getting Started
Visualization Options
For Clauses
Date Range and Time Settings
Calculator
Numerical Settings
Segmentation: Advanced
Assisted Analysis
Properties Explorer
Frequency in Segmentation
Trends in Segmentation
Did [not] Perform Clauses
Cumulative vs. Non-Cumulative Analysis in Segmentation
Total Count of vs. Users Who Performed
Save Your Segmentation Analysis
Export Results in Segmentation
Explore Users from Segmentation
Funnels: Basics
Getting Started with Funnels
Group By Settings
Conversion Window
Tracking Properties
Date Range and Time Settings
Visualization Options
Interpreting a Funnel Analysis
Funnels: Advanced
Group By
Filters
Conversion over Time
Conversion Order
Trends
Funnel Direction
Multi-path Funnels
Analyze as Cohort from Funnel
Save a Funnel Analysis
Explore Users from a Funnel
Export Results from a Funnel
Saved Analyses
Manage Analyses in Dashboards
Dashboards
Dashboards––Getting Started
Manage Dashboards
Dashboard Filters
Organize Dashboards
Scheduled Reports
Favorites
Time and Interval Settings in Dashboards
Query Notes in Dashboards
User Aliasing
Analytics Resources
The Demo Environment
Keyboard Shortcuts
Tutorials
Analytics for Marketers
Analytics for Product Managers
Compare Conversion Across Acquisition Sources
Analyze Product Feature Usage
Identify Points of User Friction
Time-based Subscription Analysis
Dashboard Tips and Tricks
Understand Product Stickiness
Optimize User Flow with A/B Testing
User Segments
IDSync
IDSync Overview
Use Cases for IDSync
Components of IDSync
Store and Organize User Data
Identify Users
Default IDSync Configuration
Profile Conversion Strategy
Profile Link Strategy
Profile Isolation Strategy
Best Match Strategy
Aliasing
Data Master
Group Identity
Overview
Create and Manage Group Definitions
Introduction
Catalog
Live Stream
Data Plans
Data Plans
Blocked Data Backfill Guide
Warehouse Sync
Data Privacy Controls
Data Subject Requests
Default Service Limits
Feeds
Cross-Account Audience Sharing
Approved Sub-Processors
Import Data with CSV Files
Import Data with CSV Files
CSV File Reference
Glossary
Video Index
Analytics (Deprecated)
Identity Providers
Single Sign-On (SSO)
Setup Examples
Introduction
Developer Docs
Introduction
Integrations
Introduction
Rudderstack
Google Tag Manager
Segment
Data Warehouses and Data Lakes
Advanced Data Warehouse Settings
AWS Kinesis (Snowplow)
AWS Redshift (Define Your Own Schema)
AWS S3 Integration (Define Your Own Schema)
AWS S3 (Snowplow Schema)
BigQuery (Snowplow Schema)
BigQuery Firebase Schema
BigQuery (Define Your Own Schema)
GCP BigQuery Export
Snowflake (Snowplow Schema)
Snowplow Schema Overview
Snowflake (Define Your Own Schema)
Developer Basics
Aliasing
Using Predictive Audiences
You can create predictive audiences in the mParticle UI.
Note that you may see the name “Vidora” instead of Cortex in some documentation and UI screens.
Prerequisites
- If you haven’t yet, set up a Cortex event output.
- Set up a Cortex feed input.
- Once the live integration has been configured and verified, reach out to your Customer Success Manager (CSM) in order to initiate a replay of historical data. Providing historical events enables Cortex to start building ML pipelines right away rather than waiting for a sufficient volume of data to be gathered through the live integration.
Create a predictive audience
To create and activate a predictive audience:
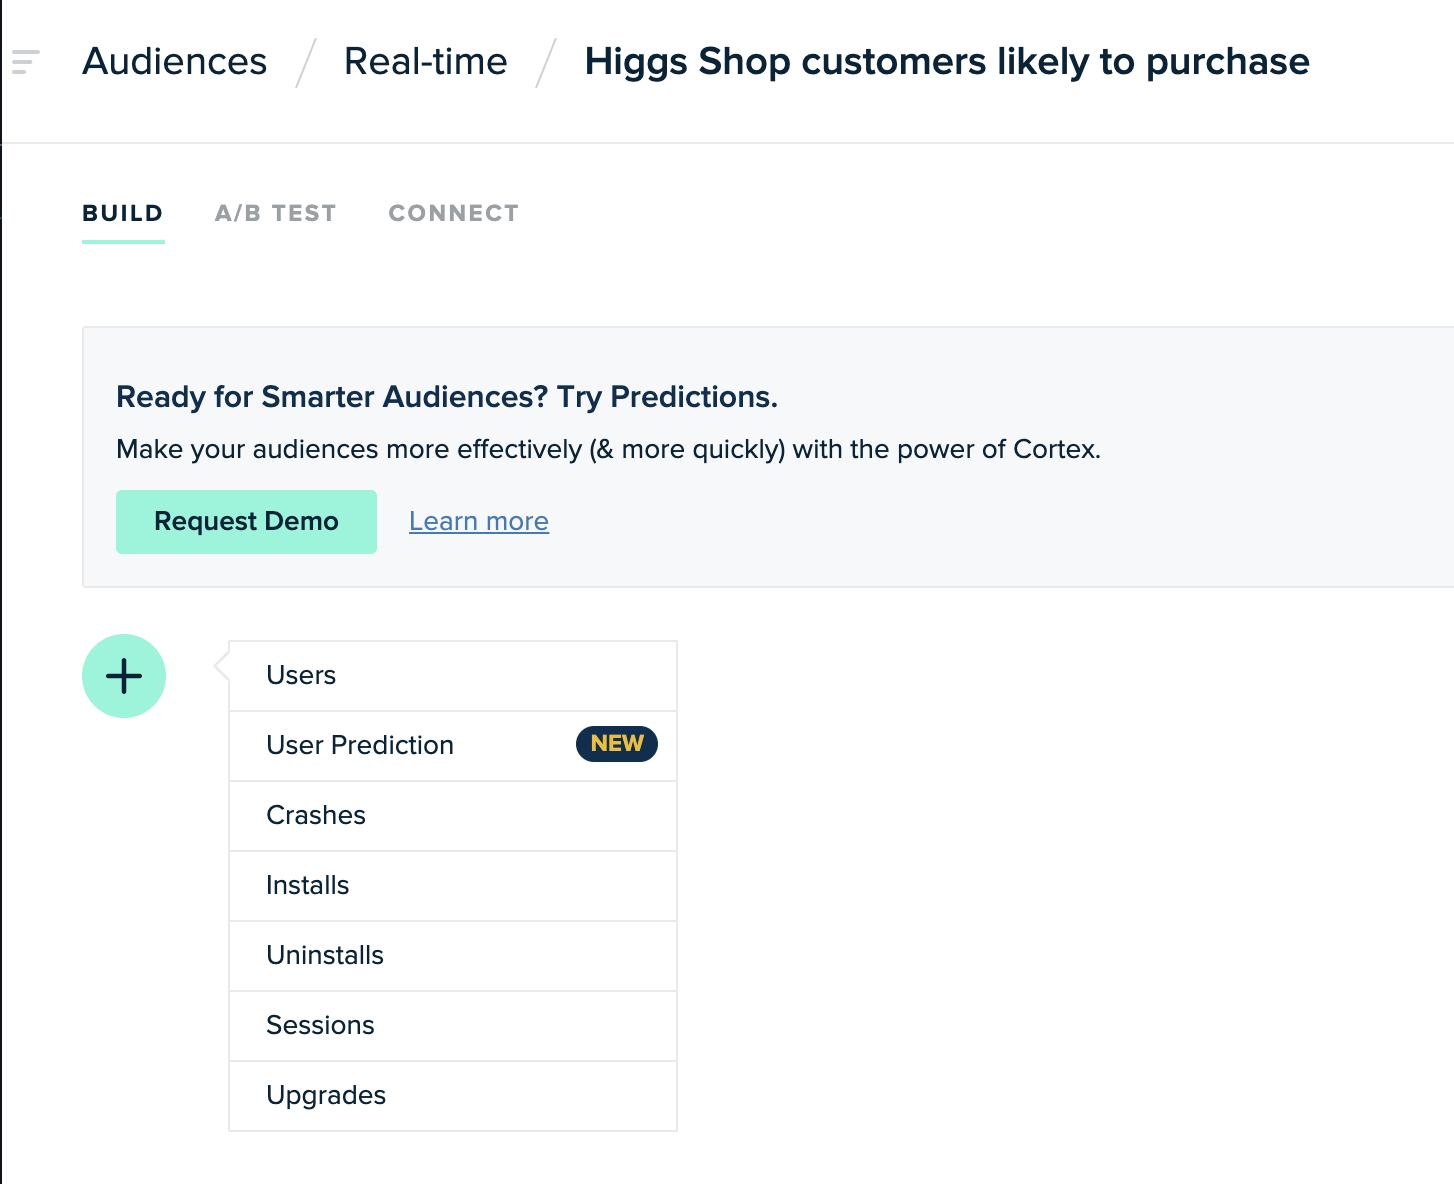
- In mParticle, navigate to Audiences > Real-time and click New Audience.
- Enter your information in the New Audience form and click Create.
- In the Build tab, click Add Criteria to display a list of items:
-
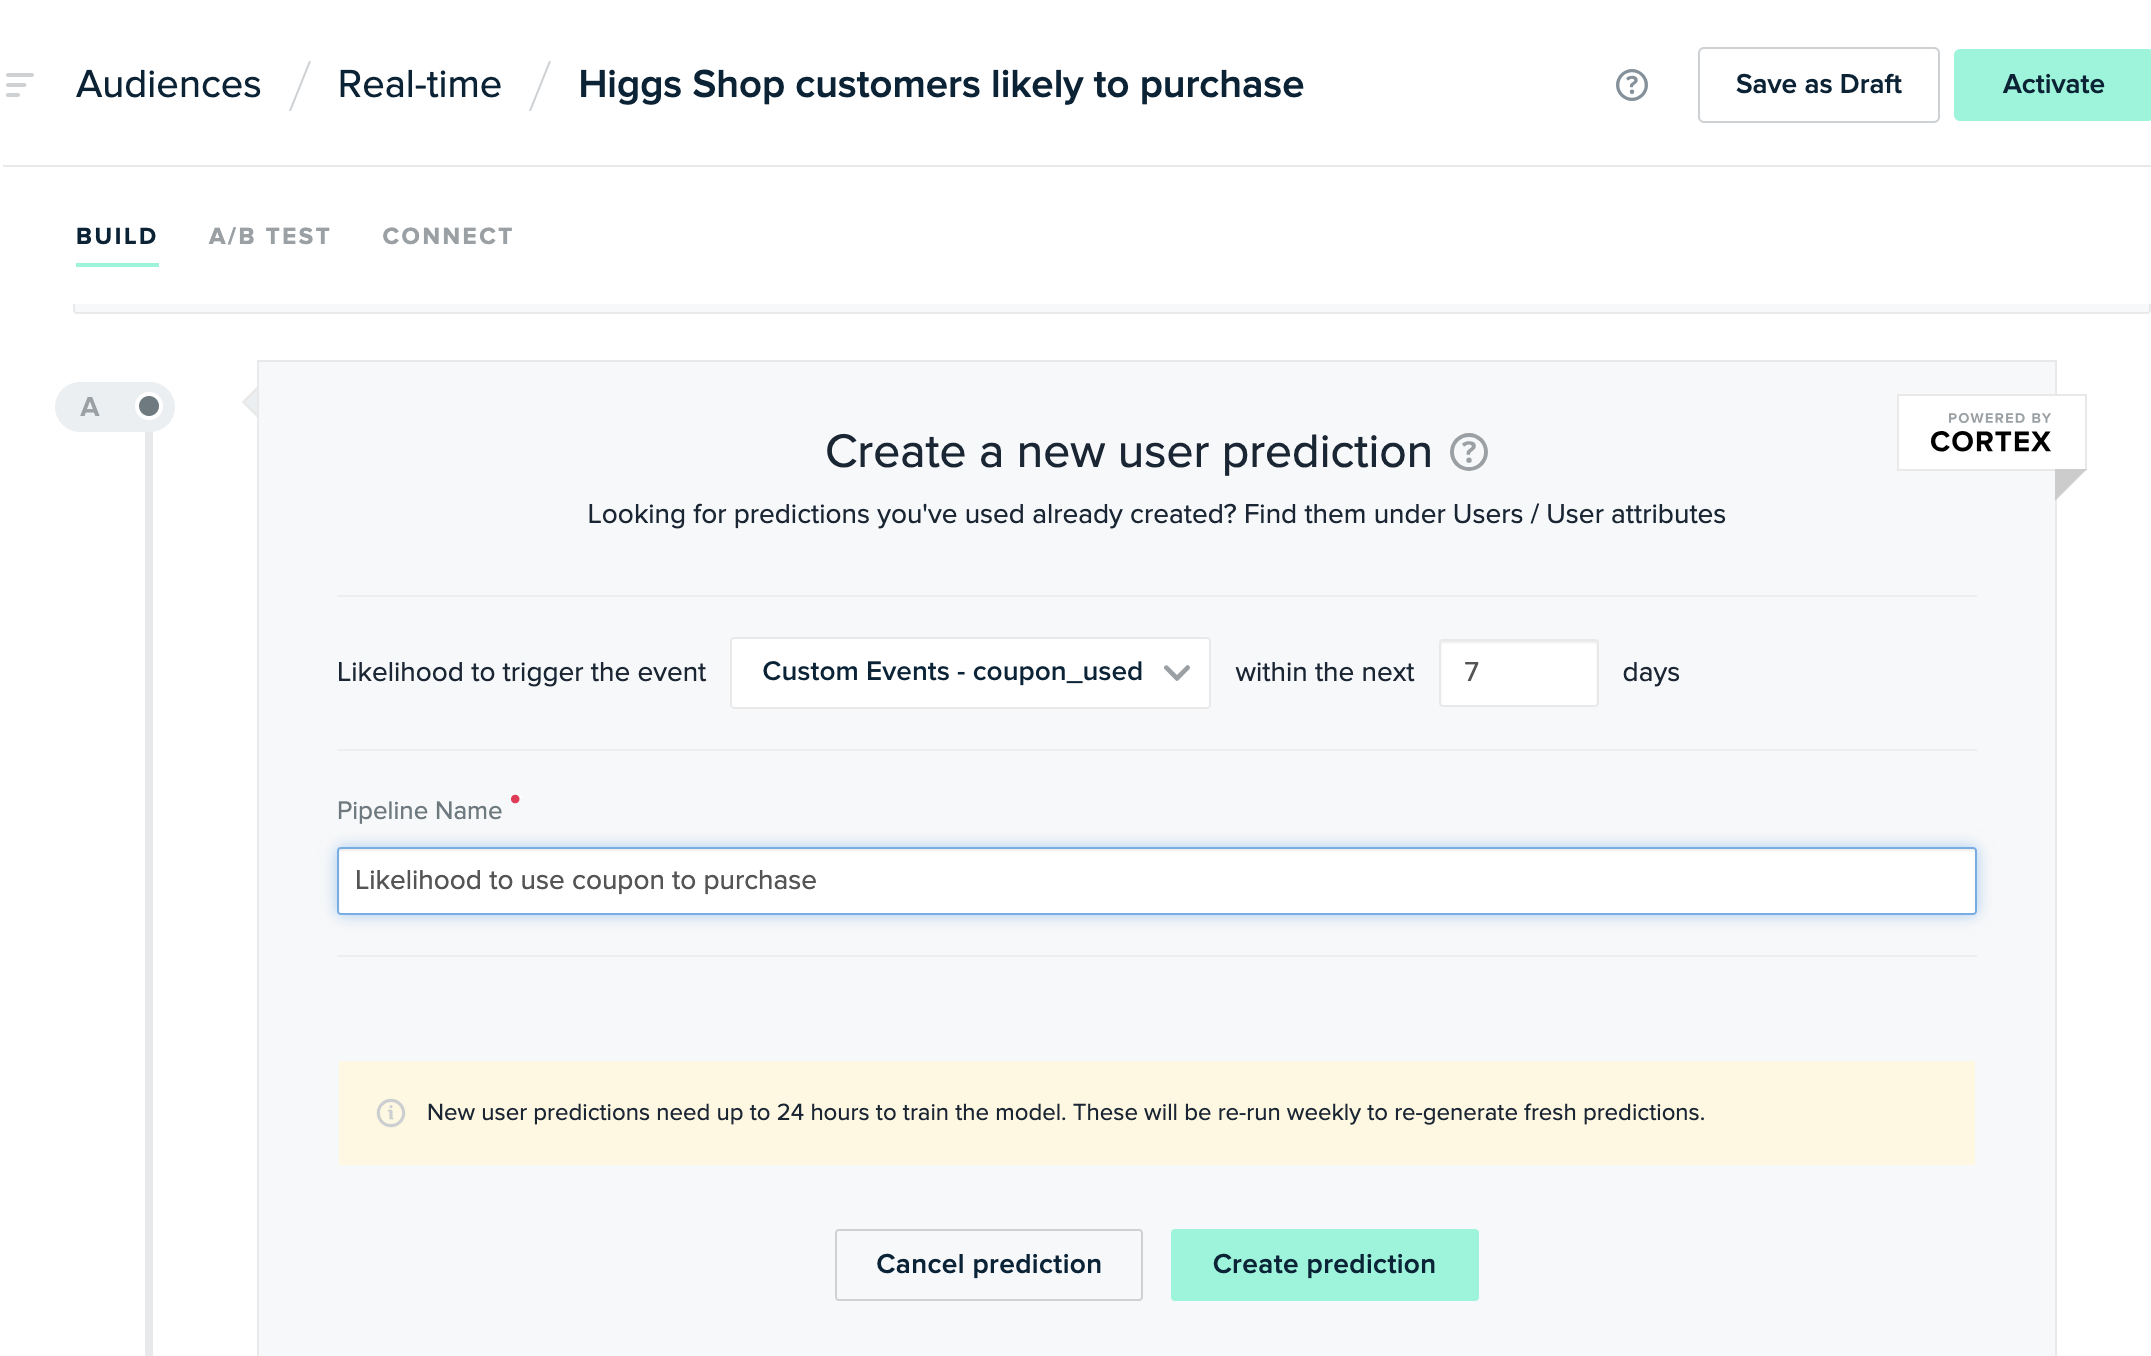
If you haven’t already created a user prediction, click User Prediction from the list and enter the User Prediction information:
If you’ve already created a user prediction, select it from the list in Users > Choose User Feature > User Attributes.
- Click Create prediction.
- mParticle displays the audience definition, where you can see that two user predictions have been created, one for score and one for percentile. Choose one.
- Specify the threshold. For example, if you wanted a likelihood of greater than 90 percent, you’d set the following values:
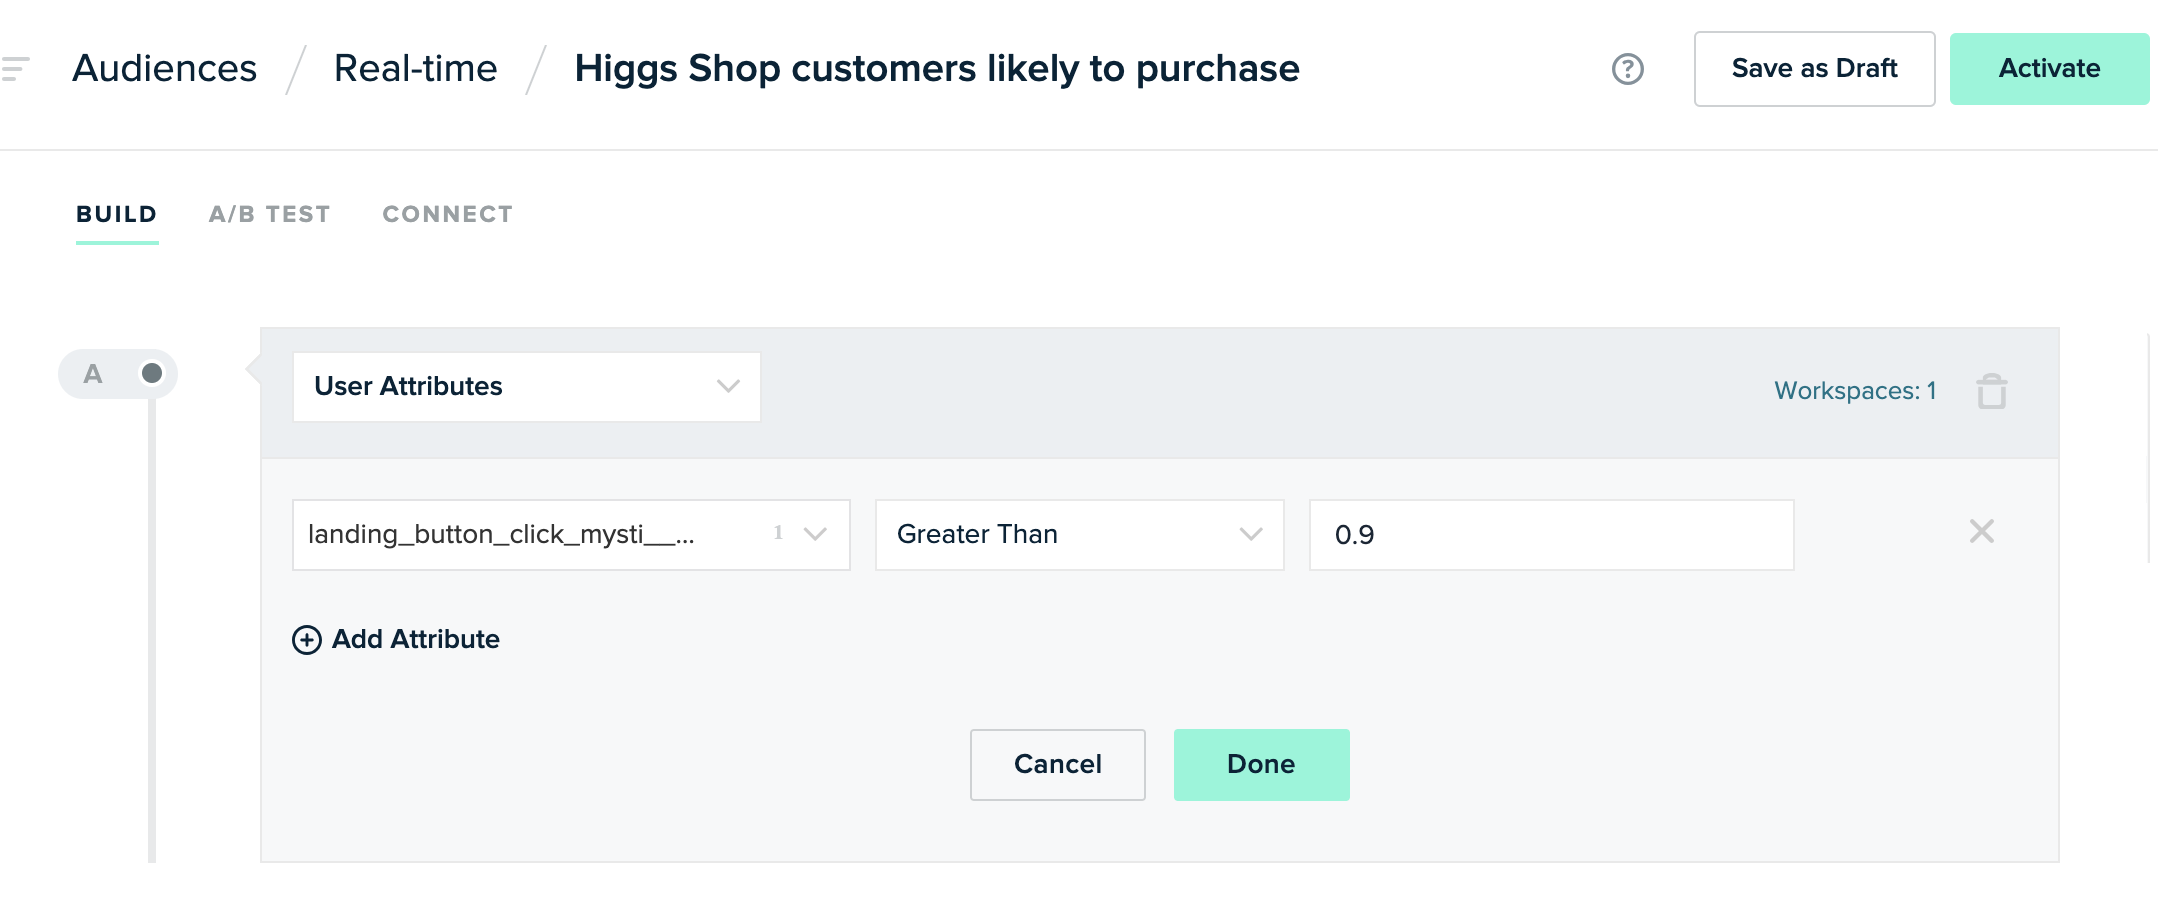
- Click Done.
- Choose either Save as Draft or Activate.
- Once you choose Activate, mparticle prompts you to optionally create an A/B test, and then connect to an output.
After you create a prediction, a pipeline is created in Cortex, and the pipeline begins calculating. Calculation may take up to 24 hours, though typically the delay is about an hour.
If there’s not enough data to learn from, the calculation may fail and the prediction won’t exist, resulting in an empty audience. To correct this, choose different criteria or troubleshoot your data for issues.
To check on the status of your pipeline, view it in Cortex.
Include and exclude users from predictions
When setting criteria for a new user prediction, you can specify whether Cortex should generate that prediction for all users or a specific subset. Narrowing predictions to a subset of users can help improve the accuracy of your predictions, and avoid generating predictive attributes for users who are not relevant to a specific use case.
To focus on a subset of users, select the option A subset of users in the Make predictions for field.

Once you’ve selected this option, you can build queries with user attributes and behavioral events to select the users for whom Cortex will generate this prediction.

Why include or exclude users?
While it may be counterintuitive, using more data to generate a prediction does not mean the prediction will be more accurate. Not all users are relevant to every prediction you want to create, and irrelevant users can make it more difficult for the ML model to identify meaningful patterns and trends. This is why it’s best to consider the business outcome you want to achieve when defining the user segment that will generate a prediction.
Use case examples
-
Objective: Non-subscriber to subscriber conversion
- Include: Non-subscribers
- Exclude: Subscribers
- Reasoning: Subscribers have already converted, so there is no benefit to generating a subscription likelihood for these users.
-
Objective: Subscription upgrade (tier 1 to tier 2)
- Include: Tier 1 subscribers
- Exclude: Tier 2 subscribers
- Reasoning: Since Tier 2 subscribers have already upgraded, there is no benefit in predicting their likelihood of upgrading.
-
Objective: Churn prevention
- Include: Active users
- Exclude: Lapsed users
- Reasoning: Since lapsed users have already churned, they should not be part of the effort to prevent churn. As such, there is no value in generating an attribute predicting their likelihood of churning.
-
Objective: Cross sell: Get purchasers of item A to buy a variant at a higher price point
- Include: Customers who purchased item A
- Exclude: Customers who did not buy item A
- Reasoning: Since customers who have already purchased item A are more likely to purchase its more expensive counterpart, predicting the likelihood of cross sell for these customers only would be more efficient.
-
Objective: Predicting which viewers who have not yet watched a show will watch it in the future
- Include: Viewers who have not watched this show
- Exclude: Viewers who have watched this show
- Reasoning: Since the objective of this campaign is to acquire new viewers of a show, this predictive attribute should exclude viewers who have already watched the show.
Was this page helpful?
- Last Updated: February 27, 2025