Documentation
Developers
API References
Platform API
Platform API Overview
Accounts
Apps
Audiences
Calculated Attributes
Data Points
Feeds
Field Transformations
Services
Users
Workspaces
Data Subject Request API
Data Subject Request API Version 1 and 2
Data Subject Request API Version 3
Warehouse Sync API
Warehouse Sync API Overview
Warehouse Sync API Tutorial
Warehouse Sync API Reference
Data Mapping
Warehouse Sync SQL Reference
Warehouse Sync Troubleshooting Guide
ComposeID
Warehouse Sync API v2 Migration
Calculated Attributes Seeding API
Bulk Profile Deletion API Reference
Custom Access Roles API
Data Planning API
Group Identity API Reference
Pixel Service
Profile API
Events API
mParticle JSON Schema Reference
IDSync
Client SDKs
AMP
AMP SDK
Android
Initialization
Configuration
Network Security Configuration
Event Tracking
User Attributes
IDSync
Screen Events
Commerce Events
Location Tracking
Media
Kits
Application State and Session Management
Data Privacy Controls
Error Tracking
Opt Out
Push Notifications
WebView Integration
Logger
Preventing Blocked HTTP Traffic with CNAME
Linting Data Plans
Troubleshooting the Android SDK
API Reference
Upgrade to Version 5
Cordova
Cordova Plugin
Identity
Direct Url Routing
Direct URL Routing FAQ
Web
Android
iOS
iOS
Initialization
Configuration
Event Tracking
User Attributes
IDSync
Screen Tracking
Commerce Events
Location Tracking
Media
Kits
Application State and Session Management
Data Privacy Controls
Error Tracking
Opt Out
Push Notifications
Webview Integration
Upload Frequency
App Extensions
Preventing Blocked HTTP Traffic with CNAME
Linting Data Plans
Troubleshooting iOS SDK
Social Networks
iOS 14 Guide
iOS 15 FAQ
iOS 16 FAQ
iOS 17 FAQ
iOS 18 FAQ
API Reference
Upgrade to Version 7
React Native
Getting Started
Identity
Unity
Upload Frequency
Getting Started
Opt Out
Initialize the SDK
Event Tracking
Commerce Tracking
Error Tracking
Screen Tracking
Identity
Location Tracking
Session Management
Web
Initialization
Configuration
Content Security Policy
Event Tracking
User Attributes
IDSync
Page View Tracking
Commerce Events
Location Tracking
Media
Kits
Application State and Session Management
Data Privacy Controls
Error Tracking
Opt Out
Custom Logger
Persistence
Native Web Views
Self-Hosting
Multiple Instances
Web SDK via Google Tag Manager
Preventing Blocked HTTP Traffic with CNAME
Facebook Instant Articles
Troubleshooting the Web SDK
Browser Compatibility
Linting Data Plans
API Reference
Upgrade to Version 2 of the SDK
Xamarin
Getting Started
Identity
Web
Alexa
Server SDKs
Node SDK
Go SDK
Python SDK
Ruby SDK
Java SDK
Quickstart
Android
Overview
Step 1. Create an input
Step 2. Verify your input
Step 3. Set up your output
Step 4. Create a connection
Step 5. Verify your connection
Step 6. Track events
Step 7. Track user data
Step 8. Create a data plan
Step 9. Test your local app
iOS Quick Start
Overview
Step 1. Create an input
Step 2. Verify your input
Step 3. Set up your output
Step 4. Create a connection
Step 5. Verify your connection
Step 6. Track events
Step 7. Track user data
Step 8. Create a data plan
Python Quick Start
Step 1. Create an input
Step 2. Create an output
Step 3. Verify output
Guides
Partners
Introduction
Outbound Integrations
Outbound Integrations
Firehose Java SDK
Inbound Integrations
Compose ID
Data Hosting Locations
Glossary
Migrate from Segment to mParticle
Migrate from Segment to mParticle
Migrate from Segment to Client-side mParticle
Migrate from Segment to Server-side mParticle
Segment-to-mParticle Migration Reference
Rules Developer Guide
API Credential Management
The Developer's Guided Journey to mParticle
Guides
Getting Started
Create an Input
Start capturing data
Connect an Event Output
Create an Audience
Connect an Audience Output
Transform and Enhance Your Data
Personalization
Introduction
Profiles
Audiences
Audiences Overview
Create an Audience
Connect an Audience
Manage Audiences
Real-time Audiences (Legacy)
Standard Audiences (Legacy)
Calculated Attributes
Calculated Attributes Overview
Using Calculated Attributes
Create with AI Assistance
Calculated Attributes Reference
Predictive Audiences
Predictive Audiences Overview
Using Predictive Audiences
Journeys
Journeys Overview
Manage Journeys
Download an audience from a journey
Audience A/B testing from a journey
Journeys 2.0
Predictive Attributes
What are predictive attributes?
Platform Guide
Billing
Usage and Billing Report
The New mParticle Experience
The new mParticle Experience
The Overview Map
Observability
Observability Overview
Observability User Guide
Observability Troubleshooting Examples
Observability Span Glossary
Introduction
Data Retention
Connections
Activity
Live Stream
Data Filter
Rules
Tiered Events
mParticle Users and Roles
Analytics Free Trial
Troubleshooting mParticle
Usage metering for value-based pricing (VBP)
Analytics
Introduction
Setup
Sync and Activate Analytics User Segments in mParticle
User Segment Activation
Welcome Page Announcements
Settings
Project Settings
Roles and Teammates
Organization Settings
Global Project Filters
Portfolio Analytics
Analytics Data Manager
Analytics Data Manager Overview
Events
Event Properties
User Properties
Revenue Mapping
Export Data
UTM Guide
Query Builder
Data Dictionary
Query Builder Overview
Modify Filters With And/Or Clauses
Query-time Sampling
Query Notes
Filter Where Clauses
Event vs. User Properties
Group By Clauses
Annotations
Cross-tool Compatibility
Apply All for Filter Where Clauses
Date Range and Time Settings Overview
User Attributes at Event Time
Understanding the Screen View Event
Analyses
Analyses Introduction
Segmentation: Basics
Getting Started
Visualization Options
For Clauses
Date Range and Time Settings
Calculator
Numerical Settings
Segmentation: Advanced
Assisted Analysis
Properties Explorer
Frequency in Segmentation
Trends in Segmentation
Did [not] Perform Clauses
Cumulative vs. Non-Cumulative Analysis in Segmentation
Total Count of vs. Users Who Performed
Save Your Segmentation Analysis
Export Results in Segmentation
Explore Users from Segmentation
Funnels: Basics
Getting Started with Funnels
Group By Settings
Conversion Window
Tracking Properties
Date Range and Time Settings
Visualization Options
Interpreting a Funnel Analysis
Funnels: Advanced
Group By
Filters
Conversion over Time
Conversion Order
Trends
Funnel Direction
Multi-path Funnels
Analyze as Cohort from Funnel
Save a Funnel Analysis
Explore Users from a Funnel
Export Results from a Funnel
Saved Analyses
Manage Analyses in Dashboards
Dashboards
Dashboards––Getting Started
Manage Dashboards
Dashboard Filters
Organize Dashboards
Scheduled Reports
Favorites
Time and Interval Settings in Dashboards
Query Notes in Dashboards
User Aliasing
Analytics Resources
The Demo Environment
Keyboard Shortcuts
Tutorials
Analytics for Marketers
Analytics for Product Managers
Compare Conversion Across Acquisition Sources
Analyze Product Feature Usage
Identify Points of User Friction
Time-based Subscription Analysis
Dashboard Tips and Tricks
Understand Product Stickiness
Optimize User Flow with A/B Testing
User Segments
IDSync
IDSync Overview
Use Cases for IDSync
Components of IDSync
Store and Organize User Data
Identify Users
Default IDSync Configuration
Profile Conversion Strategy
Profile Link Strategy
Profile Isolation Strategy
Best Match Strategy
Aliasing
Data Master
Group Identity
Overview
Create and Manage Group Definitions
Introduction
Catalog
Live Stream
Data Plans
Data Plans
Blocked Data Backfill Guide
Warehouse Sync
Data Privacy Controls
Data Subject Requests
Default Service Limits
Feeds
Cross-Account Audience Sharing
Approved Sub-Processors
Import Data with CSV Files
Import Data with CSV Files
CSV File Reference
Glossary
Video Index
Analytics (Deprecated)
Identity Providers
Single Sign-On (SSO)
Setup Examples
Introduction
Developer Docs
Introduction
Integrations
Introduction
Rudderstack
Google Tag Manager
Segment
Data Warehouses and Data Lakes
Advanced Data Warehouse Settings
AWS Kinesis (Snowplow)
AWS Redshift (Define Your Own Schema)
AWS S3 Integration (Define Your Own Schema)
AWS S3 (Snowplow Schema)
BigQuery (Snowplow Schema)
BigQuery Firebase Schema
BigQuery (Define Your Own Schema)
GCP BigQuery Export
Snowflake (Snowplow Schema)
Snowplow Schema Overview
Snowflake (Define Your Own Schema)
Developer Basics
Aliasing
Journeys 2.0
Journeys 2.0 is a new way of creating and working with your customer segments that provides greater flexibility and control in how you target high-value users. By giving you the ability to create and easily visualize nested customer segments, Journeys 2.0 lets you easily hone in on the users that matter most to your business.
Opting in / out
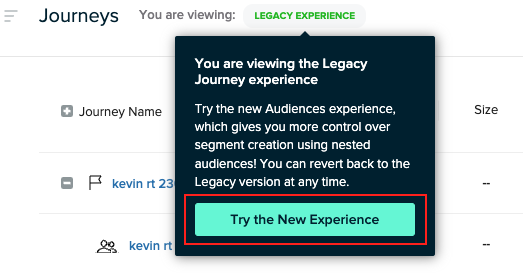
To opt in to Journeys 2.0, navigate to either Audiences > Journeys or Audiences > Real-time, and hover over the text “LEGACY EXPERIENCE” next to the top breadcrumb navigation. Then, click “Try the New Experience” in the modal that appears upon hover:
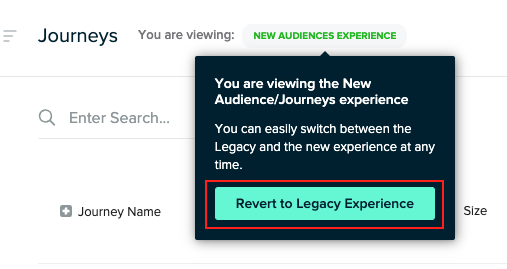
Once opted in to Journeys 2.0, you can revert to the legacy Audiences experience at any time by hovering over “NEW AUDIENCES EXPERIENCES” in the top navigation and clicking “Revert to Legacy Experience”:
Journeys landing page
After opting in, the Audiences > Journeys section of the UI will display a table that includes every Audience and Journey you have created, sorted by Last Updated by default.
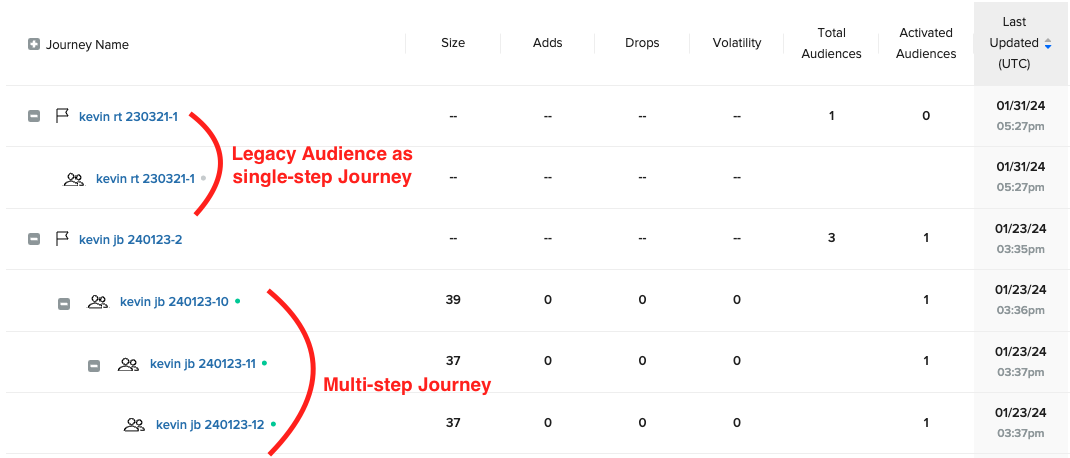
The Journeys 2.0 landing page represents two main types of customer segments:
- Single-step Journeys Rows with a Total Audiences value of 1 represent both single-step Journeys that you have created in the past, as well as legacy Real-time Audiences that have been migrated here as single-step Journeys.
- Multi-step Journeys Rows with a Total Audiences value greater than 1 are multi-step Journeys, which are represented in this view as nested Audiences. Click on the ”+” icon next to the name of a multi-step Journey to expand it to expose the individual milestones (or Audiences) the Journey contains. Clicking any of the nested Audiences will bring you to the Journeys canvas, where you can update this or any Audience contained within the Journey.
Audiences vs. Milestones
Functionally, a Milestone and an audience are the same. Both represent a targeted segment of customers that you can forward to integration partners, run A/B splits on, and otherwise leverage in campaigns. Their only difference is how you create them in mParticle:
- A Milestone is an individual step within a journey that you have defined to capture a meaningful moment in the customer lifecycle (i.e. a free trial signup, an email interaction, or an ad click). Each Milestone creates an audience of customers who fit the criteria you have set for it.
- An audience is a customer segment that you have created.
Update an existing Journey / Audience
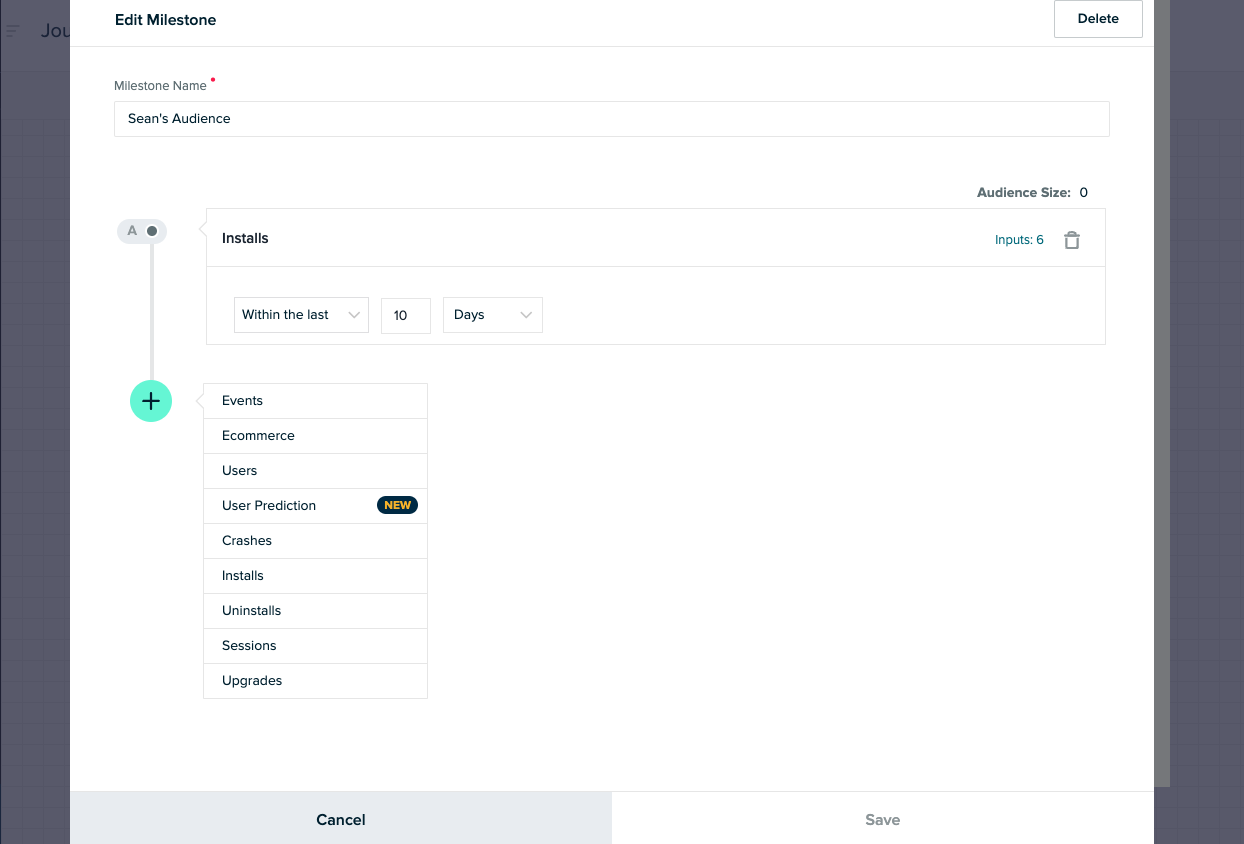
To update a journey (either single- or multi-step), expand it by clicking the ”+” icon to the left of its name, then click on one of the milestones nested beneath it. This will display the Milestone editor within the Journey canvas, where you can update the inclusion criteria for this particular Audience:
Closing the Milestone editor will display the full Journey canvas, which you can use to add additional Journeys features like new paths, additional milestones, and A/B tests.
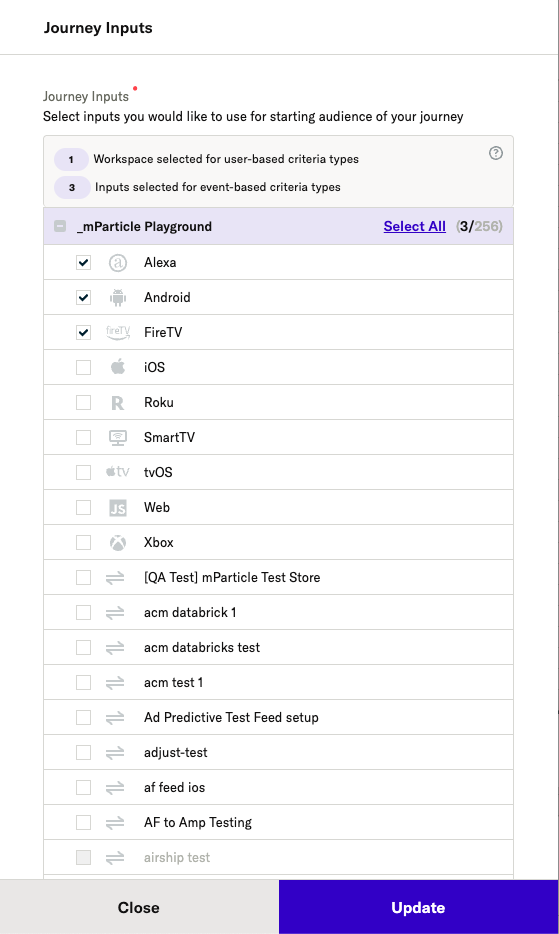
Edit Journey Inputs
At any time after a Journey has been created, you can edit that Journey’s data inputs. First, click on the top node in the Journey which has the heading “Journey Inputs”:
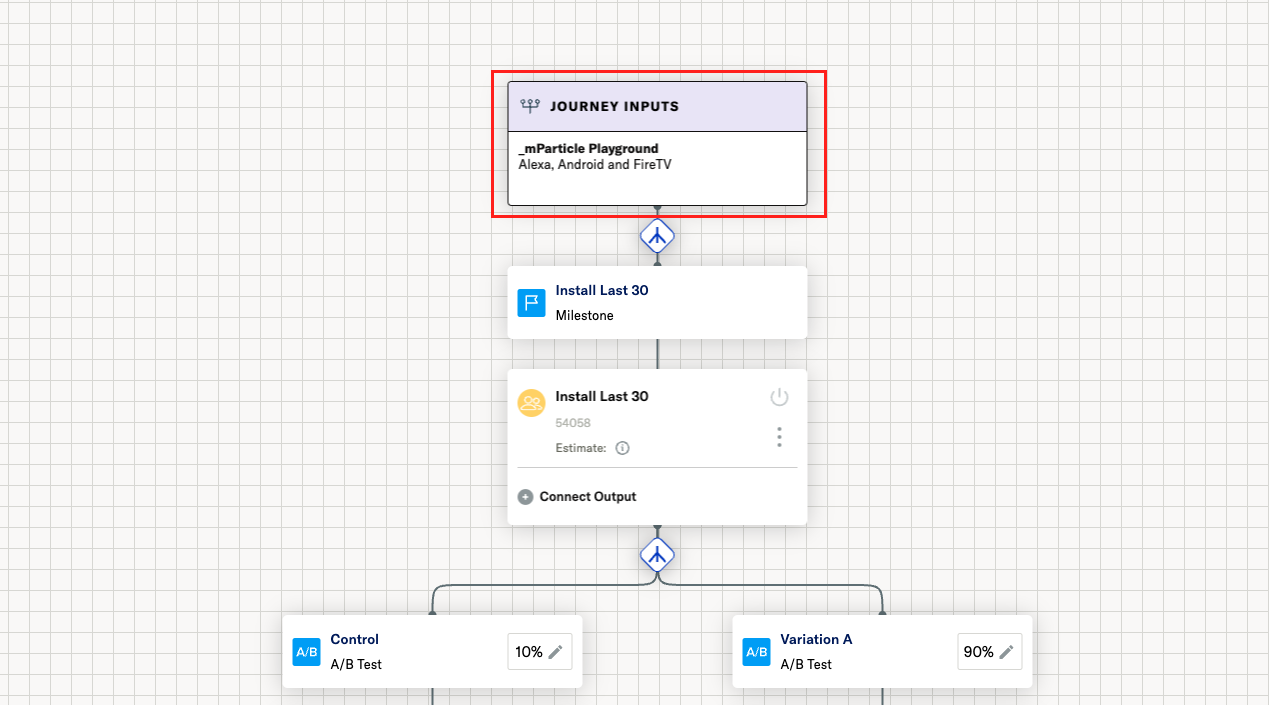
Next, add or remove inputs as you see fit, then click Update.
Create a new Journey
The Journeys canvas provides a flexible and powerful tool for creating targeted customer segments. Let’s look at two of the main ways you can use Journeys to create audiences:
Single-Milestone Audiences
As mentioned above, creating a Milestone within a Journey is functionally equivalent to a creating a Real-time Audience. By using the selection criteria and logical operators within a Milestone, you can create highly targeted customer segments for your campaigns. Let’s explore how to do this.
At the Journeys landing page (Audiences > Journeys), click the New Journey button in the top right-hand corner of the screen.

At the Create Journey modal, name your Journey, select your inputs, and click Create.

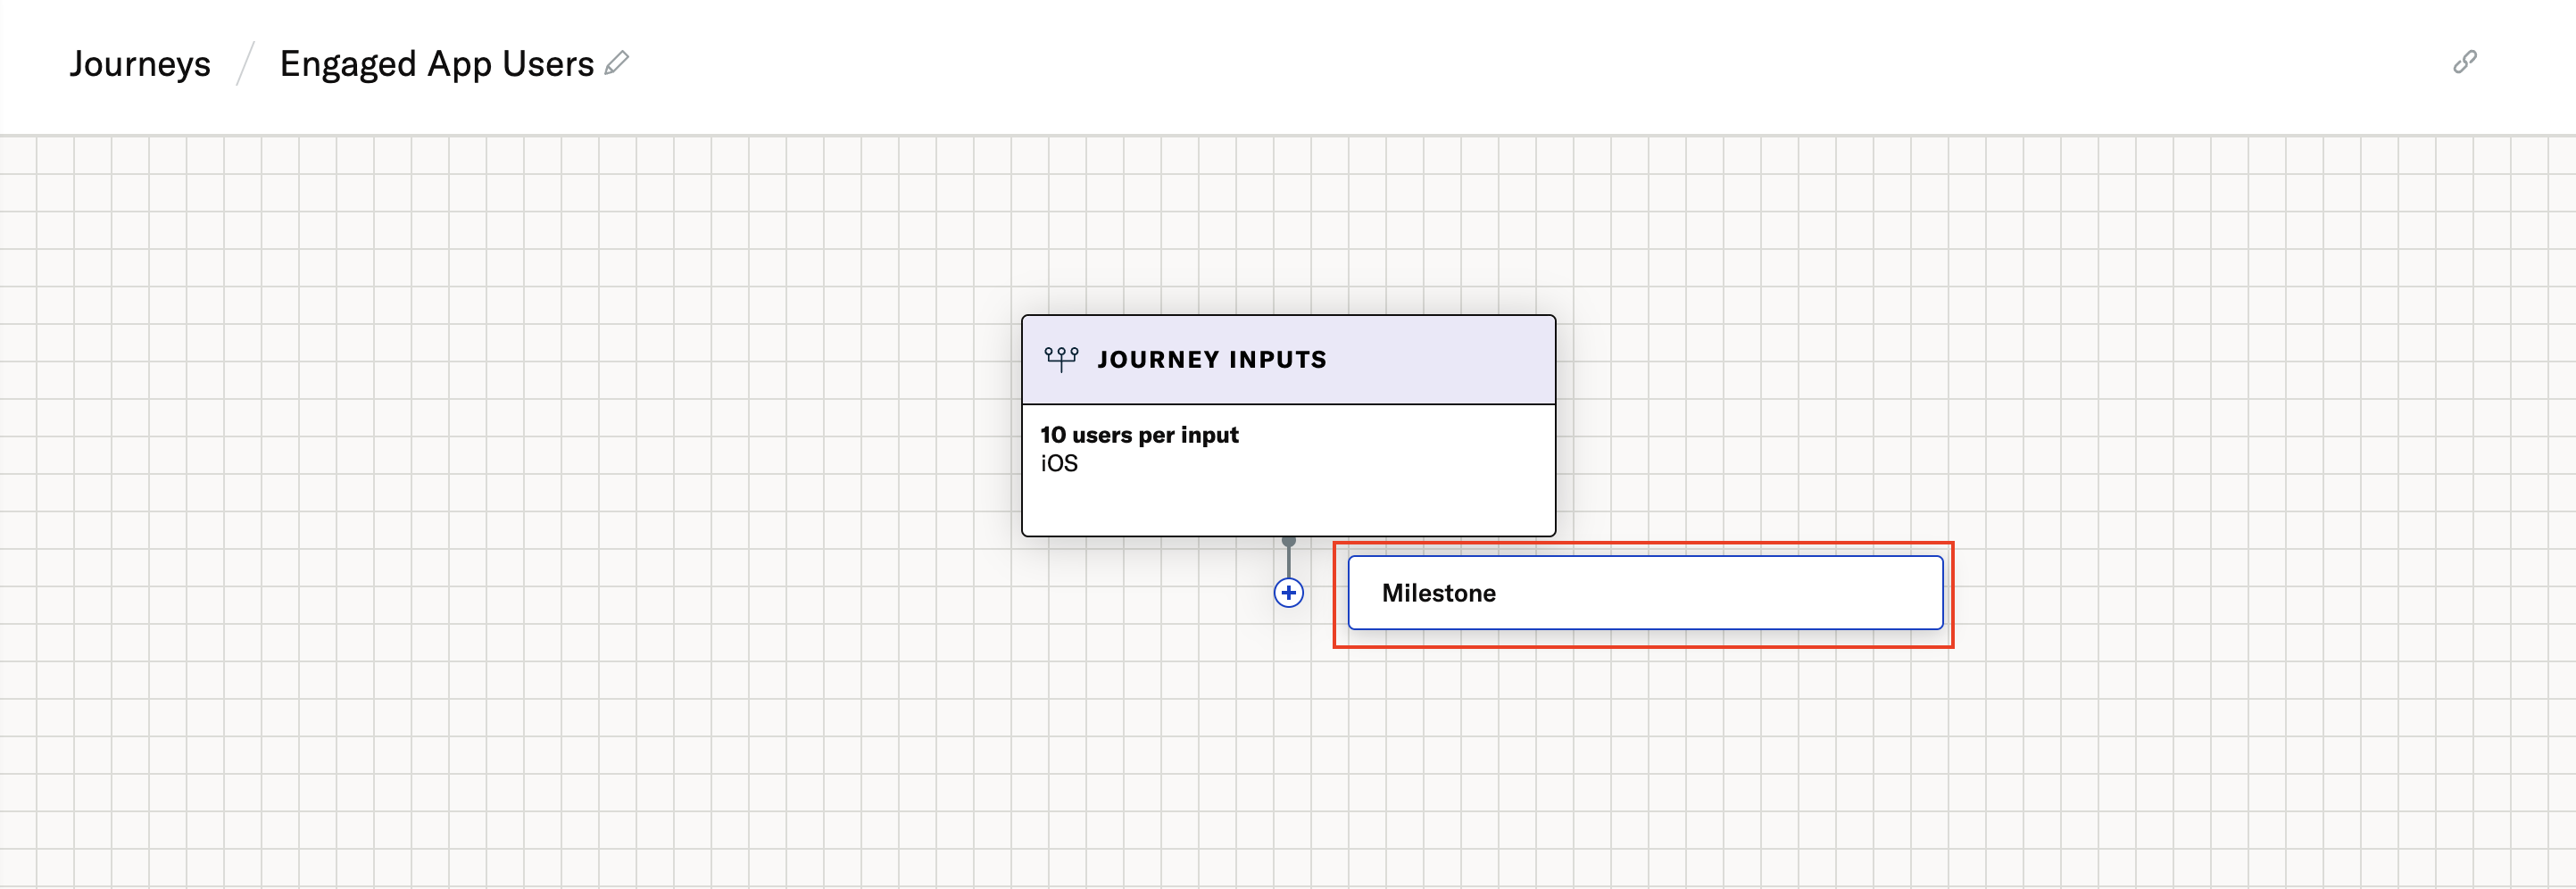
In the Journey canvas, click the ”+” icon followed by the Milestone option to create your first (and only) Milestone in the Journey.
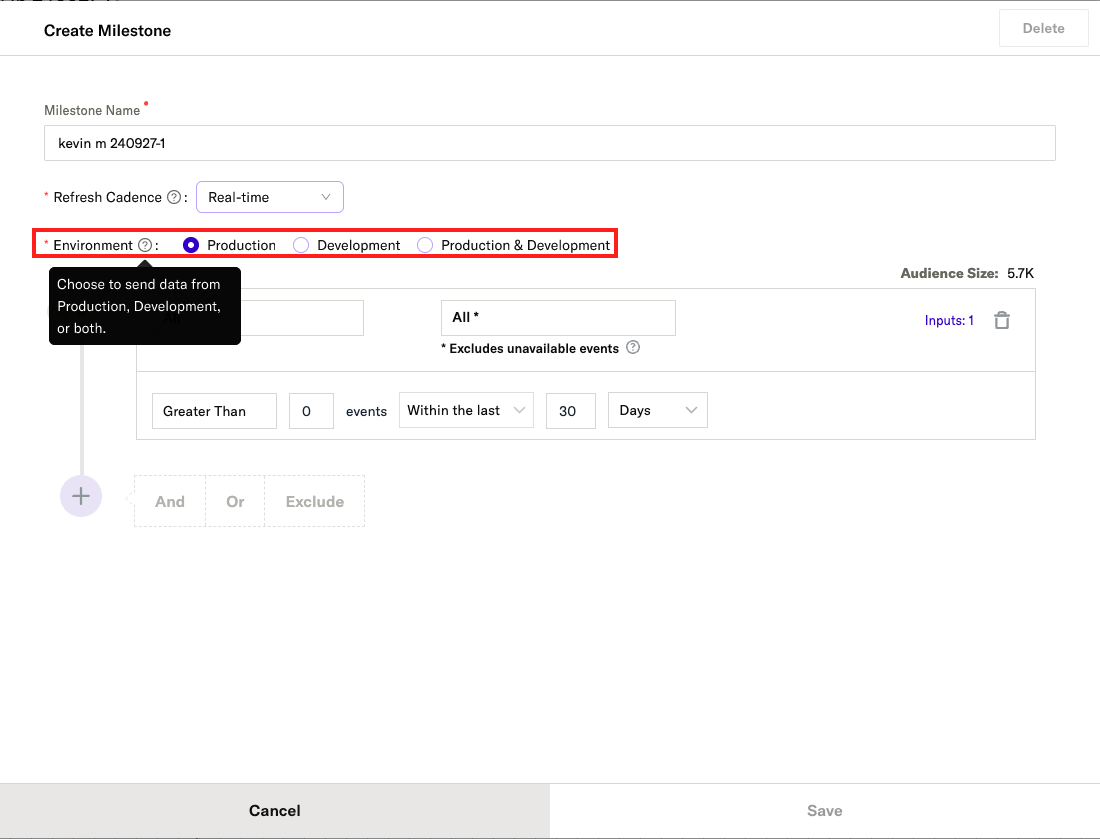
Choose your audience environment
For each audience you create, you can select the environment(s) from which you want users in that audience to come from (Production, Development, or both).
Considerations for selecting an audience environment
- Test data in Development may overwrite Production data in partner systems. If you send dummy or anonymized data to your Development environment, you should select the Production environment for any audiences you forward to partners to prevent unwanted overwriting. For example, you send test customer profiles to Development environment with real customer IDs but anonymized emails for privacy purposes, the anonymized emails can overwrite real ones in any system you forward them to.
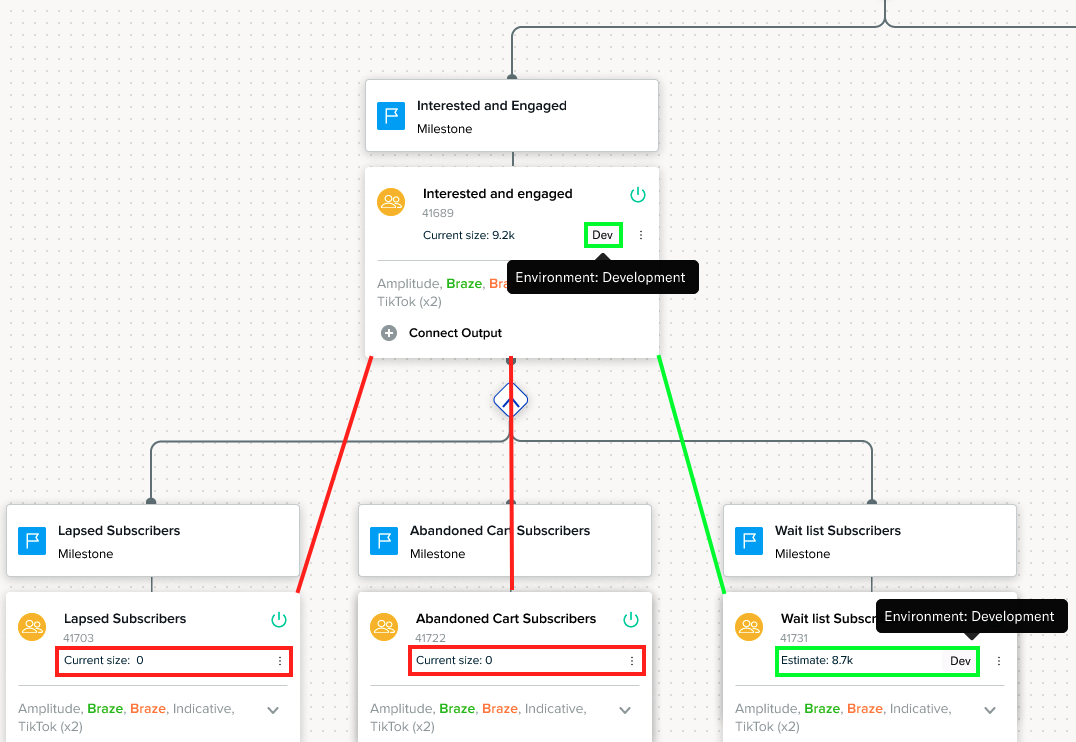
- Parent and child audience environment should align. If a parent audience pulls its members from Development and its child pulls its members from Production, the child audience will be empty (and vice versa).
In the example below, Wait list Subscribers (child) and Interested and Engaged (parent) both use the Development environment, which is why the child audience has been populated with users. The other child audiences (Lapsed Subscribers and Abandoned Cart Subscribers) both use the Production environment which conflicts with their parent’s environment, and therefore have no users.
Audience criteria auto-complete
As you define your audience criteria, a list of suggested matching values will appear based on what you’ve entered.
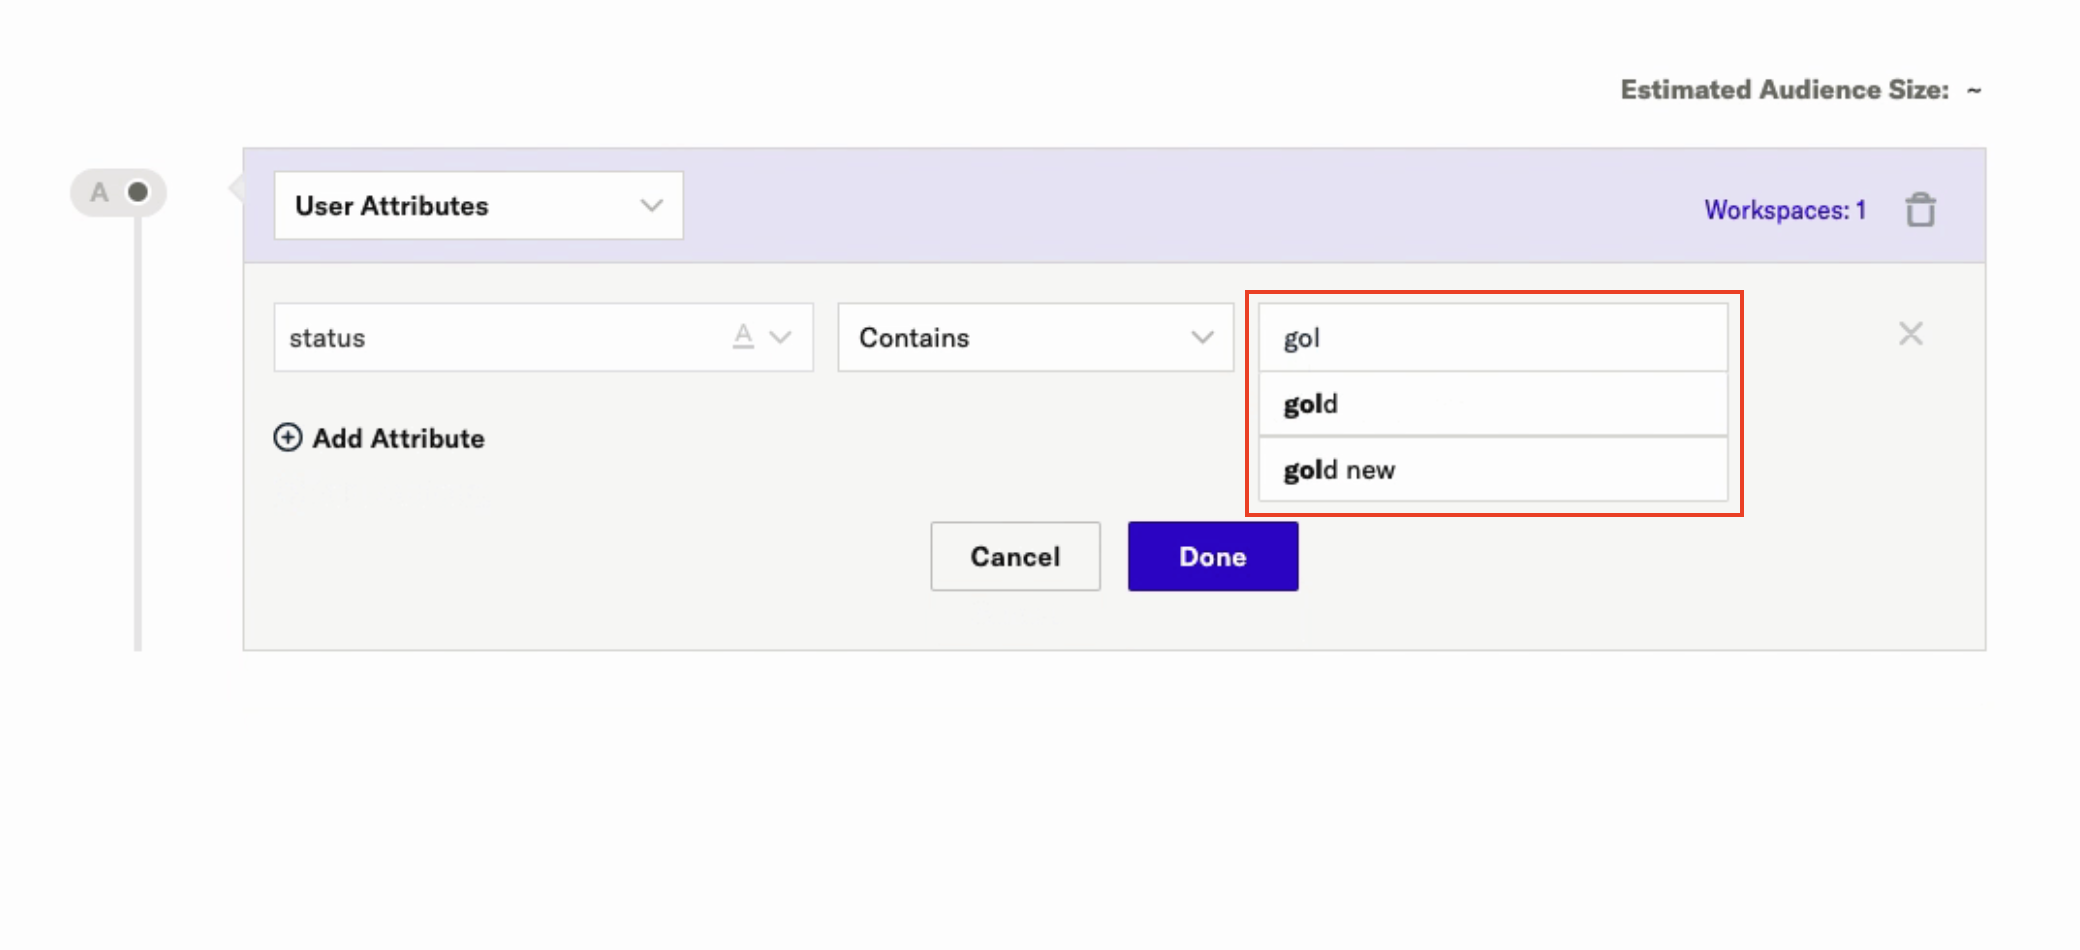
This feature works both when building new audiences and fine-tuning existing ones, helping you save time, reduce manual effort, and improves accuracy.
To use this feature, you must have one of the following standard Roles: User, Admin, Audiences-only, Support, or Admin+Compliance. Alternatively, you can create a Custom Role with any of the following tasks: audiences:draft, audiences:edit, catalog, or audiences.
Combine criteria with Boolean operators
In the Milestone editor, you can begin adding criteria to target the users you want in your audience. Once you have added your first criterion, you can use the Boolean operators And, Or, and Exclude to create logical relationships with subsequent criteria.
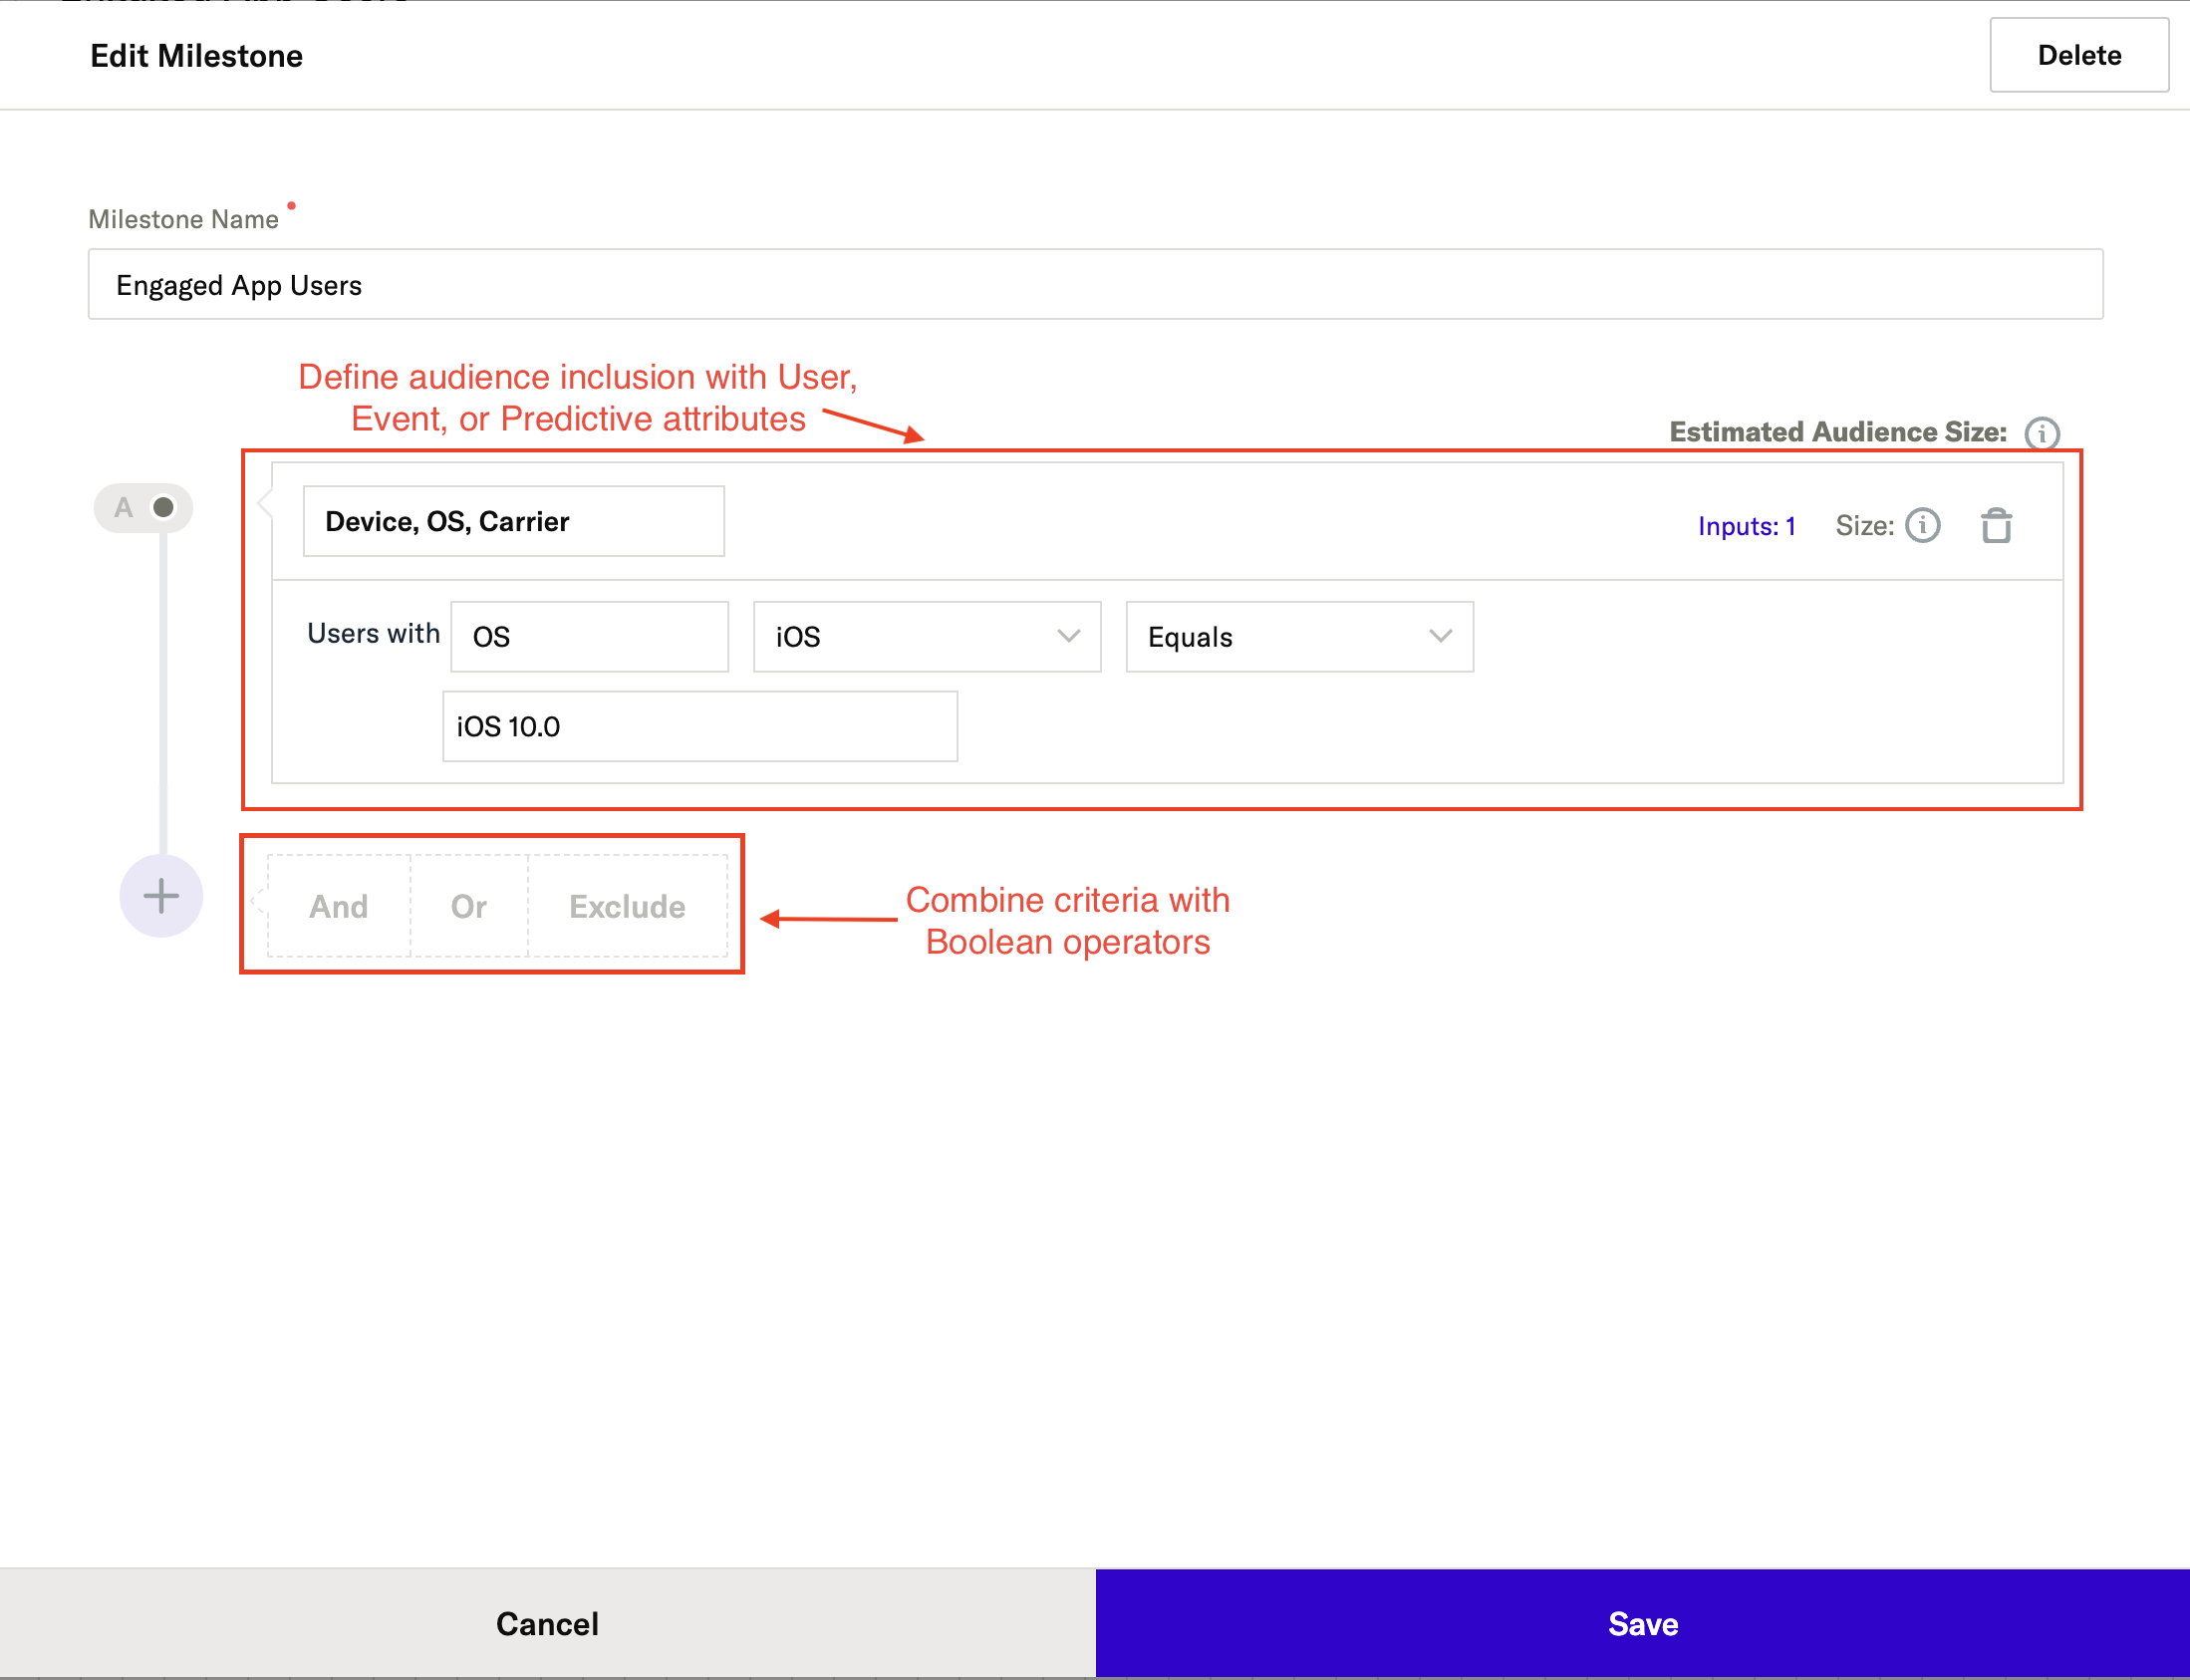
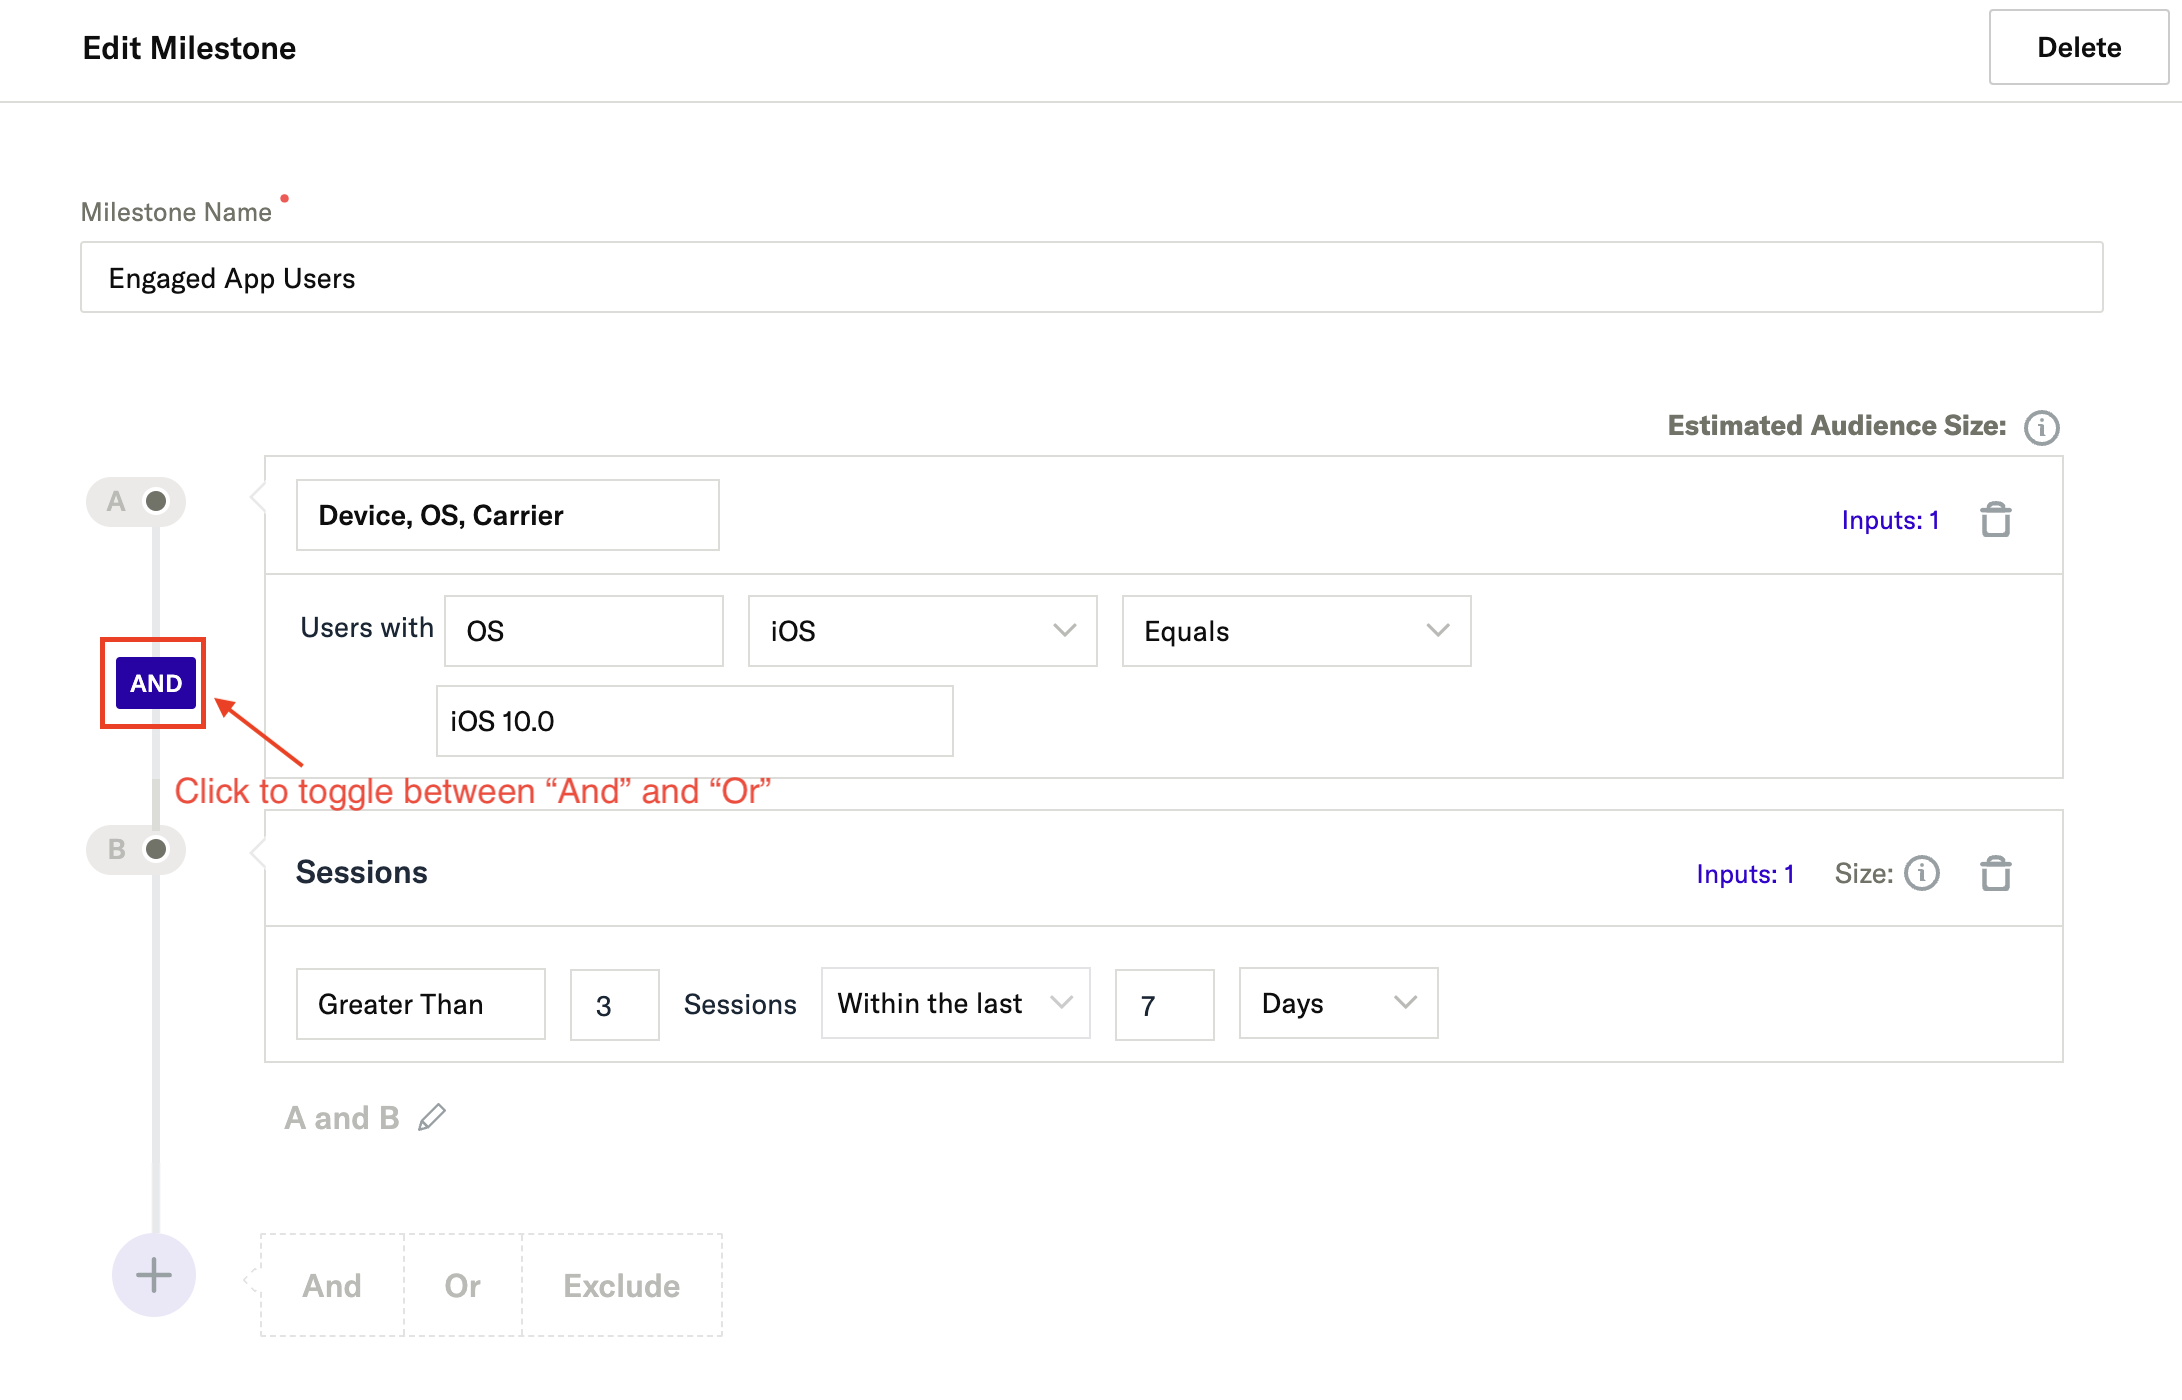
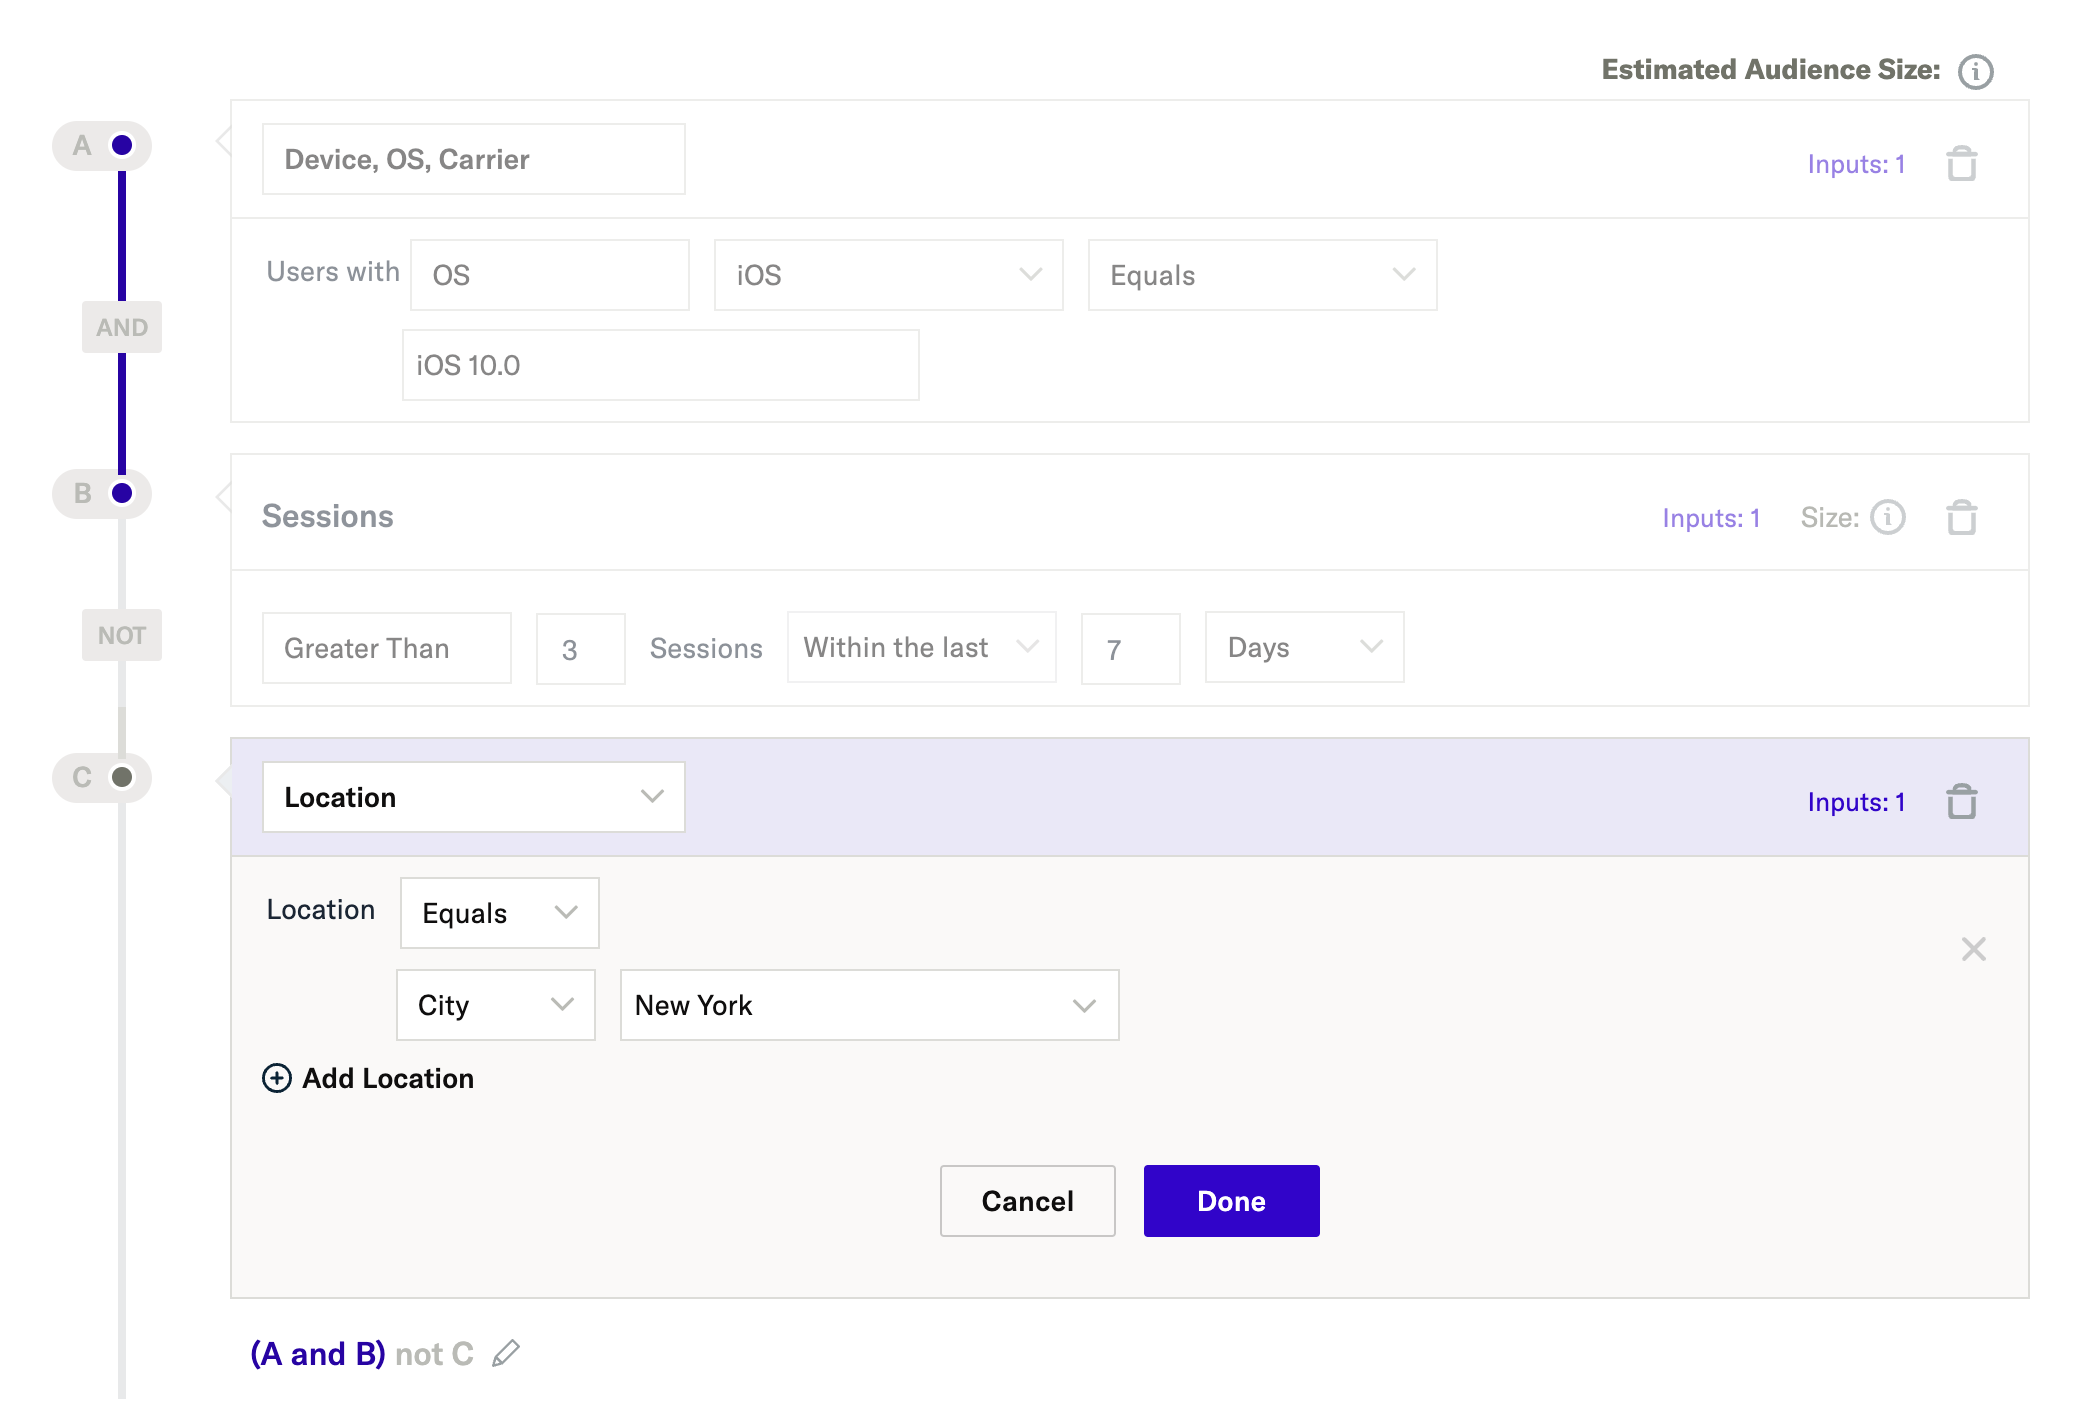
Continue adding and combining operators to hone in on the precise user segment that matters to your business goals. The Milestone below, for example, uses three criteria and two Boolean operators to create a segment of customers who are on iOS 10.0, have started at least three sessions within the last seven days, who are not located in New York City.
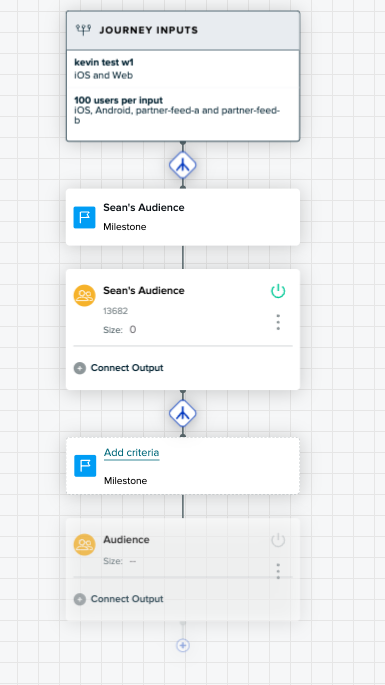
Nested audiences from multiple Milestones
Now let’s see another approach to using Journeys and Milestones to create targeted customer segments, which is is equivalent to creating nested audiences in the legacy Real-time Audiences experience. To explore how this works, let’s first look at a nested audience created with the legacy Real-time Audience builder as an example:
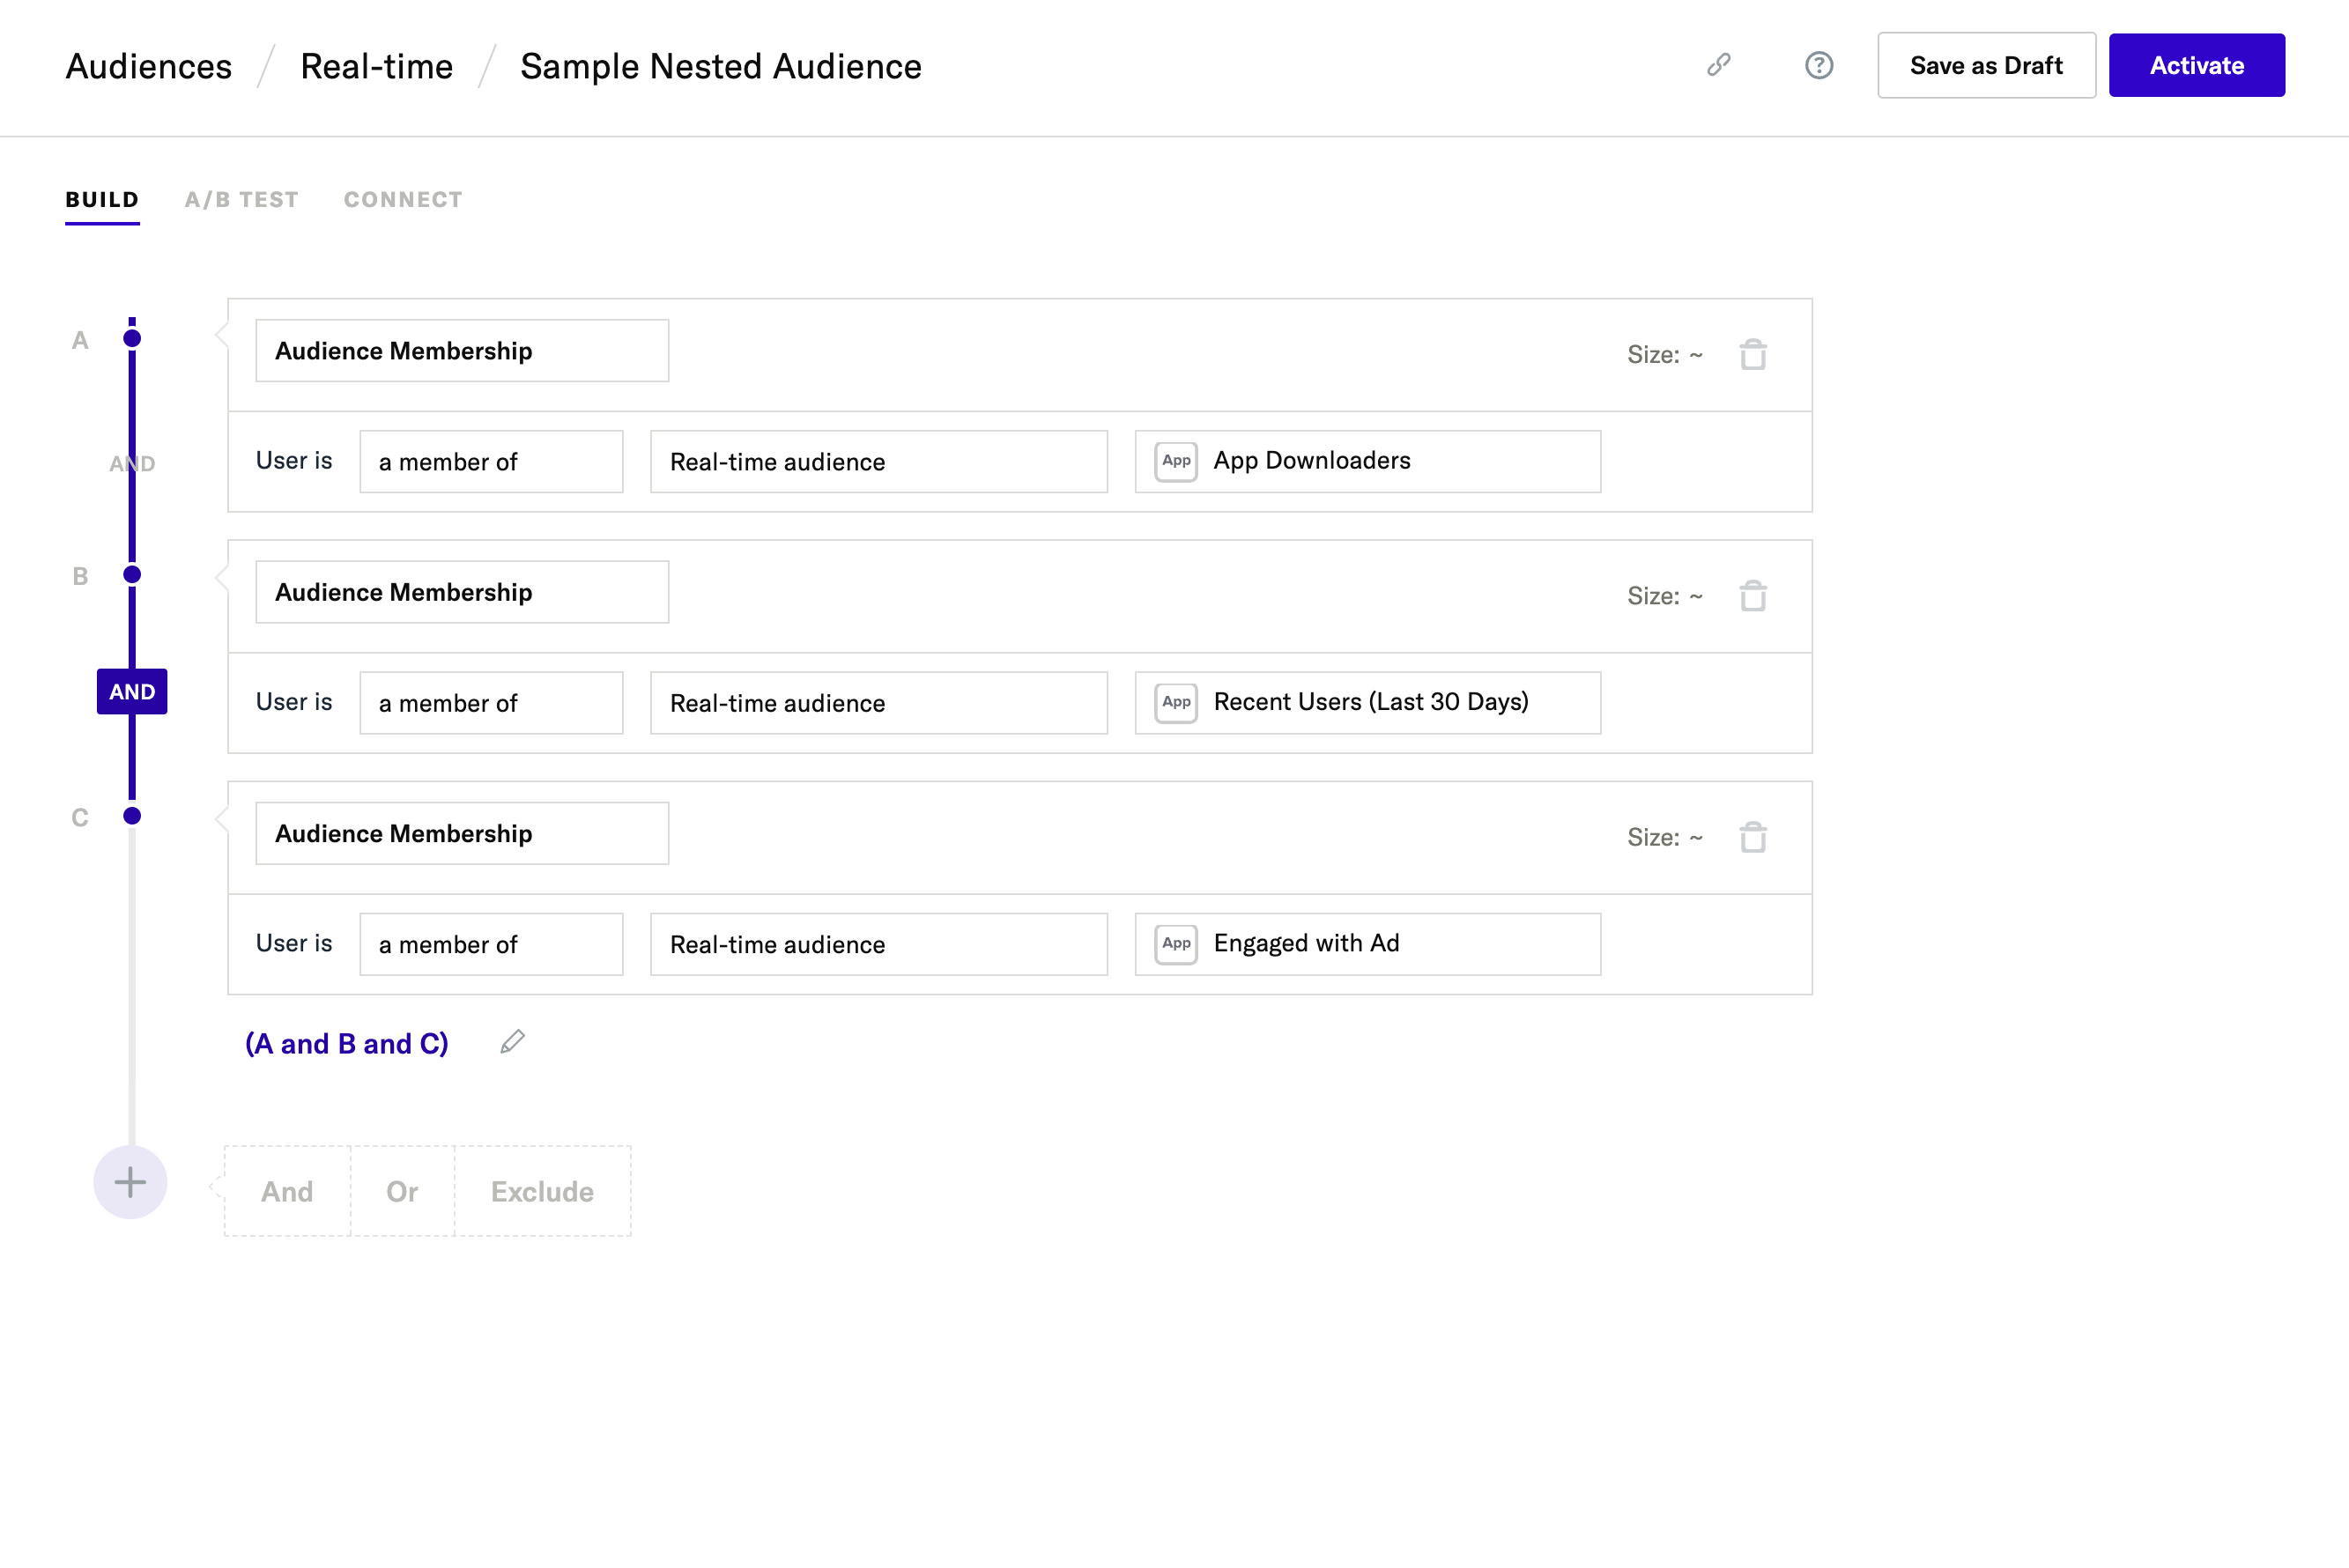
This customer segment uses membership in three separate Audiences––App Downloaders, Recent Users (Last 30 Days), and Engaged with Ad––as its membership criteria (which is what makes it a “nested” audience). Now, let’s see how we can recreate this segment as a Journey.
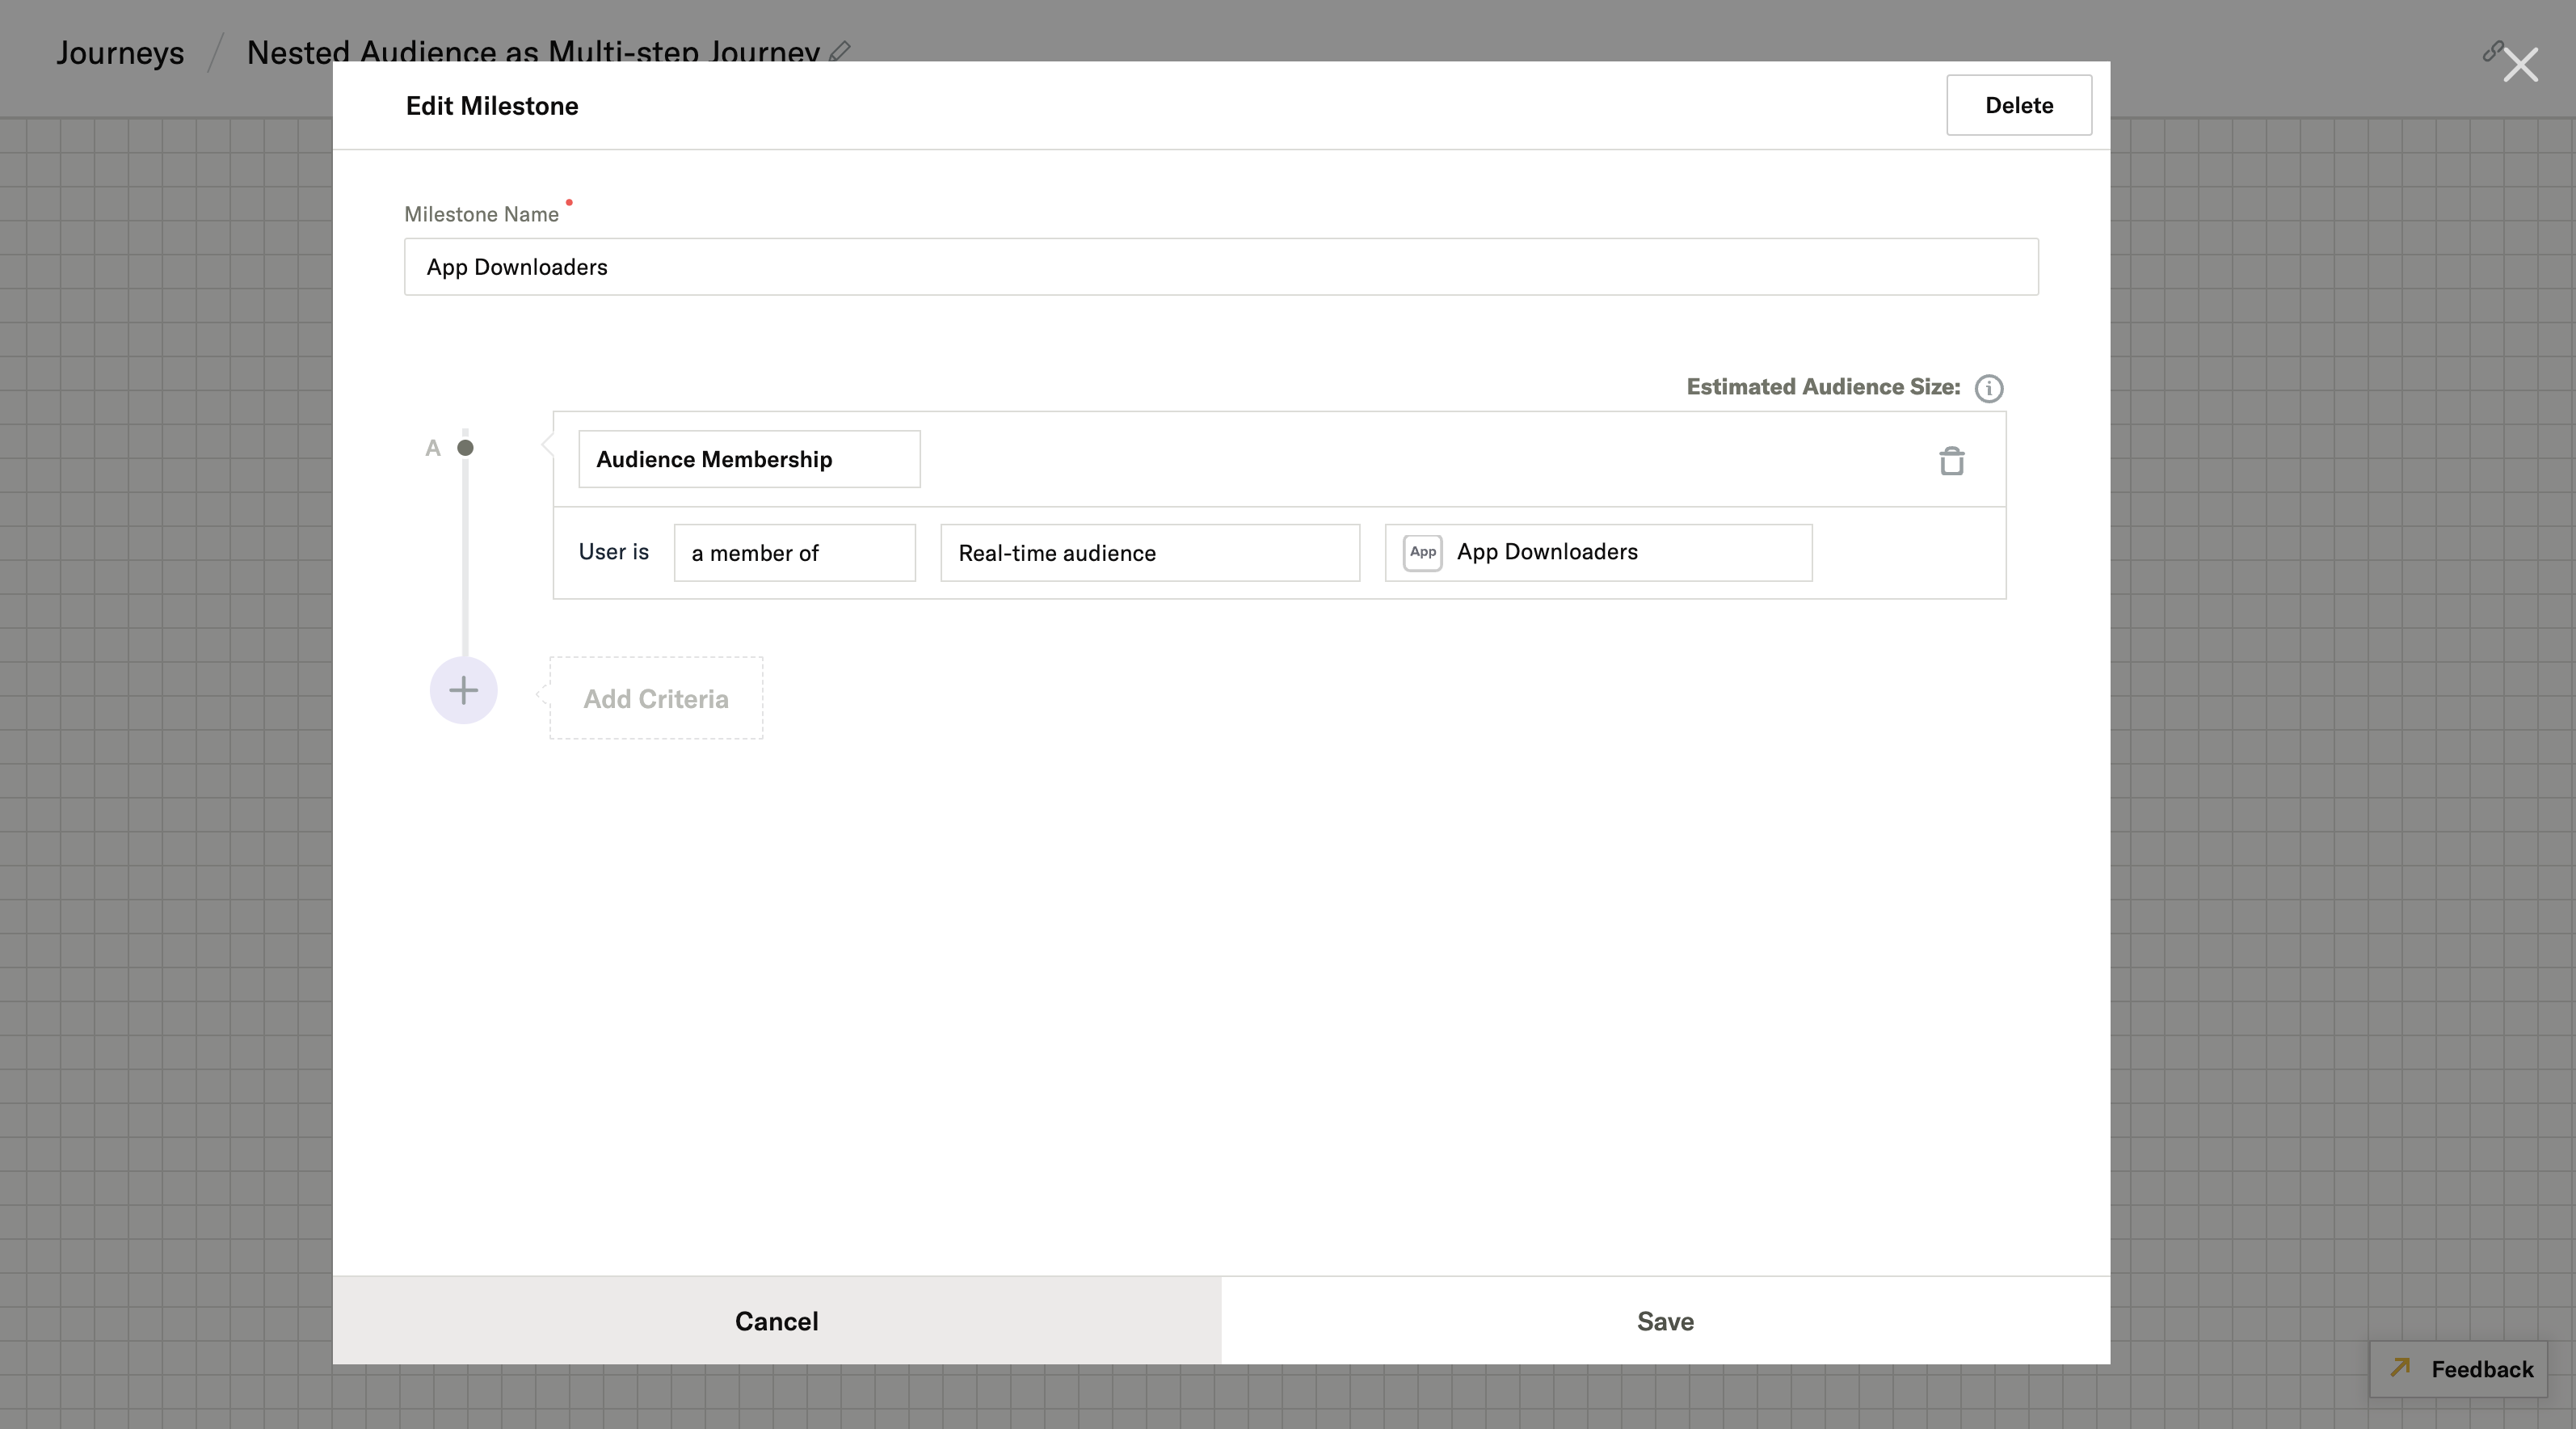
First, create a new Journey, then click the ”+” icon under the top (and only) node in your Journey to create a new Milestone. For this Milestone, set membership in the first audience from your nested audience (App Downloaders) as the sole inclusion criteria:
Now, create two more Milestones for the remaining two audiences in the original nested audience:
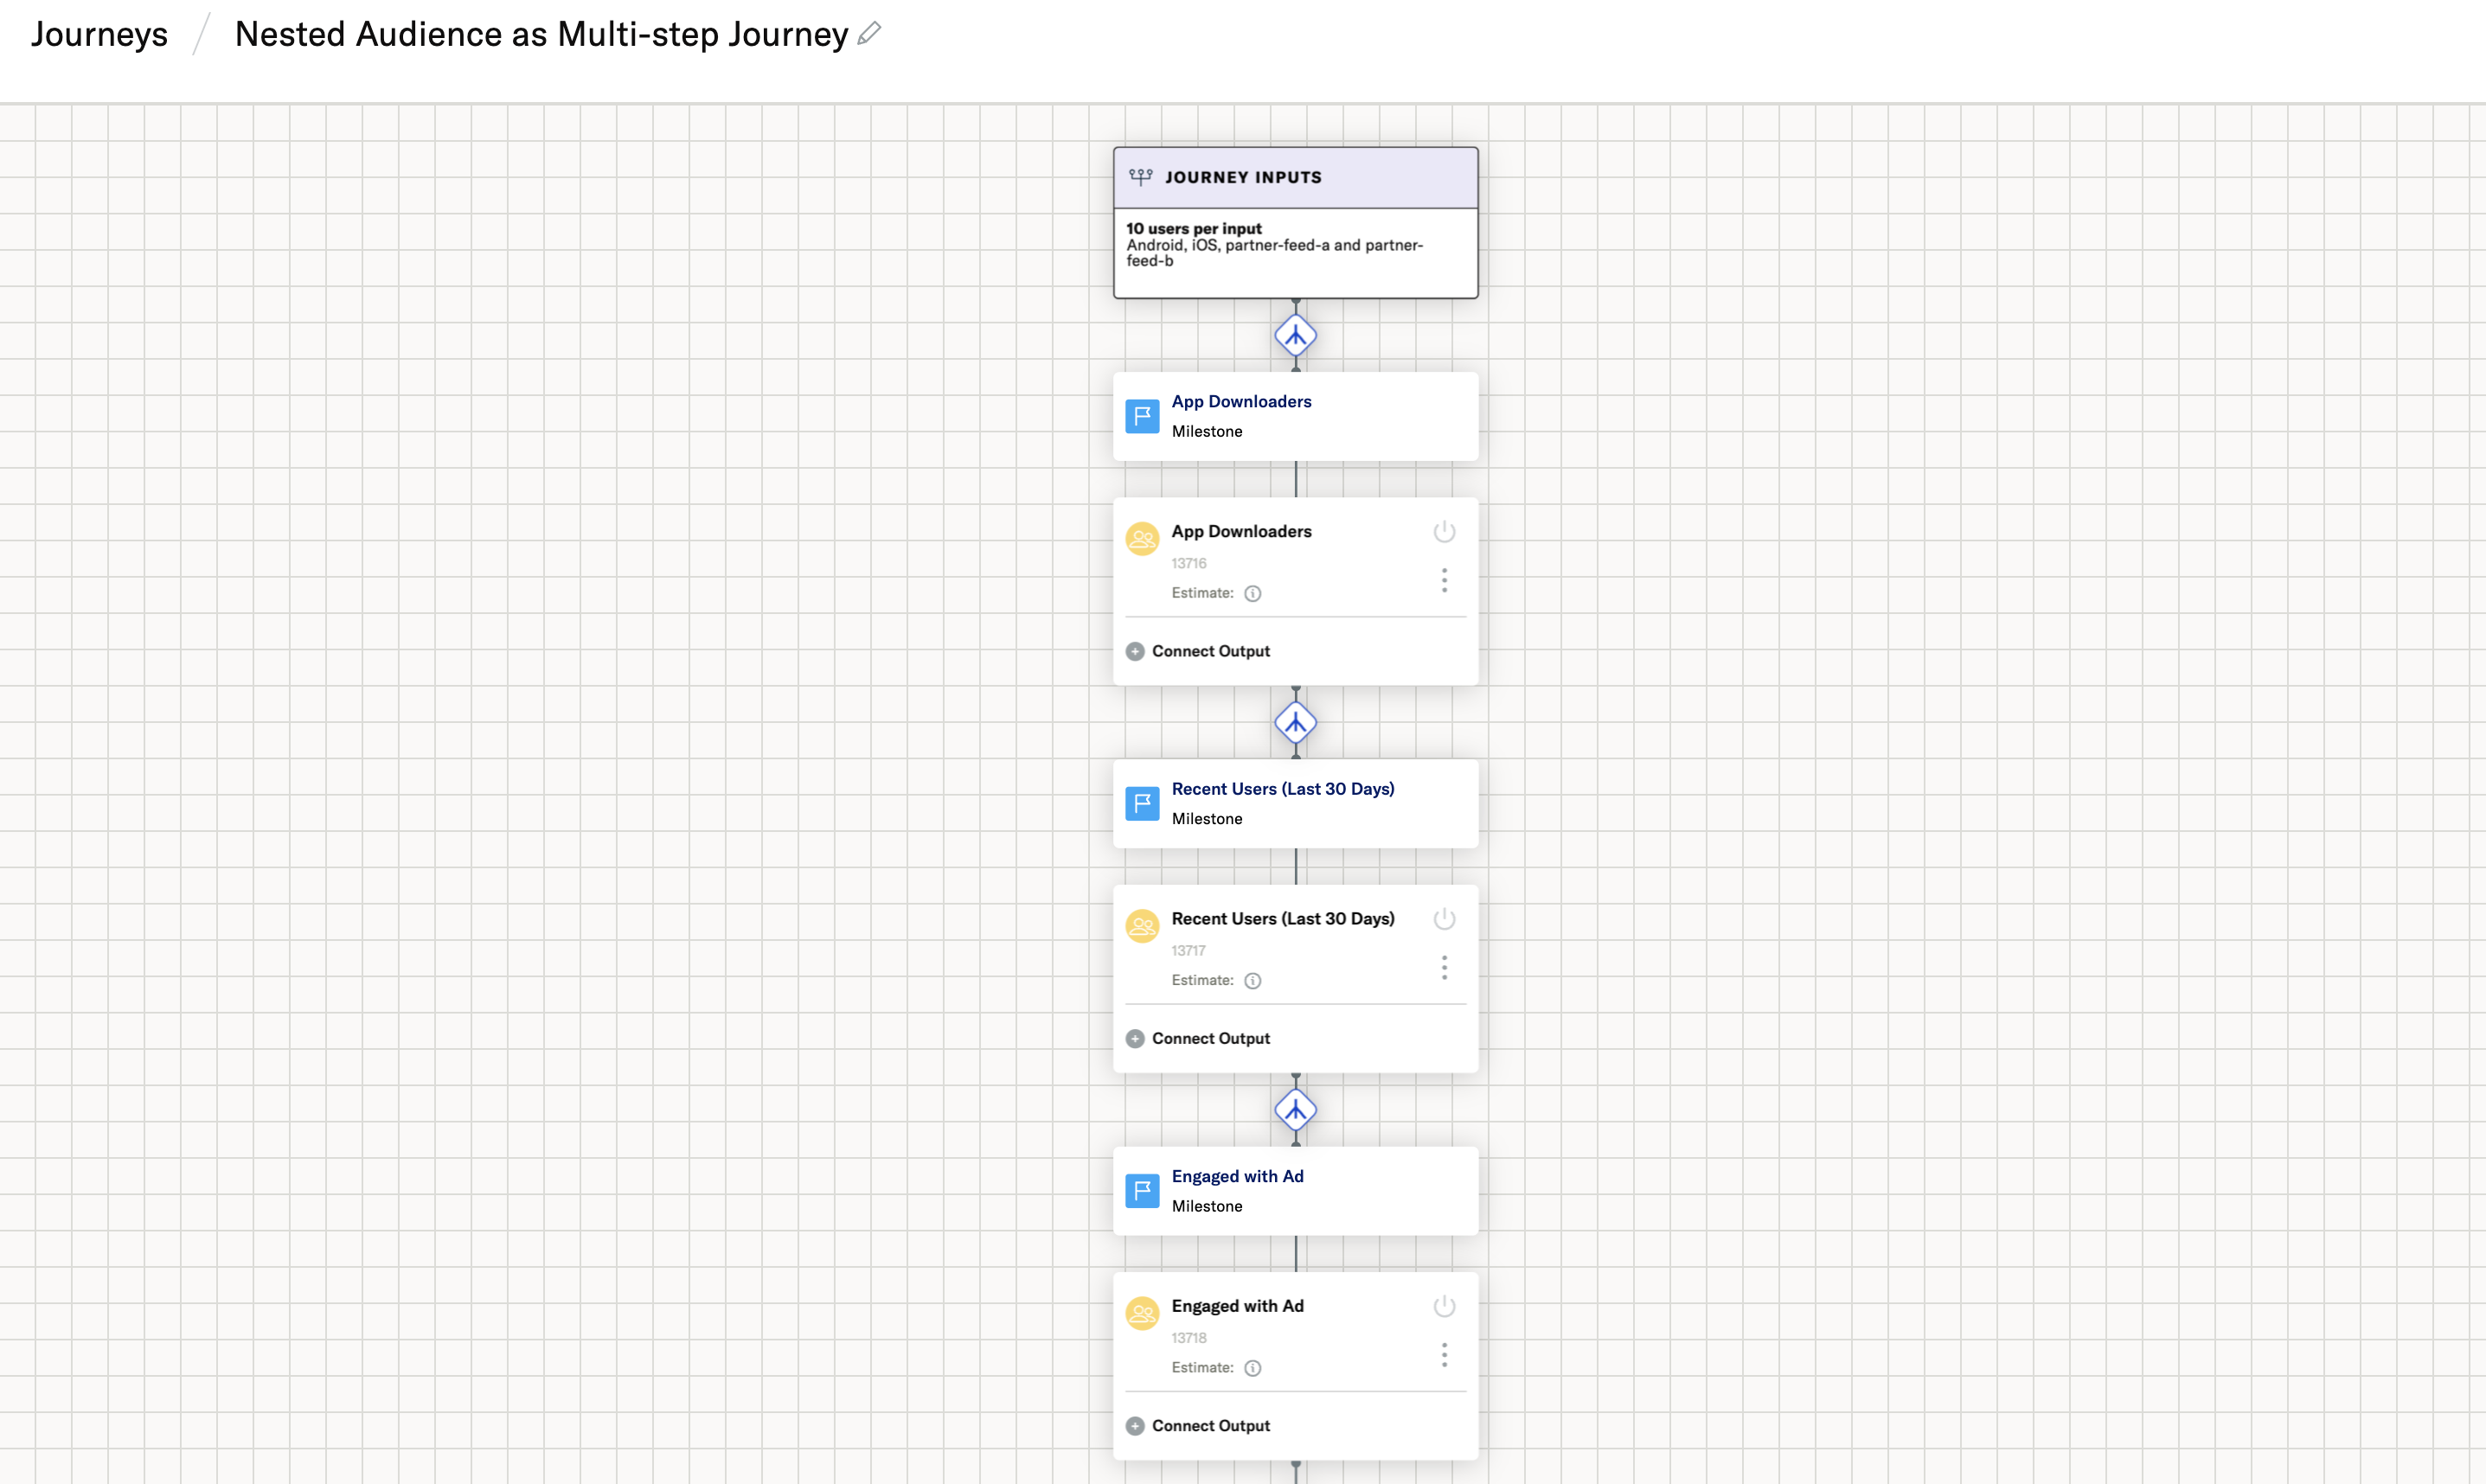
This Journey is now effectively the same customer segment as the nested audience created with the legacy Real-time Audience builder, with the added advantages of being able to add A/B Tests, new paths, and partner integrations at each individual Milestone (or nested audience), and the ability to visualize each Milestone that comprises the segment in one place.
Audience Insights
The Insights tab in the audience builder gives you quick visibility into the customers included in your audience. This helps you better understand who you are targeting and ensure your audience meets your business goals. The Insights tab displays four metrics:
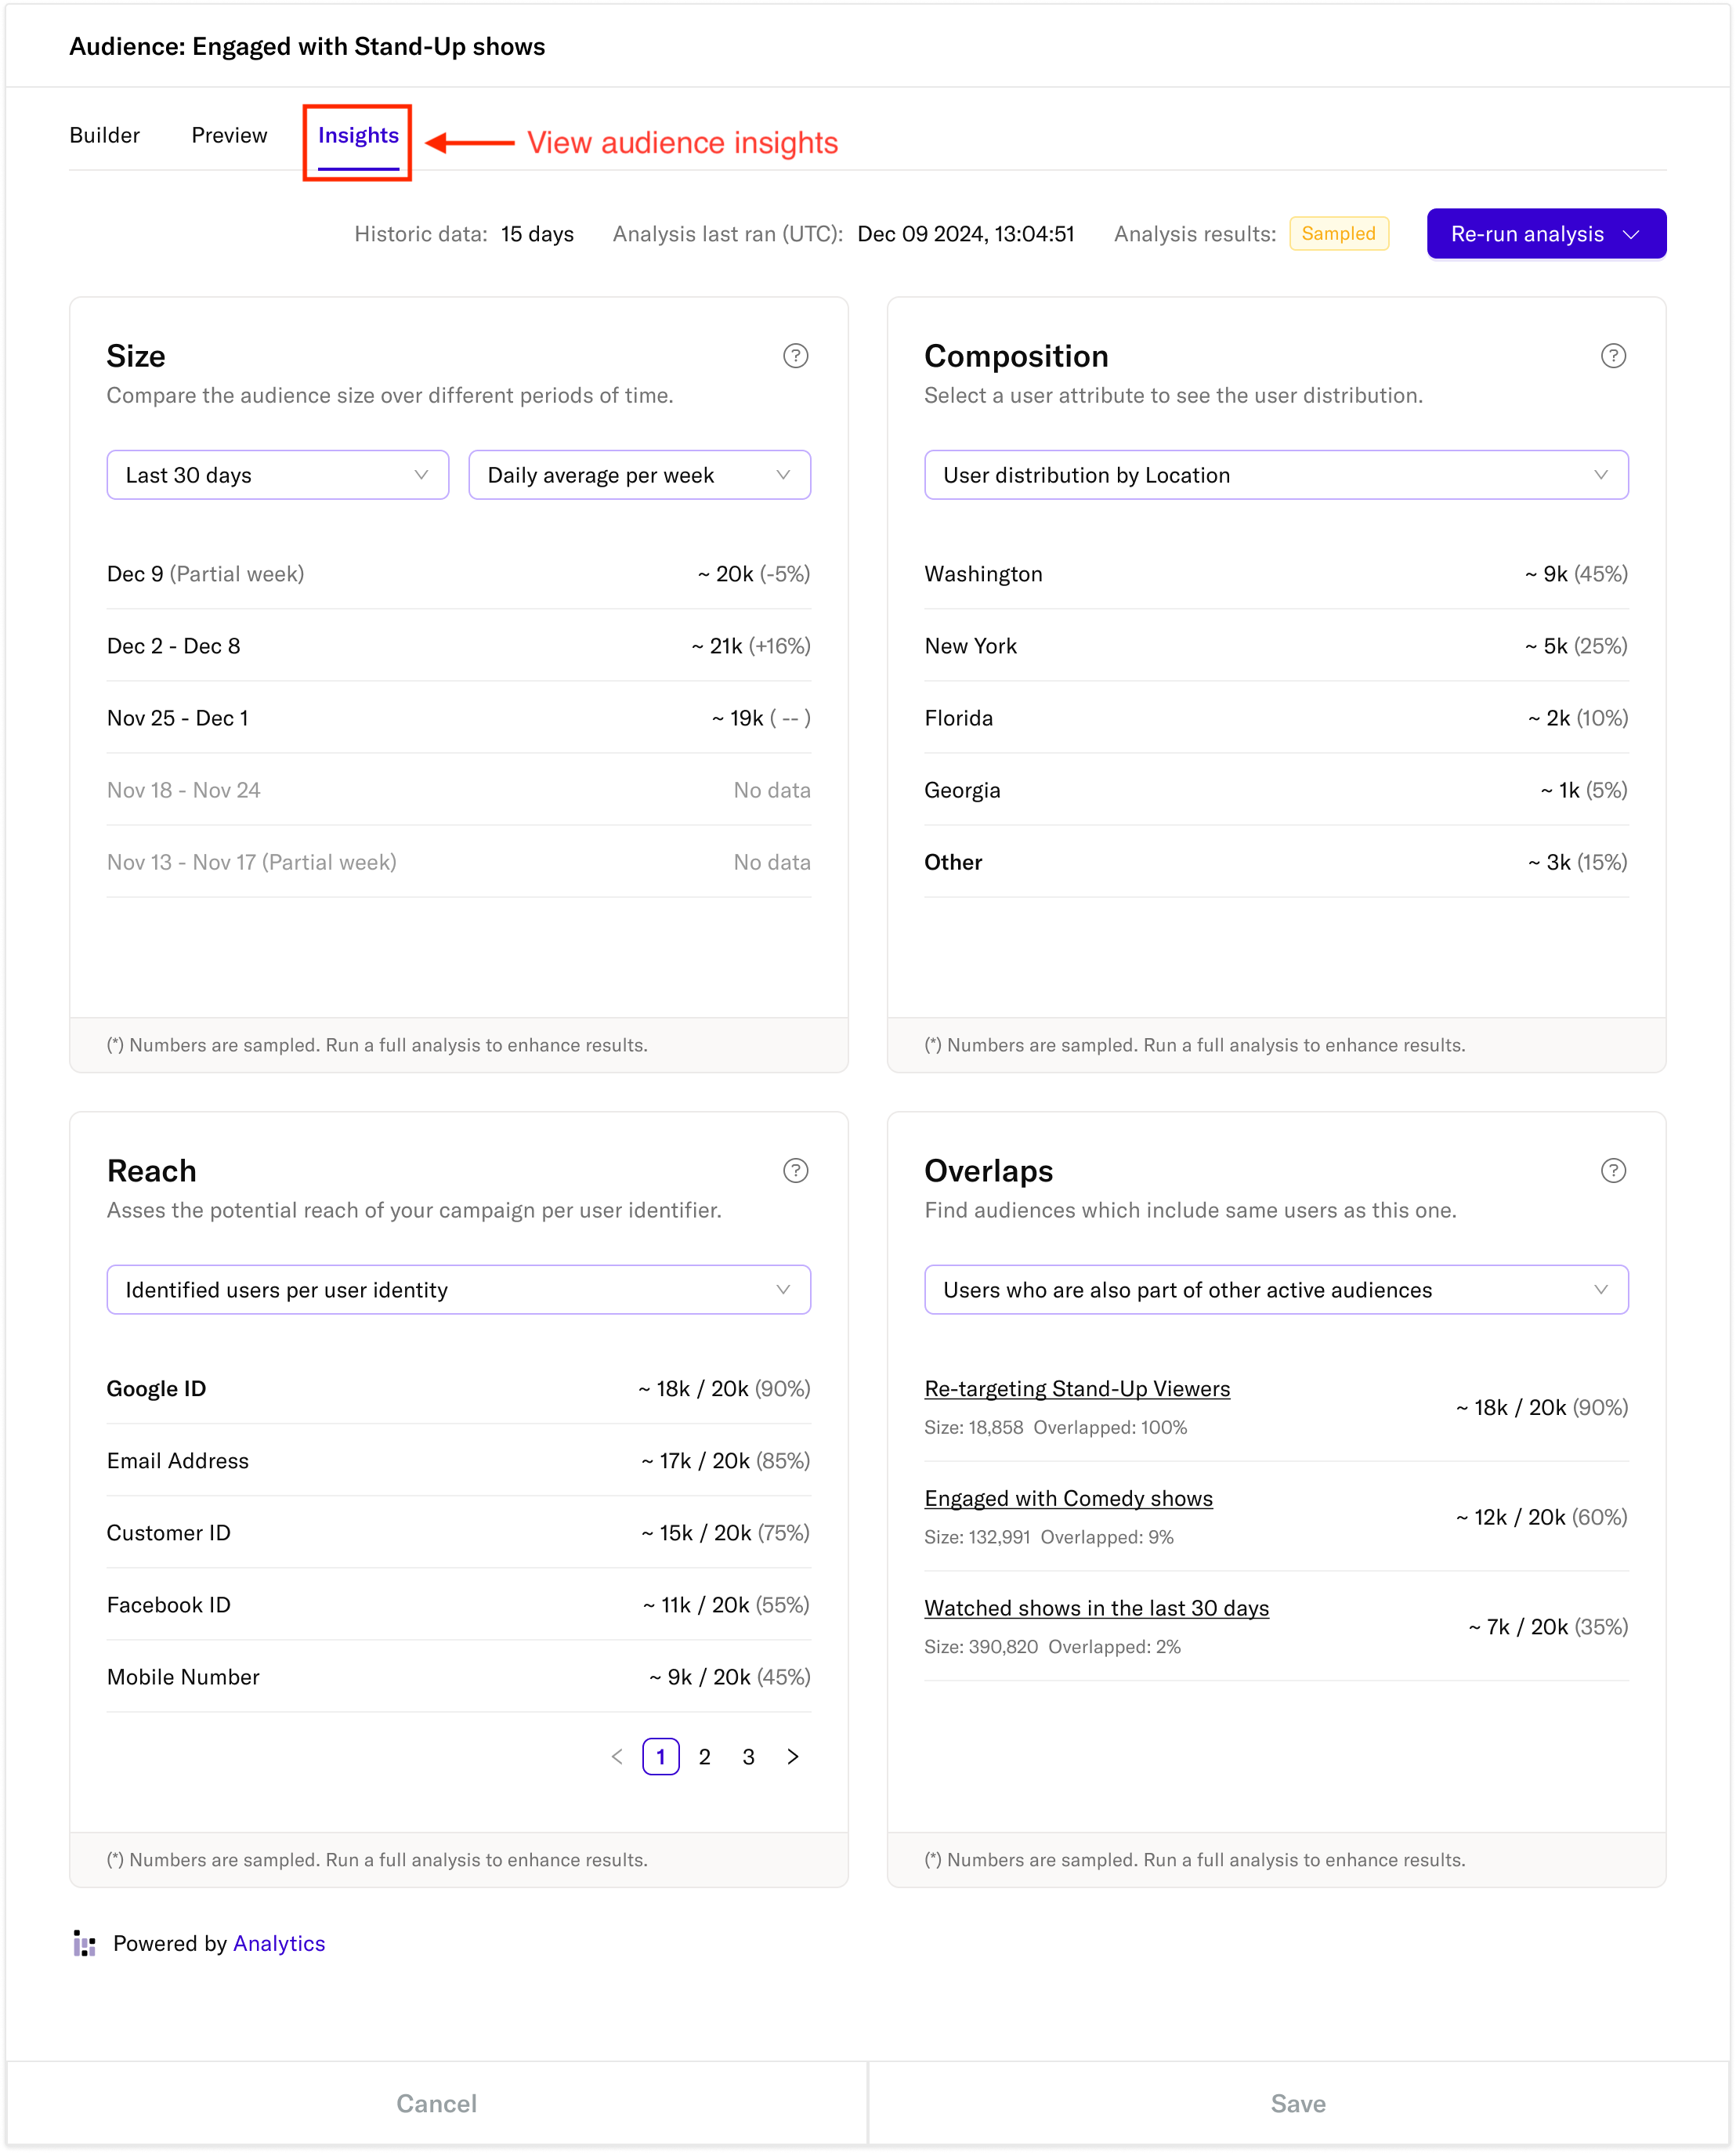
Size
Compare your audience size over different time periods to track growth trends and fluctuations. The size metric shows:
- Daily average audience size per week
- Custom date range comparisons (e.g., Last 30 days)
- Percentage changes between periods
- Partial week data clearly marked
Composition
Analyze the distribution of users across different attributes to understand your audience demographics and characteristics:
- View user distribution by various attributes (e.g., Location)
- See percentage breakdowns for each attribute value
- Compare relative sizes of different user segments
- Filter and sort distribution data as needed
Reach
Assess the potential reach of your campaign across different user identifiers:
- Track identified users per identity type (e.g., Email Address, Customer ID)
- View coverage percentages for each identifier
- Compare reach across multiple identification methods
- Monitor identity match rates and coverage gaps
Overlaps
Find audiences that share users with your current audience to optimize targeting and prevent duplicate messaging:
- See other active audiences containing the same users
- View overlap percentages between audiences
- Compare audience sizes and shared user counts
- Identify potential audience consolidation opportunities
Note: Numbers shown in the Insights tab are sampled by default. For precise figures, use the “Re-run analysis” option to perform a full audience analysis.
Each section of the Insights tab helps you make informed decisions about your audience targeting strategy and campaign optimization. Use these metrics to refine your audiences and ensure they align with your marketing objectives.
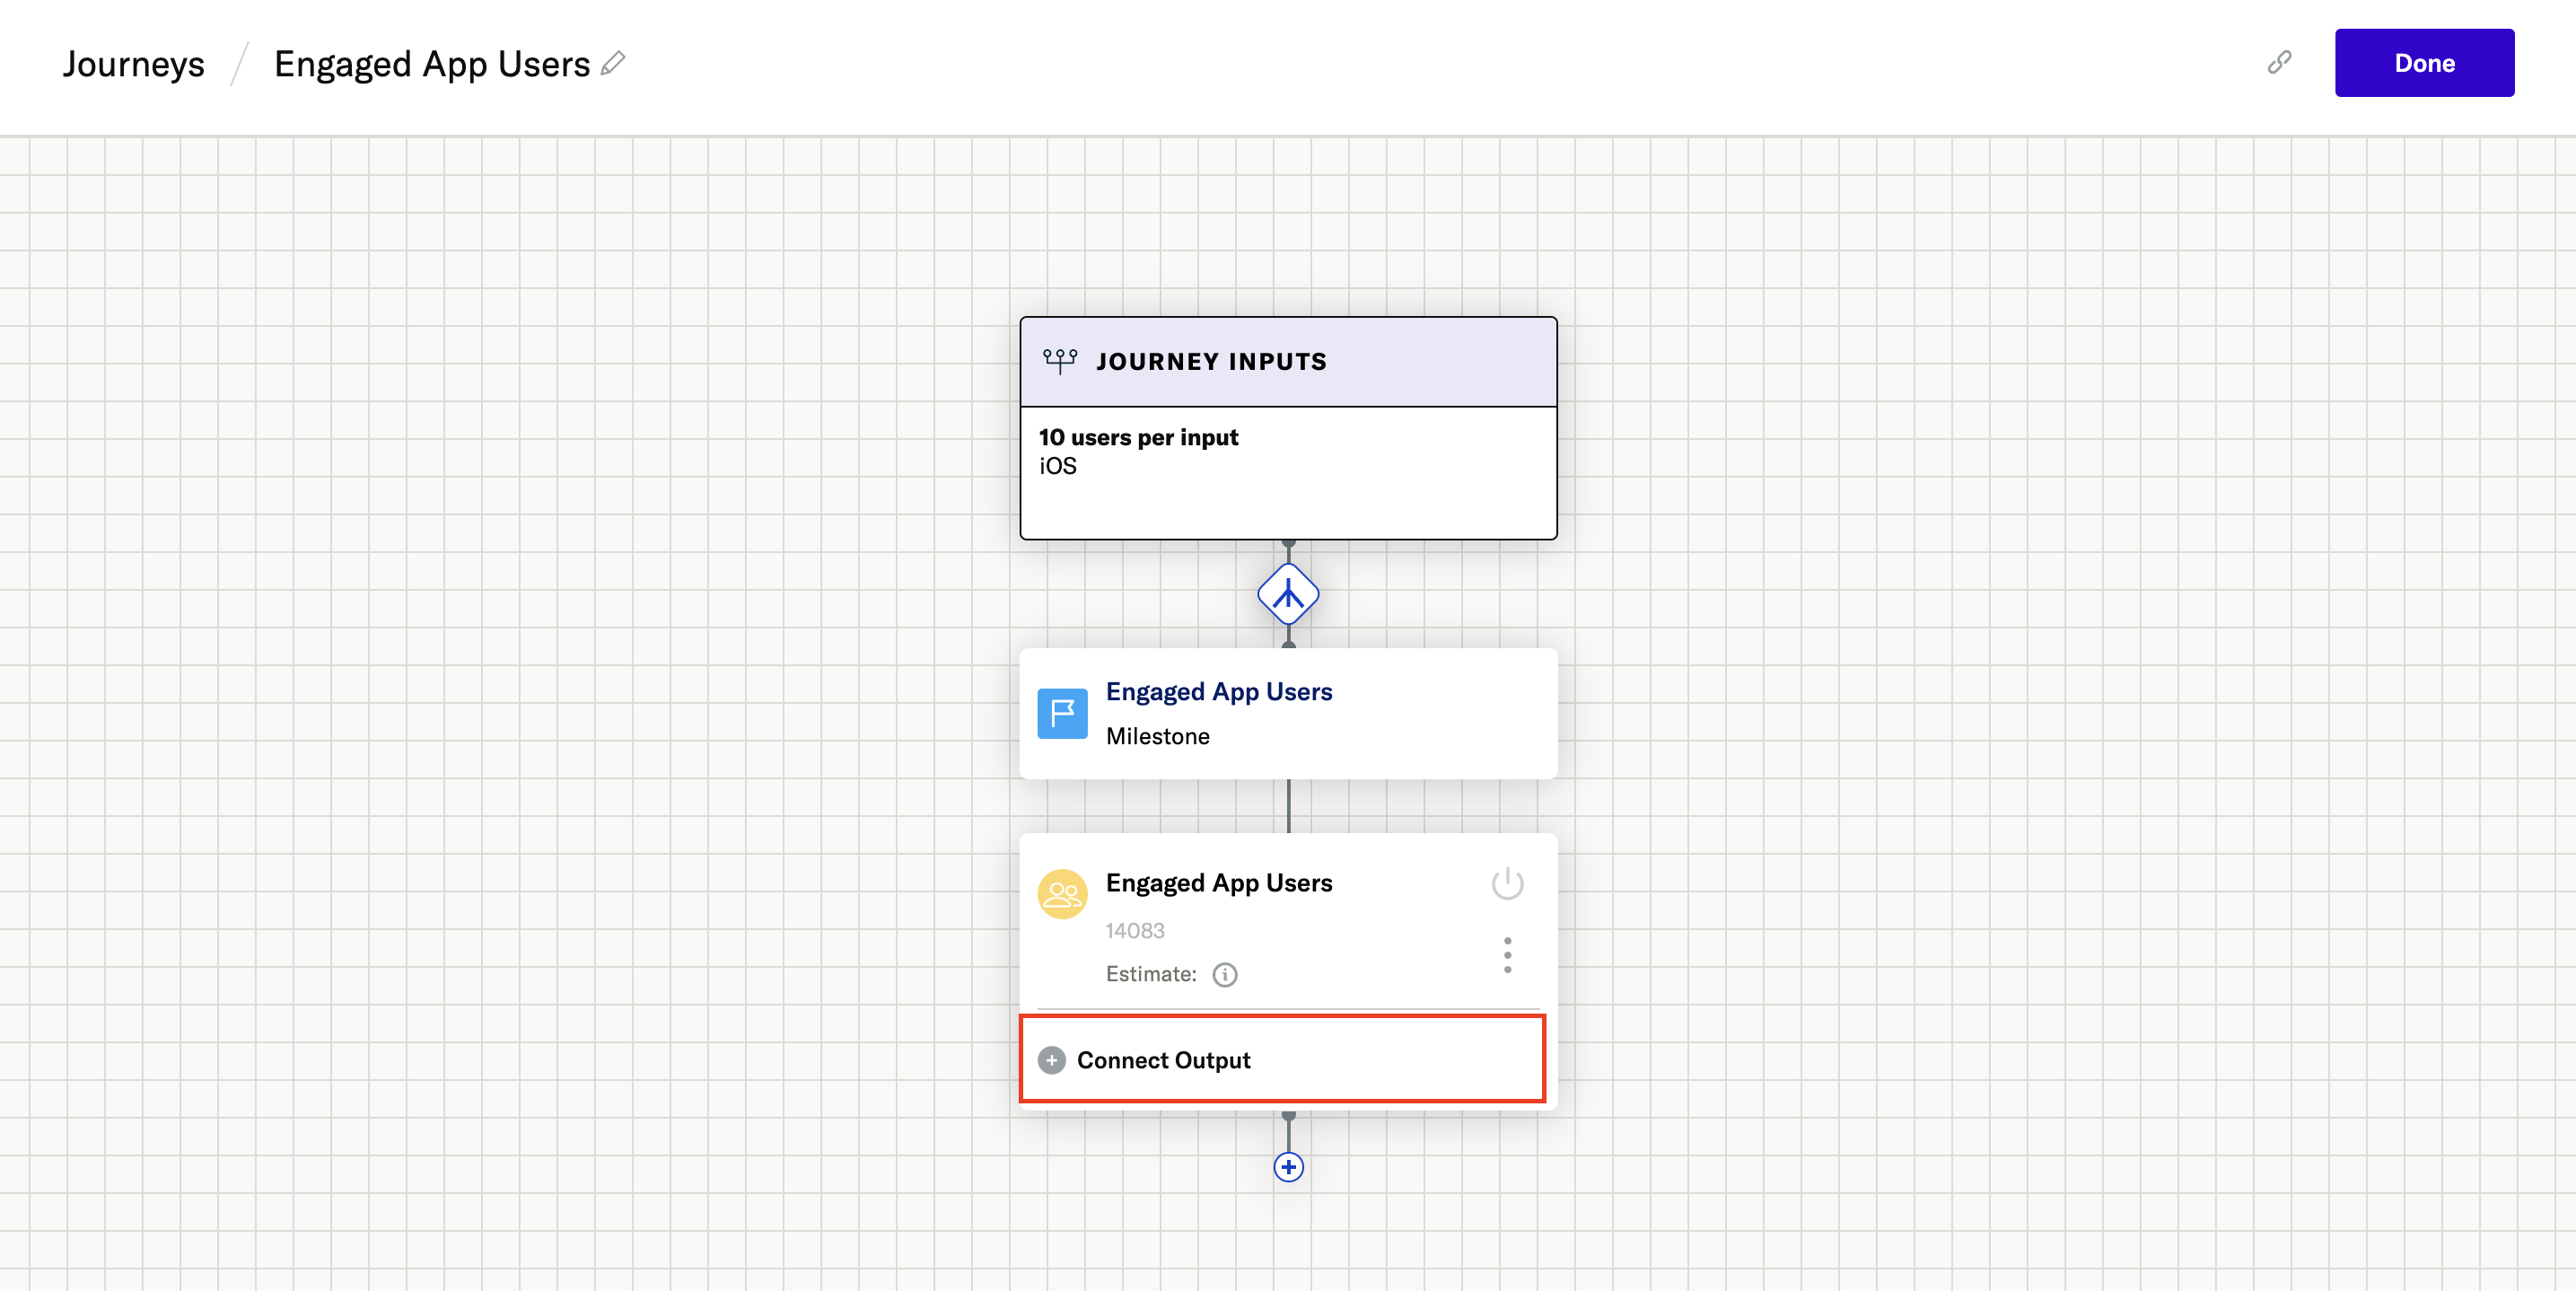
Activate a Milestone in a campaign
Once you have created a Milestone that you want to forward to an external tool for use in a campaign, click the Connect Output button in the Audience tile under the Milestone in your Journey, then follow the steps to connect that audience to any of your connected outputs.
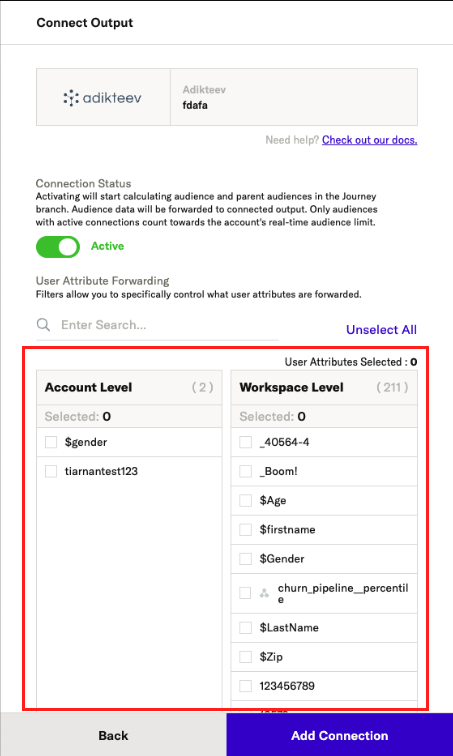
Selective User Attribute forwarding
You can optionally include additional User Attributes, beyond identities, when forwarding to each Audience output. This enables you to use richer data in your activation platform, such as LTV, lead score or propensity to convert. In the last step of the process to connect an output, select which account and workspace level attributes you would like to forward to that particular tool:
Organize journeys / audiences with Tags
As you continue to use create new audiences, you can use tags to keep them organized and allow team members to easily see the purpose of each audience at a glance. For example, you can use tags to group your audiences by campaign type, giving them names like retargeting, lead gen, and product launch.
Create a new tag
- Navigate to the Journeys homepage.
- Click the + icon next to the name of a Journey to expose its milestones.
- Click the Tags icon in the row for that milestone.
- Enter the name of your new tag in the text bar. Note: Tags have an 18 character limit.
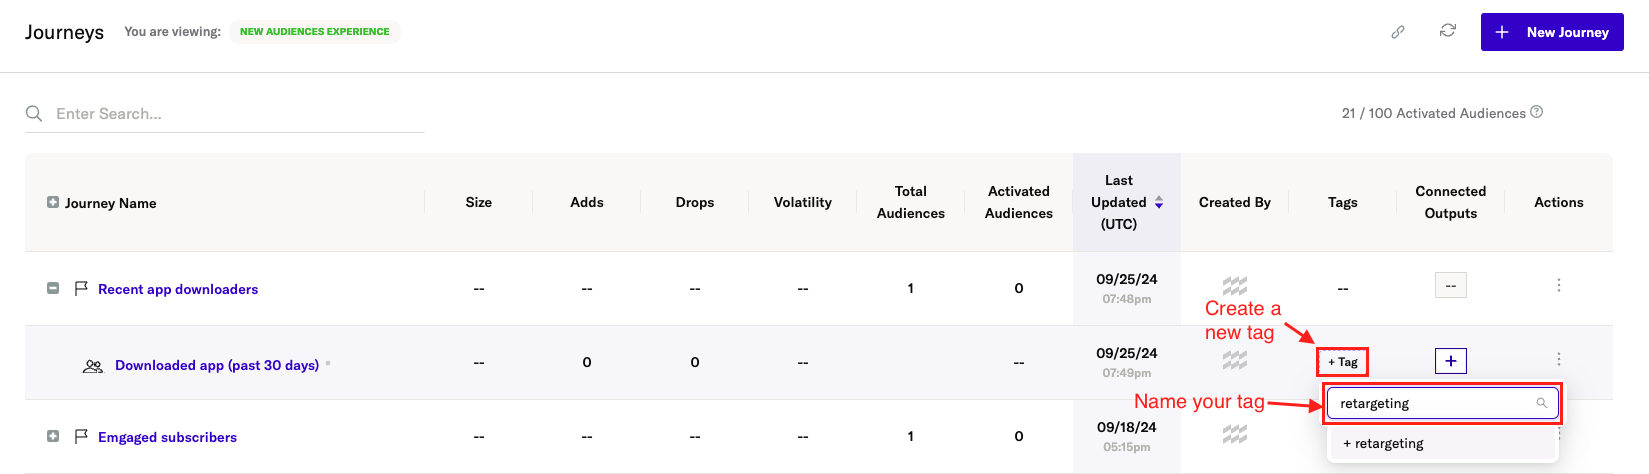
To apply your tag, click the name of the new tag below the text bar. To add additional tags, select name of the tag(s) that has already been applied, open the dropdown menu, and click the additional tags you would like to add.
Search milestones by tag name
Tag names can be used as search queries to return all audiences that have that particular tag applied.
Share Audiences within Journeys between accounts
You can share Audiences within Journeys between your organization’s accounts, with detailed control over what data is shared. Share data broadly or restrict it to only what’s needed for a campaign. This feature does not affect data shared with third-party tools.
Adjust sharing settings
- At the Journey’s homepage, open the Actions menu for the Audience you wish to share.
- Select Share to open the sharing modal.
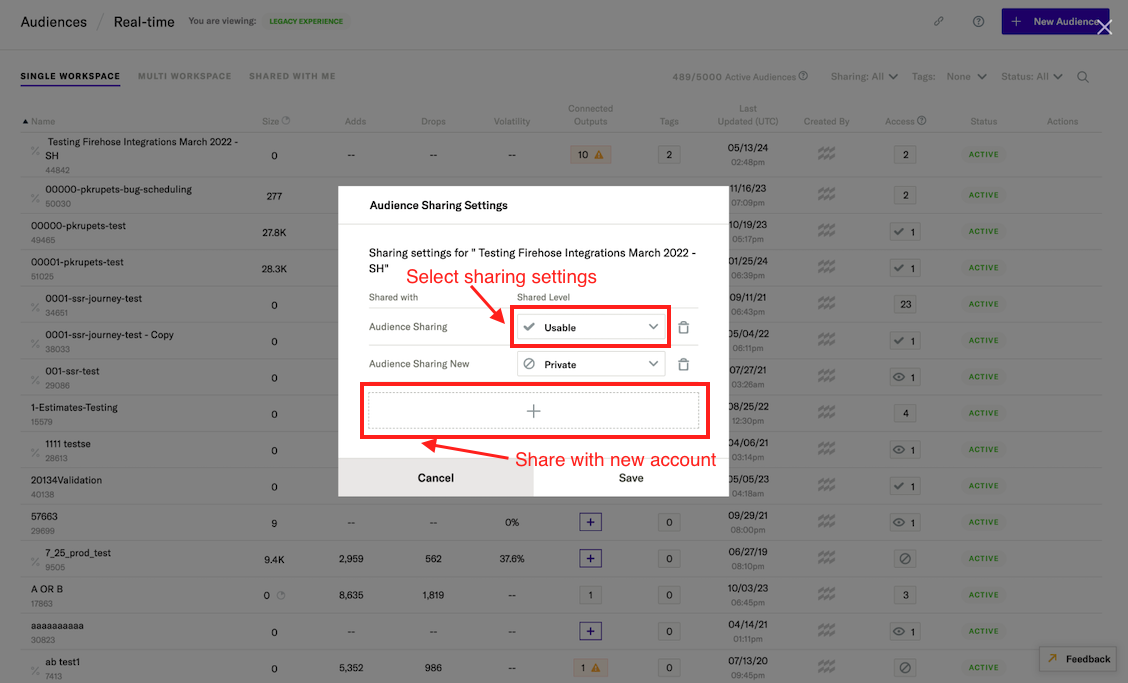
In the modal, view accounts the audience is shared with and their sharing permissions. There are four sharing permission levels:
Permission Levels | Level | Access Details | | --------- | -------- | | Owner | Full access to the audience, including editing, audience updates, and connecting outputs. Admins can set permissions. | | Private | The audience is invisible to the receiving account. | | View only | Visible to the receiving account but cannot connect to outputs. | | Usable | Visible to the receiving account and can connect to outputs. Audience definition cannot be edited. |
Share audience with new account
- In the sharing modal, select the + icon.
- Choose the account and the desired permission settings.
View shared audiences
To view audiences that have been shared with an account, navigate to Segmentation, then select Shared Audiences in the left-hand navigation.
Was this page helpful?
- Last Updated: February 27, 2025