Developers
API References
Data Subject Request API
Data Subject Request API Version 1 and 2
Data Subject Request API Version 3
Warehouse Sync API
Warehouse Sync API Overview
Warehouse Sync API Tutorial
Warehouse Sync API Reference
Data Mapping
Warehouse Sync SQL Reference
Warehouse Sync Troubleshooting Guide
ComposeID
Warehouse Sync API v2 Migration
Platform API
Key Management
Platform API Overview
Accounts
Apps
Audiences
Calculated Attributes
Data Points
Feeds
Field Transformations
Services
Users
Workspaces
Audit Logs API
Bulk Profile Deletion API Reference
Calculated Attributes Seeding API
Custom Access Roles API
Data Planning API
Household Reach API Reference
Pixel Service
Profile API
Events API
mParticle JSON Schema Reference
IDSync
Client SDKs
Android
Initialization
Configuration
Network Security Configuration
Event Tracking
User Attributes
IDSync
Screen Events
Commerce Events
Location Tracking
Media
Kits
Application State and Session Management
Data Privacy Controls
Error Tracking
Opt Out
Push Notifications
WebView Integration
Logger
Preventing Blocked HTTP Traffic with CNAME
Workspace Switching
Linting Data Plans
Troubleshooting the Android SDK
API Reference
Upgrade to Version 5
Upgrade to Version 6
AMP
AMP SDK
Direct Url Routing
Direct URL Routing FAQ
Web
Android
iOS
Cordova
Cordova Plugin
Identity
iOS
Workspace Switching
Initialization
Configuration
Event Tracking
User Attributes
IDSync
Screen Tracking
Commerce Events
Location Tracking
Media
Kits
Application State and Session Management
Data Privacy Controls
Error Tracking
Opt Out
Push Notifications
Webview Integration
Upload Frequency
Preventing Blocked HTTP Traffic with CNAME
Linting Data Plans
Troubleshooting iOS SDK
Social Networks
iOS 14 Guide
iOS 15 FAQ
iOS 16 FAQ
iOS 17 FAQ
iOS 18 FAQ
API Reference
Upgrade to Version 7
Upgrade to Version 9
.NET MAUI
Getting Started
Identity
React Native
Getting Started
Identity
Web
Initialization
Configuration
Content Security Policy
Event Tracking
User Attributes
IDSync
Page View Tracking
Commerce Events
Location Tracking
Media
Kits
Application State and Session Management
Data Privacy Controls
Error Tracking
Opt Out
Custom Logger
Persistence
Native Web Views
Self-Hosting
Multiple Instances
Web SDK via Google Tag Manager
Preventing Blocked HTTP Traffic with CNAME
Facebook Instant Articles
Troubleshooting the Web SDK
Browser Compatibility
Linting Data Plans
API Reference
Upgrade to Version 3 of the SDK
Unity
Upload Frequency
Getting Started
Opt Out
Initialize the SDK
Event Tracking
Commerce Tracking
Error Tracking
Screen Tracking
Identity
Location Tracking
Session Management
Alexa
Quickstart
Android
Overview
Step 1. Create an input
Step 2. Verify your input
Step 3. Set up your output
Step 4. Create a connection
Step 5. Verify your connection
Step 6. Track events
Step 7. Track user data
Step 8. Create a data plan
Step 9. Test your local app
iOS Quick Start
Overview
Step 1. Create an input
Step 2. Verify your input
Step 3. Set up your output
Step 4. Create a connection
Step 5. Verify your connection
Step 6. Track events
Step 7. Track user data
Step 8. Create a data plan
Python Quick Start
Step 1. Create an input
Step 2. Create an output
Step 3. Verify output
Server SDKs
Node SDK
Go SDK
Python SDK
Ruby SDK
Java SDK
Guides
Partners
Introduction
Outbound Integrations
Outbound Integrations
Firehose Java SDK
Inbound Integrations
Compose ID
Data Hosting Locations
Glossary
Migrate from Segment to mParticle
Migrate from Segment to mParticle
Migrate from Segment to Client-side mParticle
Migrate from Segment to Server-side mParticle
Segment-to-mParticle Migration Reference
Rules Developer Guide
API Credential Management
The Developer's Guided Journey to mParticle
Guides
Platform Overview
Introduction
Navigating mParticle
The Overview Map
Getting Started
Create an Input
Start capturing data
Connect an Event Output
Create an Audience
Connect an Audience Output
Transform and Enhance Your Data
mParticle Agent
Overview
Explore Your Data
Build Audiences
Create Predictions
Data and Privacy
mParticle Agent FAQ
Oversight
System Alerts
Data Platform
Trends
Setup
Connections
Feeds
Import Data with CSV Files
Import Data with CSV Files
CSV File Reference
SFTP Credentials
Live Stream
Data Catalog
Rules
Plans
Filters
Event Forwarding
Event Match Quality
Data Retention
Tiered Events
Blocked Data Backfill Guide
Data Warehouse
Composable Audiences
Warehouse Setup Overview
Customer 360
Overview
User Profiles
Overview
User Profiles
Identity Dashboard
Identity Resolution Log
Household Reach
Calculated Attributes
Calculated Attributes Overview
Using Calculated Attributes
Create with AI Assistance
Calculated Attributes Reference
Predictions
Predictions Overview
What's Changed in the New Predictions UI
View and Manage Predictions
Predict Future Behavior
Future Behavior Predictions Overview
Create Future Behavior Prediction
Manage Future Behavior Predictions
Create an Audience with Future Behavior Predictions
Analytics
Introduction
Core Analytics (Beta)
Analytics Free Trial
Setup
Sync and Activate Analytics User Segments in mParticle
User Segment Activation
Welcome Page Announcements
Settings
Project Settings
Roles and Teammates
Organization Settings
Global Project Filters
Portfolio Analytics
Analytics Data Manager
Analytics Data Manager Overview
Events
Event Properties
User Properties
Revenue Mapping
Export Data
UTM Guide
Analyses
Analyses Introduction
Segmentation: Basics
Getting Started
Visualization Options
For Clauses
Date Range and Time Settings
Calculator
Numerical Settings
Segmentation: Advanced
Assisted Analysis
Properties Explorer
Frequency in Segmentation
Trends in Segmentation
Did [not] Perform Clauses
Cumulative vs. Non-Cumulative Analysis in Segmentation
Total Count of vs. Users Who Performed
Save Your Segmentation Analysis
Export Results in Segmentation
Explore Users from Segmentation
Funnels: Basics
Getting Started with Funnels
Group By Settings
Conversion Window
Tracking Properties
Date Range and Time Settings
Visualization Options
Interpreting a Funnel Analysis
Funnels: Advanced
Group By
Filters
Conversion over Time
Conversion Order
Trends
Funnel Direction
Multi-path Funnels
Analyze as Cohort from Funnel
Save a Funnel Analysis
Explore Users from a Funnel
Export Results from a Funnel
Saved Analyses
Manage Analyses in Dashboards
Query Builder
Data Dictionary
Query Builder Overview
Modify Filters With And/Or Clauses
Query-time Sampling
Query Notes
Filter Where Clauses
Event vs. User Properties
Group By Clauses
Annotations
Cross-tool Compatibility
Apply All for Filter Where Clauses
Date Range and Time Settings Overview
User Attributes at Event Time
Understanding the Screen View Event
User Aliasing
Dashboards
Dashboards––Getting Started
Manage Dashboards
Dashboard Filters
Organize Dashboards
Scheduled Reports
Favorites
Time and Interval Settings in Dashboards
Query Notes in Dashboards
Analytics Resources
The Demo Environment
Keyboard Shortcuts
User Segments
Tutorials
Analytics for Marketers
Analytics for Product Managers
Compare Conversion Across Acquisition Sources
Analyze Product Feature Usage
Identify Points of User Friction
Time-based Subscription Analysis
Dashboard Tips and Tricks
Understand Product Stickiness
Optimize User Flow with A/B Testing
Analytics (Deprecated)
Identity Providers
Single Sign-On (SSO)
Setup Examples
Introduction
Developer Docs
Introduction
Integrations
Introduction
Rudderstack
Google Tag Manager
Segment
Data Warehouses and Data Lakes
Advanced Data Warehouse Settings
AWS Kinesis (Snowplow)
AWS Redshift (Define Your Own Schema)
AWS S3 Integration (Define Your Own Schema)
AWS S3 (Snowplow Schema)
BigQuery (Snowplow Schema)
BigQuery Firebase Schema
BigQuery (Define Your Own Schema)
GCP BigQuery Export
Snowflake (Snowplow Schema)
Snowplow Schema Overview
Snowflake (Define Your Own Schema)
Developer Basics
Aliasing
Audiences
Audiences Overview
Create an Audience
Connect an Audience
Manage Audiences
Audience Insights
Audience Sharing
Match Boost
Inclusive & Exclusive Audiences (Early Access)
Inclusive & Exclusive Audiences Overview
Using Logic Blocks in Audiences
Combining Inclusive and Exclusive Audiences
Inclusive & Exclusive Audiences FAQ
Audience Expansion
Predictive Audiences
Predictive Audiences Overview
Using Predictive Audiences
Composable Audiences
Composable Audiences Overview
User Guide
User Guide Overview
Audience Setup
Frequently Asked Questions
Troubleshooting mParticle
Default Service Limits
Glossary
Integrations
24i
Event
Aarki
Audience
ABTasty
Audience
AdChemix
Event
Actable
Feed
AdMedia
Audience
Adobe Audience Manager
Audience
Adobe Marketing Cloud
Cookie Sync
Server-to-Server Events
Platform SDK Events
Adobe Campaign Manager
Audience
Adobe Experience Platform
Event
Adobe Target
Audience
AdPredictive
Feed
AgilOne
Event
Algolia
Event
Amazon Kinesis
Event
Amazon Redshift
Data Warehouse
Amazon SNS
Event
Amobee
Audience
Amazon SQS
Event
Anodot
Event
Antavo
Feed
Apptentive
Event
Apptimize
Event
Apteligent
Event
Awin
Event
Microsoft Azure Blob Storage
Event
Bidease
Audience
Bing Ads
Event
Bluecore
Event
Bluedot
Feed
Bugsnag
Event
Cadent
Audience
Census
Feed
comScore
Event
Conversant
Event
Crossing Minds
Event
Custom Feed
Custom Feed
Databricks
Data Warehouse
Datadog
Event
Didomi
Event
Eagle Eye
Audience
Edge226
Audience
Emarsys
Audience
Epsilon
Event
Everflow
Audience
Facebook Offline Conversions
Event
Google Analytics for Firebase
Event
Flurry
Event
Flybits
Event
ForeSee
Event
FreeWheel Data Suite
Audience
Google Ad Manager
Audience
Friendbuy
Event
Google Analytics 4
Event
Google Analytics
Event
Google BigQuery
Audience
Data Warehouse
Google Enhanced Conversions
Event
Google Marketing Platform
Audience
Event
Cookie Sync
Google Marketing Platform Offline Conversions
Event
Google Pub/Sub
Event
Google Tag Manager
Event
Heap
Event
Herow
Feed
Hightouch
Feed
Hyperlocology
Event
Ibotta
Event
ID5
Kit
Impact
Event
InMarket
Audience
Intercom
Event
ironSource
Audience
Inspectlet
Event
Kafka
Event
Kissmetrics
Event
Kubit
Event
LaunchDarkly
Feed
LifeStreet
Audience
LiveLike
Event
Localytics
Event
Liveramp
Audience
MadHive
Audience
mAdme Technologies
Event
Marigold
Audience
Mediasmart
Audience
Microsoft Ads
Microsoft Ads Audience Integration
MediaMath
Audience
Microsoft Azure Event Hubs
Event
Mintegral
Audience
Monetate
Event
Movable Ink - V2
Event
Movable Ink
Event
Multiplied
Event
Nami ML
Feed
Nanigans
Event
NCR Aloha
Event
Neura
Event
OneTrust
Event
Oracle BlueKai
Event
Paytronix
Feed
Persona.ly
Audience
Personify XP
Event
Plarin
Event
Primer
Event
Qualtrics
Event
Quantcast
Event
Rakuten
Event
Regal
Event
Reveal Mobile
Event
RevenueCat
Feed
Scalarr
Event
Branch S2S Event
Event
Shopify
Custom Pixel
Feed
SFTP
Audience
SimpleReach
Event
Singular-DEPRECATED
Event
Skyhook
Event
Slack
Event
Smadex
Audience
SmarterHQ
Event
Snapchat Conversions
Event
Snowflake
Data Warehouse
Audience
Snowplow
Event
Spotify
Event
Splunk MINT
Event
StartApp
Audience
Talon.One
Audience
Event
Feed
Loyalty Feed
Tapad
Audience
Taplytics
Event
Taptica
Audience
Tapjoy
Audience
Teak
Audience
Ticketure
Feed
The Trade Desk
Cookie Sync
Audience
Event
Triton Digital
Audience
TUNE
Event
Valid
Event
Vibe
Audience
Vkontakte
Audience
Vungle
Audience
Webhook
Event
Webtrends
Event
White Label Loyalty
Event
Wootric
Event
Xandr
Audience
Cookie Sync
Yotpo
Feed
Yahoo (formerly Verizon Media)
Cookie Sync
Audience
YouAppi
Audience
Salesforce Mobile Push
Event
Create Predictions
This guide explains how to use the mParticle Agent to choose a prediction type, create a Future Behavior prediction, interpret supported predictions, and prepare an audience from a target range you select.
- Start with a business goal: Describe the behavior you want to predict. The Agent can recommend Future Behavior, Similar Customers, or Best Offering.
- Review before creating: For a Future Behavior prediction, check the completed definition, Calculation Readiness, and pipeline capacity before approving creation.
- Use the results: Review the prediction’s status, freshness, and quality information. Select the exact target range yourself before the Agent prepares one individual audience from a Future Behavior or Similar Customers prediction.
For example, ask the Agent to predict which customers will purchase footwear in the next 30 days or renew a subscription.
Supported prediction tasks
The mParticle Agent can create Future Behavior predictions after you review and confirm a proposal. It cannot create Similar Customers or Best Offering predictions; you create those yourself in the manual Predictions workflow. The agent can recommend a prediction type, review saved configurations, and interpret current usable results for all three types.
The agent can use an active Future Behavior or Similar Customers prediction with current usable results to prepare one individual real-time audience. You select the exact target range, review the audience proposal, and confirm before the agent saves it. The mParticle Agent cannot create an audience from a Best Offering prediction because that workflow requires a multi-node audience, which the agent does not currently support.
| Task | Future Behavior | Similar Customers | Best Offering |
|---|---|---|---|
| Recommend the prediction type for a business goal | Yes | Yes | Yes |
| Create the prediction with the agent | Yes, after your confirmation | No | No |
| Review a saved prediction's configuration and status | Yes | Yes | Yes |
| Interpret current usable results | Yes | Yes | Yes |
| Choose the exact target range | You choose it | You choose it | Not applicable to a single-audience workflow |
| Create one individual audience from the prediction | Yes, when Active and you have selected a range | Yes, when Active and you have selected a range | No |
The steps below focus on creating a Future Behavior prediction with the agent. To create a Similar Customers or Best Offering prediction yourself, see Predictions Overview.
Before you begin
In order to use the mParticle Agent to create a prediction:
- Predictions must be enabled for your account and the required setup must be complete.
- Your account must contain at least 45 days of historical data. For more reliable results, 90 or more days of data is recommended.
For more information, see Predictions setup requirements.
Each Future Behavior Prediction uses one pipeline, which is the processing capacity mParticle uses to calculate and refresh predictions. Your account must have enough available pipeline capacity to create it. For more information, see Predictions, pipelines, and predictive attributes.
Step 1: Open the mParticle Agent
You can open the mParticle Agent directly from the left-hand navigation by clicking mParticle Agent.
You can also open the mParticle Agent from Predictions by clicking + New Predictive Attribute and selecting Build with mP Agent.
Step 2: Describe the behavior you want to predict
Start by describing the business outcome or future behavior you want to predict using plain language. You can start with a specific request, such as predict which customers will purchase footwear in the next 30 days, or an even broader goal, such as identify customers who are likely to renew their subscription.
You don’t need to know the exact event or attribute names. The agent reviews data tracked in your workspace, suggests a target behavior and filters, and asks questions when it needs more information. If it can’t find data that supports your request, it tells you what is missing.
To learn more about investigating available data using the mParticle Agent before creating a prediction, see Explore Your Data.
Predictions are generally most useful for meaningful actions with sufficient historical behavioral data, such as purchases, subscriptions, upgrades, or repeat engagement.
Step 3: Review and refine the prediction definition
Review the definition to confirm that it represents the behavior and population you intend to predict. A Future Behavior Prediction definition includes:
- Predictive attribute name: The name of the attribute that the prediction will generate on user profiles.
- Prediction name: The name used to identify the saved prediction.
- Target behavior: The event whose future occurrence you want to predict.
- Event conditions: Optional filters that narrow the target behavior to a verified product, category, action subtype, or other supported event attribute value.
- Prediction window: How far into the future mParticle should predict whether a user will perform the target behavior.
- Users to evaluate: All users or a subset of users defined by supported criteria.
- Refresh schedule: When mParticle recalculates the prediction after its initial calculation.
If the definition doesn’t reflect your goal, reply to the agent with any feedback or corrections. For example, you could ask the agent to use a different event, add an event filter, change the prediction window, or narrow the users to evaluate.
The agent only uses events, attributes, and values found in your workspace. It won’t substitute a similarly named event that doesn’t represent the behavior you selected.
The prediction window is the period in which you want to know whether a user will perform the target behavior. It isn’t a reporting period.
Evaluating all users is supported, but a subset may better represent the relevant population for goals such as upgrades or sign-ups. Narrow the users to evaluate only when that matches the business goal and still leaves enough relevant data for the prediction to calculate reliably.
Step 4: Review Calculation Readiness and pipeline capacity
Before you create a Future Behavior prediction, the mParticle Agent assesses the completed definition and shows its Calculation Readiness. This gives you a chance to review a potential calculation problem before creating the prediction.
- Checking: The assessment is in progress. Wait for a result before creating a proposal.
- Ready: Known calculation requirements appear to be met.
- At risk: The definition can proceed, but a condition may reduce the likelihood of a successful calculation. Review the reason before approving creation.
- Blocked: The prediction cannot proceed until you resolve the identified blocker.
- Unverified: Readiness could not be confirmed. Review the explanation before deciding whether to proceed.
In the following example, the completed definition displays the target behavior, users to evaluate, data environment, and refresh frequency.
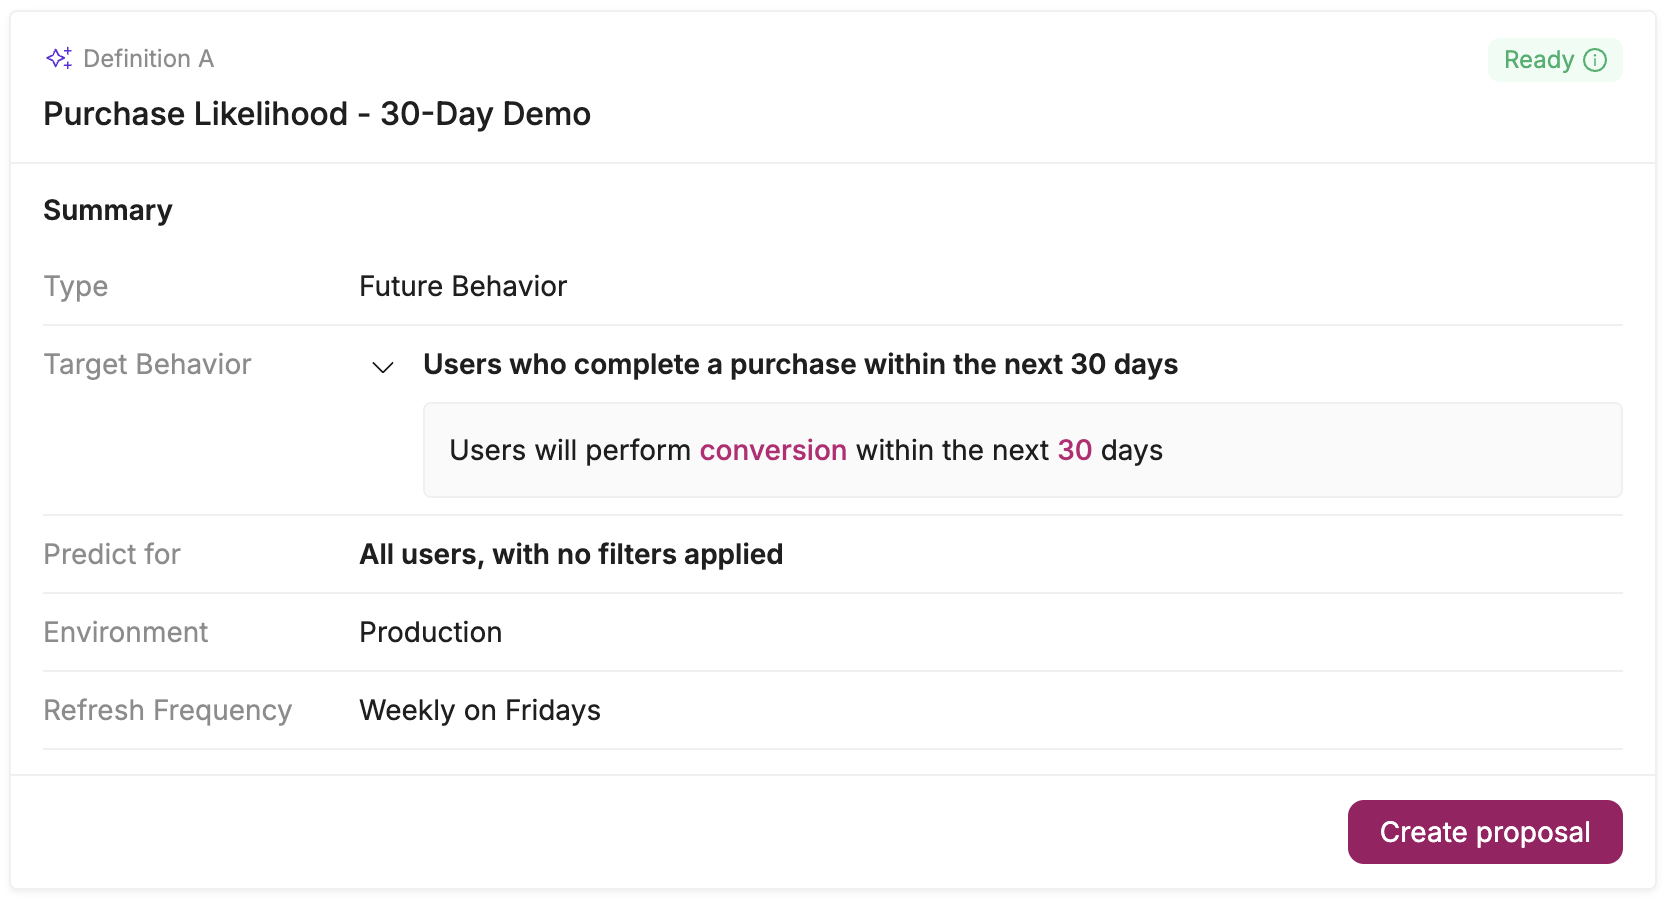
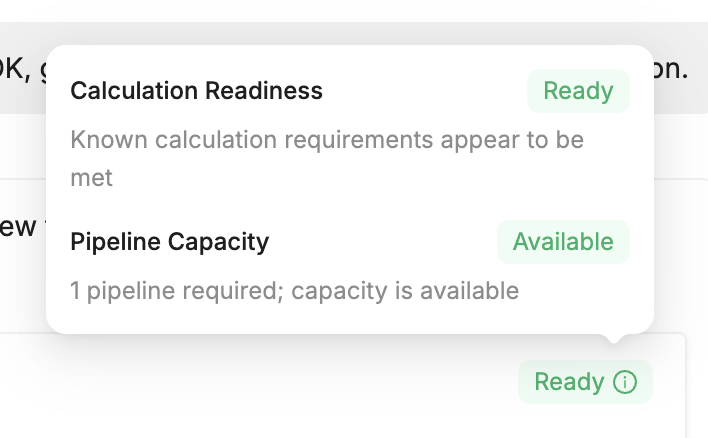
The green Ready label in the top right of the definition card indicates that the completed definition appears likely to calculate. The details separately show that pipeline capacity is available.
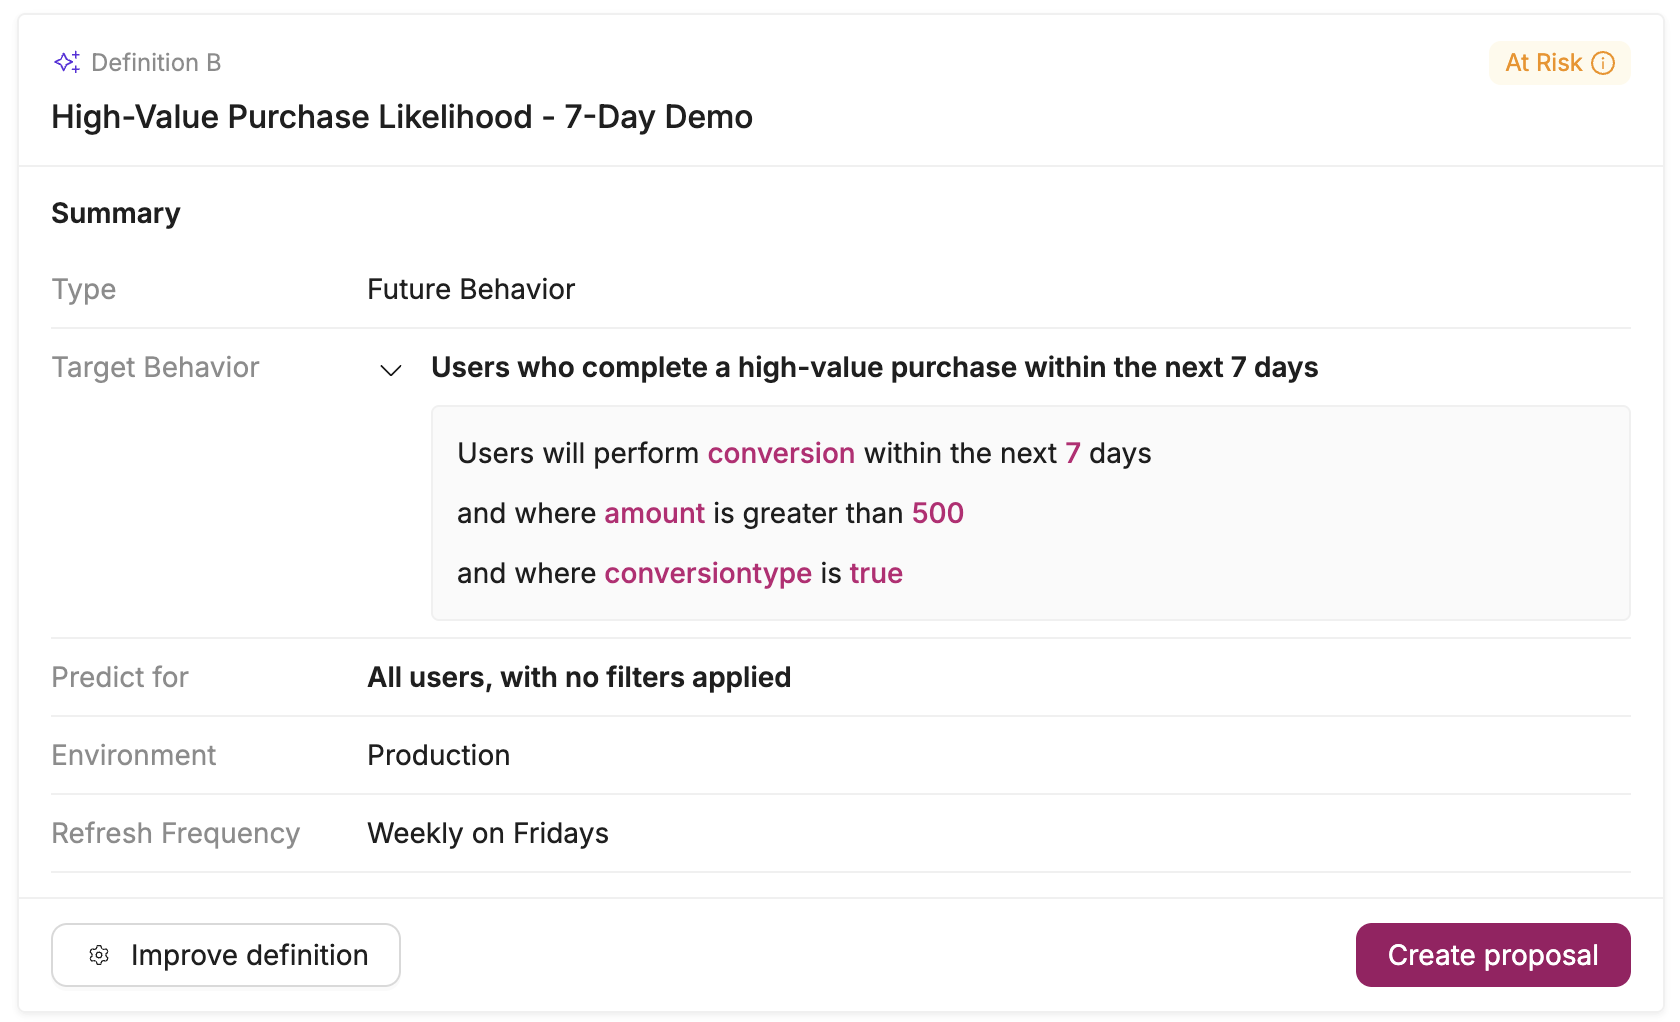
In this At risk example, the Agent warns that there may not be enough historical data to calculate the prediction successfully. You can improve the definition or continue to a proposal. Pipeline capacity is available, but it does not resolve the readiness concern.
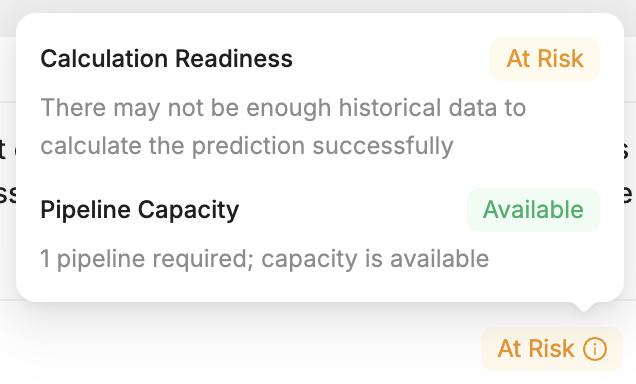
Configuration completeness means all required inputs have been supplied. Calculation Readiness assesses whether that completed definition appears likely to calculate. Pipeline Capacity separately indicates whether a pipeline is available to create and calculate the prediction. A missing required input leaves the definition incomplete; it is not an At risk result. See Pipeline usage and limits for more information.
A Ready assessment does not guarantee a successful calculation, final Strength, or campaign results. If your account does not have an available pipeline, review your existing predictions in Customer 360 > Predictive Attributes or contact your mParticle account representative.
Step 5: Review the proposal and create the prediction
Before approving the proposal, confirm:
- Target behavior and conditions: The selected event and filters represent the action you want to predict.
- Predictive attribute and window: The attribute name and prediction window match the intended use.
- Prediction name and refresh schedule: The saved name and schedule match your intended workflow.
- Users to evaluate: The selected users represent the population relevant to your goal.
- Calculation Readiness: You have reviewed the result and its explanation and improved the definition if needed.
- Pipeline capacity: Your account has enough capacity to create the prediction.
Nothing is created until you explicitly approve the proposal. After you approve it, the agent creates the Future Behavior Prediction using the reviewed configuration.
Step 6: Review results and manually select a target range
After the prediction is Active and usable, open it in Customer 360 > Predictive Attributes. Review its status, last refresh, refresh frequency, Strength, and any other quality metric displayed by the product.
A prediction’s Strength indicates how well it identifies users who are more likely to perform the target behavior. It isn’t an individual user’s probability of conversion or a guarantee of campaign performance. Interpret Strength in the context of your campaign, as explained in Manage Future Behavior Predictions.
If the prediction details page shows additional quality metrics, use the descriptions in mParticle to understand what they measure. These metrics describe how well the prediction performs overall. They don’t show an individual user’s chance of acting or recommend a target range.
Use the prediction details page’s range controls and displayed estimates for reach, predicted conversion rate, and predicted lift to compare options and select the exact target range you want.
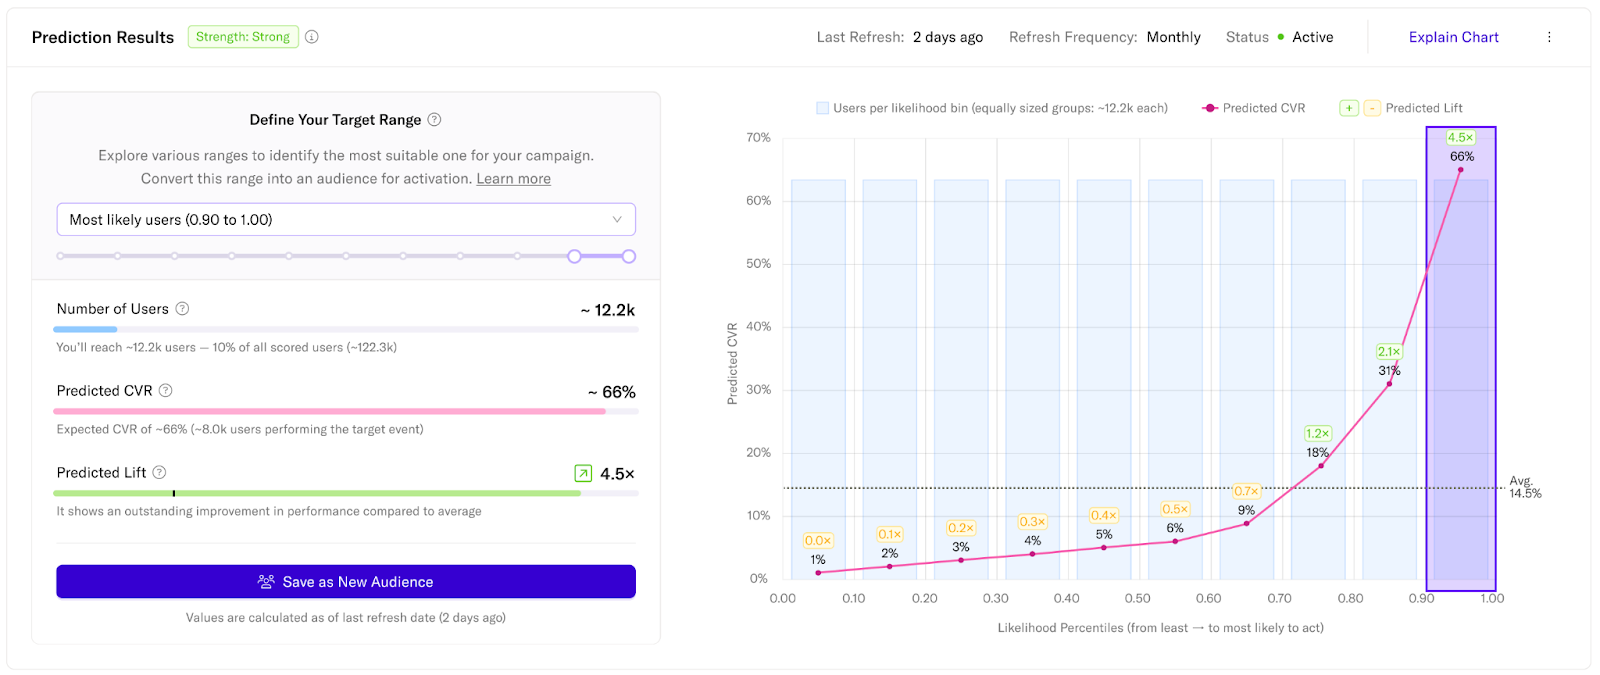
After selecting the range, return to the mParticle Agent, identify the prediction, and provide the exact range. The Agent preserves that range for audience creation without changing your decision.
For more information about Strength, results, and target ranges, see Manage Future Behavior Predictions.
Step 7: Prepare an audience from the prediction
Before asking the agent to prepare an audience, confirm:
- The prediction is Active and has current usable results.
- You reviewed the prediction’s Strength and other displayed quality metrics.
- You manually selected the exact target range you want to use.
Provide or confirm the exact range you selected. When the agent prepares the audience, it uses:
- The completed prediction and its predictive attribute.
- The selected target range.
- Any business context and additional audience requirements you provide.
The audience uses the prediction and selected range as one condition. You can also ask the agent to add verified audience requirements, such as geography, consent or channel eligibility, or excluding current customers. These requirements don’t change the prediction’s target behavior, prediction window, or users to evaluate.
The agent keeps your selected percentile range unchanged. When mParticle stores percentiles as decimals, the agent converts the equivalent range automatically (for example, the 85th through 100th percentile becomes 0.85 through 1.00).
Review the resulting audience definition and proposal before saving it. The agent can prepare one real-time audience, but it can’t create a more complex audience group, parent or child audiences, A/B splits, or remaining users audiences.
After saving the audience, connect it to an output and activate it in the mParticle UI. The agent doesn’t perform these steps. For more information about reviewing and saving audiences with the agent, see Build Audiences.
The audience remains linked to the predictive attribute. As the prediction refreshes, audience membership updates according to the selected range and any additional requirements. Monitor campaign performance against your usual benchmarks or control group, and periodically check that the prediction remains Active and refreshes as expected.
Troubleshooting prediction creation issues
The agent says my workspace isn’t ready to create a prediction
Confirm that Predictions has been set up for your account and that you have at least 45 days of usable historical data. Events visible elsewhere in mParticle aren’t necessarily ready for Predictions. For more information, see Predictions setup requirements.
If the agent can’t retrieve the applicable state, treat the prerequisite as unverified rather than missing. Contact your mParticle account representative for help confirming availability and setup.
The definition includes a warning
Review the agent’s explanation. You may need to select a target behavior that occurs more frequently, broaden the users to evaluate, or revise filters that leave too little usable data. Ask the agent to evaluate the revised definition before creating the prediction.
The account doesn’t have an available pipeline
A Future Behavior Prediction requires one pipeline to calculate. Review your current pipeline usage and existing predictions. To free capacity, you can delete an unused prediction after removing it from any audiences that reference it. For instructions, see View and Manage Predictions. Otherwise, contact your mParticle account representative to discuss your account’s pipeline capacity.
The prediction is still calculating
New predictions can take up to 24 hours to calculate. Wait until the prediction completes successfully and results become available before asking the agent to interpret results or prepare an audience from a target range.
The agent can’t hand a prediction off to audience creation until mParticle shows that the prediction is Active and usable. Predictions that are Calculating, Inactive, or Failed aren’t ready for this handoff.
The agent says the prediction type isn’t supported
The mParticle Agent creates Future Behavior predictions. Use the Predictive Attributes page to create Similar Customers or Best Offering predictions.
Next steps
- Build Audiences: Learn how to review and save the audience prepared from a prediction.
- Future Behavior Predictions Overview: Learn how Future Behavior Predictions work and when to use them.
- View and Manage Predictions: Monitor prediction status, Strength, and refresh frequency.
Was this page helpful?
- Last Updated: October 12, 2026